Wiki.js is a free and open-source wiki software solution written in JavaScript and running on the Node.js runtime. It is cross-platform and is compatible with PostgreSQL, MySQL, MariaDB, MS SQL Server, or SQLite. It offers an intuitive admin panel that allows you to manage all aspects of your wiki. It has a built-in visual editor that allows you to write all content in Markdown files and sync with your remote Git repository.
In this post, we will show you how to install Wiki.js on Fedora Linux.
Step 1 – Install Nginx and MariaDB
Before starting, you will need to install Nginx, MariaDB, Redis, and Node.js on your server. You can install all of them using the following command.
dnf install nginx mariadb-server nodejs npm redis -y
Once all the packages are installed, start and enable all required services.
systemctl start nginx mariadb redis
systemctl enable nginx mariadb redis
Step 2 – Configure MariaDB Database
Wiki.js uses MariaDB as a database backend, so you will need to create a database and user for Wiki.js.
First, connect to the MariaDB shell.
mysql
Next, create a database and user for Wiki.js.
CREATE DATABASE wikijs;
GRANT ALL PRIVILEGES ON wikijs.* TO 'wikijs'@'localhost' IDENTIFIED BY 'password';
Next, flush the privileges and exit from the MariaDB shell.
FLUSH PRIVILEGES;
QUIT;
Step 3 – Download Wiki.js
First, download the latest version of Wiki.js from Git Hub.
curl -s https://api.github.com/repos/Requarks/wiki/releases/latest \
  | grep browser_download_url \
  | grep -v windows \
  | cut -d '"' -f 4 \
  | wget -qi -
Next, create a directory for Wiki.js and extract the downloaded file inside that directory.
mkdir -p /var/www/html/wikijs
tar zxf wiki-js.tar.gz -C /var/www/html/wikijs
Next, navigate to the Wiki.js directory and copy the sample configuration file.
cd /var/www/html/wikijs
cp config.sample.yml config.yml
Next, edit the Wiki.js configuration file.
nano config.yml
Change the following lines.
port: 3000

  type: mariadb

  host: localhost
  port: 3306
  user: wikijs
  pass: 'password'
  db: wikijs

bindIP: 0.0.0.0
Save and close the file, then verify the configuration using the following command.
node server
If everything is fine, you will get the following output.
Loading configuration from /var/www/html/wikijs/config.yml... OK
2023-09-19T04:50:39.759Z [MASTER] info: =======================================
2023-09-19T04:50:39.762Z [MASTER] info: = Wiki.js 2.5.300 =====================
2023-09-19T04:50:39.762Z [MASTER] info: =======================================
2023-09-19T04:50:39.763Z [MASTER] info: Initializing...
2023-09-19T04:50:40.675Z [MASTER] info: Using database driver mysql2 for mariadb [ OK ]
2023-09-19T04:50:40.688Z [MASTER] info: Connecting to database...
2023-09-19T04:50:40.789Z [MASTER] info: Database Connection Successful [ OK ]
2023-09-19T04:50:41.770Z [MASTER] warn: DB Configuration is empty or incomplete. Switching to Setup mode...
2023-09-19T04:50:41.771Z [MASTER] info: Starting setup wizard...
2023-09-19T04:50:41.980Z [MASTER] info: Starting HTTP server on port 3000...
2023-09-19T04:50:41.981Z [MASTER] info: HTTP Server on port: [ 3000 ]
2023-09-19T04:50:41.990Z [MASTER] info: HTTP Server: [ RUNNING ]
2023-09-19T04:50:41.990Z [MASTER] info: 🔻🔻🔻🔻🔻🔻🔻🔻🔻🔻🔻🔻🔻🔻🔻🔻🔻🔻🔻🔻🔻🔻🔻🔻🔻🔻🔻🔻🔻
2023-09-19T04:50:41.991Z [MASTER] info:
2023-09-19T04:50:41.991Z [MASTER] info: Browse to http://YOUR-SERVER-IP:3000/ to complete setup!
2023-09-19T04:50:41.991Z [MASTER] info:
2023-09-19T04:50:41.991Z [MASTER] info: 🔺🔺🔺🔺🔺🔺🔺🔺🔺🔺🔺🔺🔺🔺🔺🔺🔺🔺🔺🔺🔺🔺🔺🔺🔺🔺🔺🔺🔺
Press CTRL+C to stop the server.
Step 4 – Create a Systemd Service File for Wiki.js
Next, create a systemd file to manage the Wiki.js service.
nano /etc/systemd/system/wiki.service
Add the following configuration:
[Unit]
Description=Wiki.js
After=network.target

[Service]
Type=simple
ExecStart=/usr/bin/node server
Restart=always
User=nginx
Environment=NODE_ENV=production
WorkingDirectory=/var/www/html/wikijs

[Install]
WantedBy=multi-user.target
Save and close the file, then change the ownership of the Wiki.js directory.
chown -R nginx:nginx /var/www/html/wikijs
Next, reload the systemd daemon to reload the configuration.
systemctl daemon-reload
Finally, start and enable the Wiki.js service to start at the system reboot.
systemctl enable --now wiki.service
You can check the status of the Wiki.js using the following command.
systemctl status wiki
You will see the following output.
● wiki.service - Wiki.js
     Loaded: loaded (/etc/systemd/system/wiki.service; enabled; vendor preset: disabled)
     Active: active (running) since Tue 2023-09-19 00:51:27 EDT; 4s ago
   Main PID: 4388 (node)
      Tasks: 11 (limit: 2328)
     Memory: 55.8M
        CPU: 1.710s
     CGroup: /system.slice/wiki.service
             └─4388 /usr/bin/node server

Sep 19 00:51:28 fedora node[4388]: 2023-09-19T04:51:28.996Z [MASTER] warn: DB Configuration is empty or incomplete. Switching to Setup mode...
Sep 19 00:51:28 fedora node[4388]: 2023-09-19T04:51:28.996Z [MASTER] info: Starting setup wizard...
Sep 19 00:51:29 fedora node[4388]: 2023-09-19T04:51:29.181Z [MASTER] info: Starting HTTP server on port 3000...
Sep 19 00:51:29 fedora node[4388]: 2023-09-19T04:51:29.182Z [MASTER] info: HTTP Server on port: [ 3000 ]
Sep 19 00:51:29 fedora node[4388]: 2023-09-19T04:51:29.190Z [MASTER] info: HTTP Server: [ RUNNING ]
Sep 19 00:51:29 fedora node[4388]: 2023-09-19T04:51:29.191Z [MASTER] info: 🔻🔻🔻🔻🔻🔻🔻🔻🔻🔻🔻🔻🔻🔻🔻🔻🔻🔻🔻🔻🔻🔻🔻🔻🔻🔻🔻🔻🔻
Sep 19 00:51:29 fedora node[4388]: 2023-09-19T04:51:29.191Z [MASTER] info:
Sep 19 00:51:29 fedora node[4388]: 2023-09-19T04:51:29.191Z [MASTER] info: Browse to http://YOUR-SERVER-IP:3000/ to complete setup!
Sep 19 00:51:29 fedora node[4388]: 2023-09-19T04:51:29.192Z [MASTER] info:
Sep 19 00:51:29 fedora node[4388]: 2023-09-19T04:51:29.192Z [MASTER] info: 🔺🔺🔺🔺🔺🔺🔺🔺🔺🔺🔺🔺🔺🔺🔺🔺🔺🔺🔺🔺🔺🔺🔺🔺🔺🔺🔺🔺🔺
Step 5 – Configure Nginx Virtual Host
Next, create an Nginx virtual host configuration file for Wiki.js.
nano /etc/nginx/conf.d/wikijs.conf
Add the following configuration:
server {
    listen      80;
    server_name wiki.example.com;

    location / {
        proxy_set_header Host $http_host;
        proxy_set_header X-Real-IP $remote_addr;
        proxy_pass http://127.0.0.1:3000;
        proxy_http_version 1.1;
        proxy_set_header Upgrade $http_upgrade;
        proxy_set_header Connection "upgrade";
        proxy_next_upstream error timeout http_502 http_503 http_504;
    }
}
Save and close the file, then edit the Nginx main configuration file.
nano /etc/nginx/nginx.conf
Add the following line after http{:
server_names_hash_bucket_size 64;
Save the file, then verify the Nginx configuration.
nginx -t
Output:
nginx: the configuration file /etc/nginx/nginx.conf syntax is ok
nginx: configuration file /etc/nginx/nginx.conf test is successful
Finally, restart the Nginx service to apply the changes.
systemctl restart nginx
Step 6 – Access Wiki.js
Now, open your web browser and access Wiki.js using the URL http://wiki.example.com. You will see the site configuration screen.
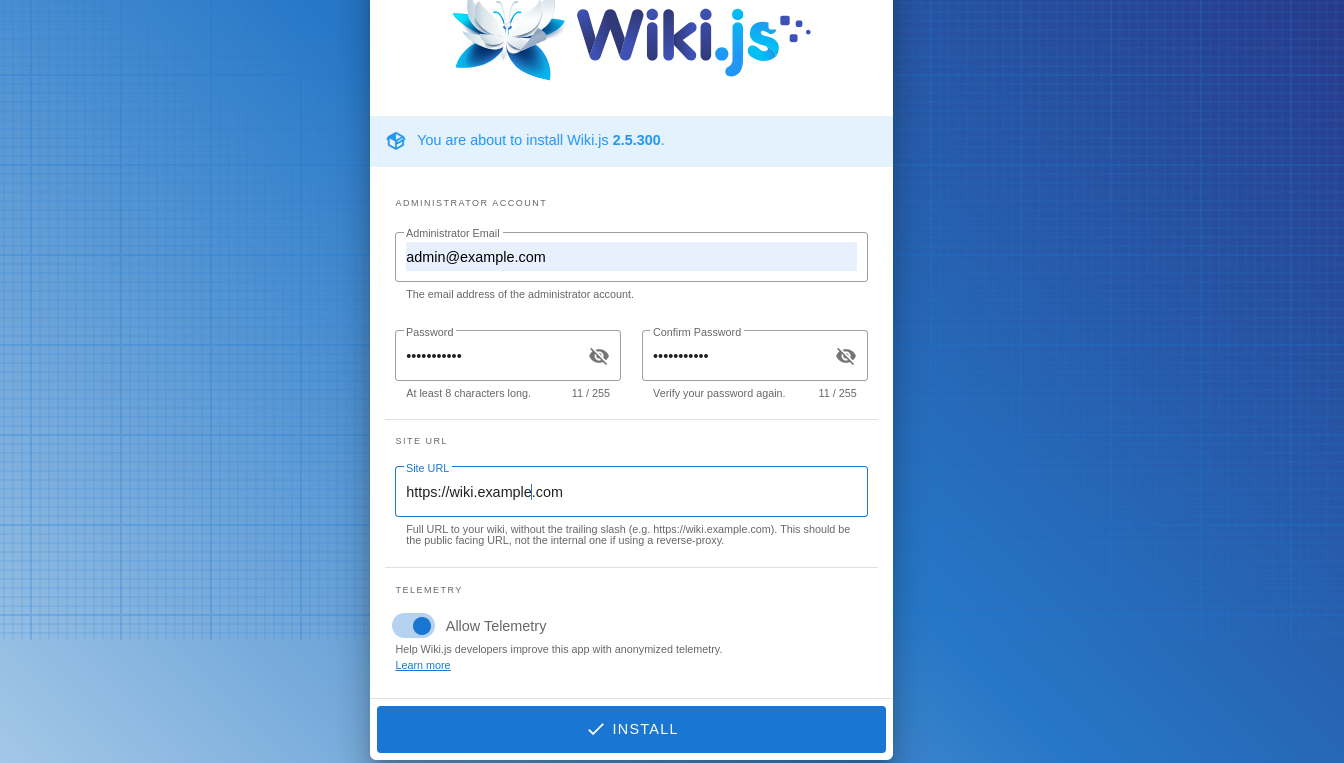
Define your admin email, password, and site URL, and click on INSTALL. You will see the Wiki.js login screen.

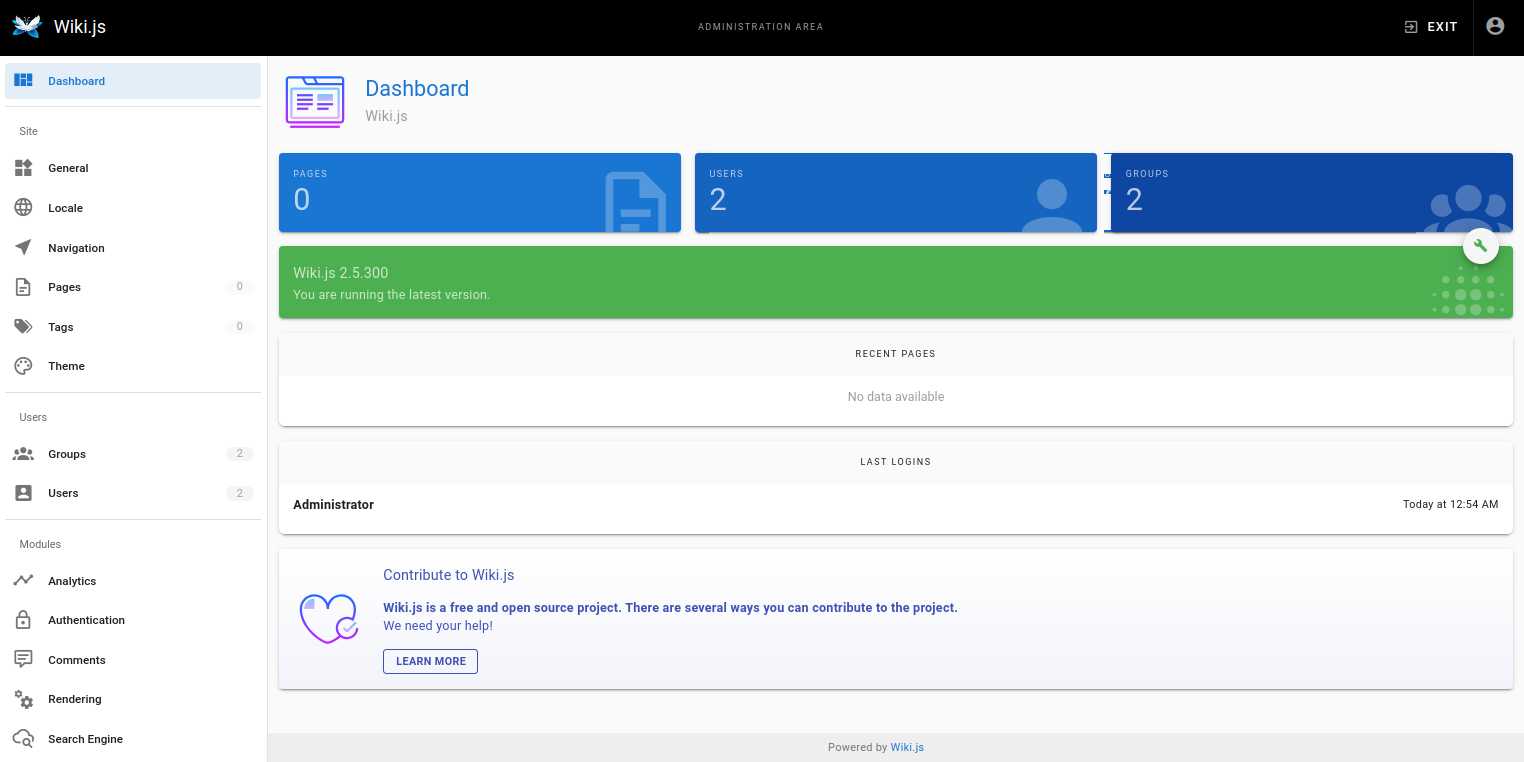
Provide your admin username and password and click on Log in. You will see the Wiki.js welcome screen.

Click on ADMINISTRATION. You will see the Wiki.js dashboard on the following screen.
Conclusion
In this tutorial, you learned how to install Wiki.js with Nginx on Fedora Linux. You can now explore the Wiki.js administration panel and start creating your own Wiki site within a few minutes. You can now try Wiki.js on dedicated server hosting from Atlantic.Net!
* This post is for informational purposes only and does not constitute professional, legal, financial, or technical advice. Each situation is unique and may require guidance from a qualified professional.
Readers should conduct their own due diligence before making any decisions.