Verified and Tested 03/10/2021
Introduction
This article discusses how to change the hostname on a server running CentOS 6.9/7.x/8.x. A hostname is a label given to a device that is connected on a network.
Prerequisites
A server with CentOS 6.9/7.x/8.x installed.
 Hostname Illustration by Walker Cahall
Modify your hostname in CentOS 6.9
If you’d like to change your CentOS server’s hostname, you’ll need to change it in a few places.
Open up the /etc/sysconfig/network file with your text editor of choice:
sudo vim /etc/sysconfig/network
Change the HOSTNAME argument to the hostname you’d like to use. Here, we’ll be changing the old hostname of ‘bespin’ to ‘endor’. See below for more information on valid hostnames:

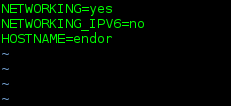
This change will take effect the next time you reboot your server. Before you do, though, you might want to also add the hostname to your /etc/hosts file.
Again, with your text editor of choice:
sudo vim /etc/hosts
In this instance, we’ll add our new hostname ‘endor’ to the entry for the loopback address 127.0.0.1 (and for fun, for the IPv6 loopback). We might also add an entry for an IP address configured on this server:
 At this point, the next time you reboot your server, your new hostname would show up in your command prompt and would also show up with the ‘hostname’ command. If you would rather not reboot your server, you can change the hostname with the ‘hostname’ command:
sudo hostname yourhostname

You may change the hostname with this command alone, but the next time you reboot your server, it would not be persistent and would load whatever hostname is still in the /etc/sysconfig/network file.
Also, you may notice that the hostname in your command prompt hasn’t changed. If you’re the sort who’s going to be annoyed by that (or, if you’d like to avoid the confusion of seeing the old hostname in the command prompt), then log out of the current session. When you log back in, the new hostname will show up in the command prompt.
One other caveat: until you do reboot your server after a hostname change, you may also notice that your logs still use the old hostname.
Changing your Hostname in CentOS 7.x and 8.x
If you are used to how CentOS 6 or earlier handles the hostname, you may notice that the same procedure doesn’t quite work the same way in CentOS 7 and 8. If you’re new to CentOS, in general, then you have no baggage to worry about having to leave behind!
In CentOS 7 and 8, hostname control is handled with the hostnamectl command. With this command, you can update three different hostnames–the static, transient, and pretty.
To see what your hostname currently is, issue the hostnamectl status command.
hostnamectl
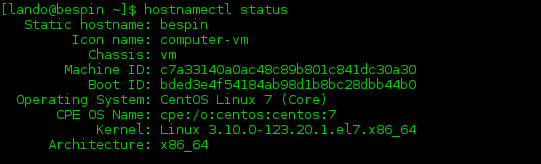
An example of the hostnamectl status command
Here, we only have the static hostname listed, which in this case, is identical to the transient and pretty hostnames. The static hostname is the one currently stored in /etc/hostname:

An example of the cat /etc/hostname command
The static hostname is the default hostname the kernel references during boot, and in most instances, will be the one you want to concern yourself with. (We’ll briefly cover transient and pretty hostnames in a bit.)
To change the hostname, issue the following command:
hostnamectl set-hostname "Your-Hostname"
In this case, we’ll be changing the current hostname of ‘bespin’ to ‘Endor’s Forest Moon’. Note what happens with the following comand:
hostnamectl status
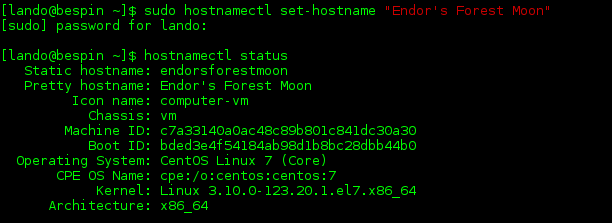
An example of the hostnamectl set-hostname and hostnamectl command
A couple of things to note here. First, when specifying the hostname, I enclosed the full hostname in double-quotation marks. This syntax is only required when using a hostname that contains characters not ordinarily allowed in a standard FQDN, such as a space or an apostrophe. They can be omitted if your hostname will conform to FQDN standard formatting (see below for more information on FQDN formatting).
Next, also note how in the hostnamectl status output, we now have line entries for static and pretty hostnames. Hostnamectl automatically removes illegal hostname characters and also converts the name to all lowercase for the static (and transient) hostname. It also writes this information to the /etc/hostname file as well. You can see it by running the following command:
cat /etc/hostname

Sample /etc/hostname
One thing the hostnamectl command doesn’t do is modify the /etc/hosts file, so we’ll still need to do that. Just open up that file with the text editor you prefer and change the current hostname entry (‘bespin’) to the new static hostname (‘endorsforestmoon’):
Using NANO
nano /etc/hosts
Using VIM
vim /etc/hosts

Sample /etc/hosts

Sample /etc/hosts
At this point, you are all set; your hostname is changed. If you are concerned that it’s not showing up in your command prompt, you will have to log out and log back in.
Now, to help demonstrate some of the differences between types of hostname, let’s set the transient hostname and take a look at the output from hostnamectl status.
It should be noted here that if you want to specify any particular hostname change, you would include which type of hostname (–static, –pretty, or –transient). This parameter can be included at nearly any point in the command, so long as it’s immediately preceded by the double hyphens. Any of the following would work:
sudo hostnamectl --transient set-hostname coruscant
sudo hostnamectl set-hostname --transient kashyyyk
sudo hostnamectl set-hostname tatooine --transient
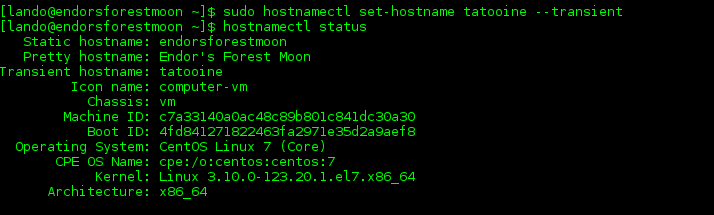
An example of the sudo hostnamectl set-hostname tatooine –transient command
Since we haven’t made any changes to the static hostname (or the contents of the /etc/hostname file), which remains the same, and should this server reboot, it will pick up this hostname.
The pretty hostname remains “Endor’s Forest Moon”, which can be called in certain instances when presenting the hostname to the user. This configuration is stored in /etc/machine-info.
The transient hostname changes the hostname in the running kernel, but unless that same change is also made to the static hostname, it won’t persist across reboots (or, if the transient hostname is assigned/maintained via something like DHCP, then also when network connectivity is lost).
This example is more illustrative than practical, of course.
Valid Hostname Restrictions
In each of these configurations, you’ll need to be sure your hostname conforms to the standards for FQDNs (Fully Qualified Domain Names). The ASCII letters a – z, the digits 0 – 9, and the hyphen (‘-‘) are the only characters acceptable (the first character, however, cannot be a hyphen). You may also find it necessary (or useful) to include the domain name as well, in which case you would then also use periods (dots) to separate the hostname and the domain name (and top-level domain). So the following would be examples of acceptable hostnames:
bespin.the-empire.starwars
endor.rebelalliance.starwars
The whole hostname should be no more than 255 characters (see RFC1123).
What Next?
With that, you now have a server with a hostname. Thank you for following along and feel free to check back with us for further updates, or check out our CentOS 7 initial setup up guide.
Cloud hosting is just one of the many hosting services offered by Atlantic.Net – We also offer dedicated, managed and secure HIPAA cloud hosting & storage services. Contact us today for more information on any of our services!