Verified and Tested 08/18/15
Introduction
Networks are composed of two or more devices that form one group, and each device is assigned a unique IP, that identifies them to that specific group. In order to keep things organized and protected withing a network, Network Administration is very important. In this how-to we will walk through the Network Administration on a FreeBSD server.
Prerequisites
A FreeBSD server configured with a static IP address. If you do not have a server already, spin up an Atlantic.Net reliable SSD Virtual Private Server.
Set up your IP address in FreeBSD
First of all, let us look at your current active interface configurations so we can Identify some important settings that make it all work. To see your network configurations type the following command:
ifconfig
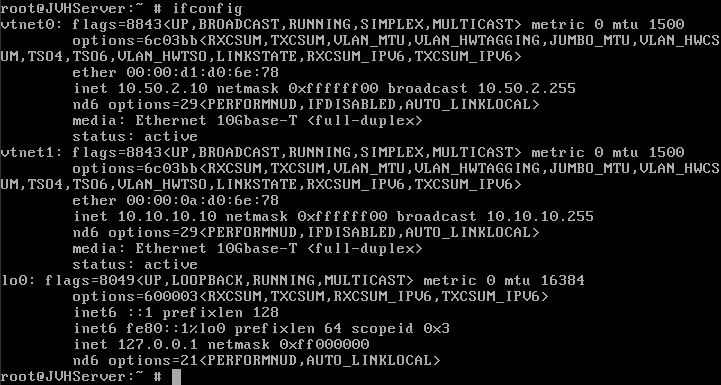
This is the output after running the ifconfig command in FreeBSD
Interface: Usually identified as ethX, our virtualized instance names the interfaces in the above output as vtnet0 and vtnet1. These interfaces are the point of connection between the device and the private or public network that they are connected to.inet: This is the IP addressed configured for use on the interface. Above, you can see that IP 10.50.2.10 is configured on interface vtnet0.
Static IP Address in FreeBSD
Static IP’s are IP addresses that are assigned to specific devices and will remain assigned until the IP it is removed or changed. Adding a static IP address could be accomplished using two different methods. You could set the IP so that it holds that address temporary, which will then be removed once the device or networking is restarted, or you can assign it permanently.
To configure a temporary static IP address, you could run the following via command line:
ifconfig vtnet0 10.50.2.10 netmask 255.255.255.0
ifconfig vtnet0 10.50.2.10/24
If you would rather permanently assign the IP address, you’ll need to make some changes to the network configuration files. Unlike the temporary one, you could reboot the device, and once it’s turned back on, it will hold the IP address that you specifically assigned to it.
Configuring a permanent IP can be done by editing the rc.conf file. First, open the rc.conf file using a text editor with the following command:
vi /etc/rc.conf
ifconfig_vtnet0="10.50.2.10 netmask 255.255.255.0"
ifconfig_vtnet0="10.50.2.10/24"
Default Gateway in FreeBSD
You will also need to configure the default Gateway for your network interface. The default gateway is the next hop on your network and is typically a router or switch that handles network connectivity and routing. The gateway is usually the first IP address in an IP range which gives you access in and out of the network that it belongs to. Setting the default gateway (called defaultrouter in FreeBSD) is again done by editing the rc.conf file.
vi /etc/rc.conf
Locate the “defaultrouter=” line and adding the Gateway IP address.
defaultrouter="10.50.2.1"
route add default 10.50.2.1
If you would like to remove the default gateway address, this can be accomplished via with the following command:
route delete default
Dynamic IP Address in FreeBSD
Dynamic IP’s are random IP addresses that could be assign or leased to specific devices. They are held by the device for a period then released and then the device would grab another IP. Adding a Dynamic IP address could be accomplished using two different methods. You could set that device IP so that it holds that address temporary, which will then be removed once the device is restarted, or you can assign it permanently.
To configure a temporary dynamic IP address, you could accomplish this using any one of with the following command:
dhclient vnet0
vi /etc/rc.conf
Now, Locate the line that reads “ifconfig_ “and replace IP address that is there with the DHCP setting that it will permanently have. This should look like the following:
ifconfig_vtnet0="DHCP"
DNS Servers in FreeBSD
DNS servers are specific servers with large libraries of registered domains which directs your request when you search a domain in your web browser. These are public servers that can be used by anyone. Google has them available along with many other companies. However, we will be using Atlantic.Net’s name servers so that domain lookup can occur quickly. This can be completed by editing the “resolv.conf” file using your text editor with the following command:
vi /etc/resolv.conf
Add your name servers to the “resolv.conf” file using the following lines (each line representing one name server, these are used for Atlantic.Net Cloud Servers.).
nameserver 209.208.127.65
nameserver 209.208.25.18
* This post is for informational purposes only and does not constitute professional, legal, financial, or technical advice. Each situation is unique and may require guidance from a qualified professional.
Readers should conduct their own due diligence before making any decisions.