Consul is a service mesh solution offering a full-featured control plane, including segmentation functionality, configuration, and service discovery. These features may be used individually as required, or they may be used together for creating a full-service mesh. Consul operates over a data plane and supports both a proxy and a native integration model. Consul ships with a simple built-in proxy that ensures everything works out-of-the-box. Consul also supports 3rd party proxy integrations, such as Envoy.
Key features of Consul include:
- Service Discovery
- Health Checking
- KV Store
- Secure Service Communication
- Multi-Datacenter Capabilities
In this tutorial, we will show you how to install a Consul server on Ubuntu. This procedure is compatible with Ubuntu 22.04 and Ubuntu 24.04.
Step 1 – Install Consul Server
First, install the required packages with the following command:
apt-get update -y
apt-get install unzip gnupg2 curl wget -y
Next, download the latest version of Consul with the following command:
wget https://releases.hashicorp.com/consul/1.21.0/consul_1.21.0_linux_amd64.zip
Once the download is completed, unzip the downloaded file with the following command:
unzip consul_1.21.0_linux_amd64.zip
Next, move the consul binary to the /usr/local/bin directory with the following command:
mv consul /usr/local/bin/
Next, verify the Consul version using the following command:
consul --version
You should get the following output:
Consul v1.21.0
Revision 4e96098f
Build Date 2025-05-06T11:58:51Z
Protocol 2 spoken by default, understands 2 to 3 (agent will automatically use protocol >2 when speaking to compatible agents)
Step 2 – Create Consul Service File
First, you will need to create a separate user and group for Consul. You can create them with the following command:
groupadd --system consul
useradd -s /sbin/nologin --system -g consul consul
Next, create required directories with the following command:
mkdir -p /var/lib/consul
mkdir /etc/consul.d
Next, change the ownership and permission of those directories:
chown -R consul:consul /var/lib/consul
chmod -R 775 /var/lib/consul
chown -R consul:consul /etc/consul.d
Next, create a Consul systemd service file with the following command:
nano /etc/systemd/system/consul.service
Add the following lines:
[Unit]
Description=Consul Service Discovery Agent
After=network-online.target
Wants=network-online.target
[Service]
Type=simple
User=consul
Group=consul
ExecStart=/usr/local/bin/consul agent -server -ui \
            -advertise=your-server-ip \
            -bind=your-server-ip \
            -data-dir=/var/lib/consul \
            -node=consul-01 \
            -config-dir=/etc/consul.d
ExecReload=/bin/kill -HUP $MAINPID
KillSignal=SIGINT
TimeoutStopSec=5
Restart=on-failure
SyslogIdentifier=consul
[Install]
WantedBy=multi-user.target
Save and close the file when you are finished.
Note: Provide proper server-ip, data directory path, and config directory that you created earlier.
Next, reload the systemd daemon with the following command:
systemctl daemon-reload
Step 3 – Configure Consul Server
First, you will need to generate a key to the necessary length and encoding. You can generate it with the following command:
consul keygen
You should get the following output:
TJ8iw/XJ+0/BSUMGuLFWkeT23LmGnfhmF/qWgA25wZU=
Next, you will need to create a Json configuration file for Consul. You can create it with the following command:
nano /etc/consul.d/config.json
Provide your server IP, hostname and Consul key as shown below:
{
"bootstrap": true,
"server": true,
"log_level": "DEBUG",
"enable_syslog": true,
"datacenter": "server1",
"addresses" : {
"http": "0.0.0.0"
},
"bind_addr": "your-server-ip",
"node_name": "ubuntu2404",
"data_dir": "/var/lib/consul",
"acl_datacenter": "server1",
"acl_default_policy": "allow",
"encrypt": "TJ8iw/XJ+0/BSUMGuLFWkeT23LmGnfhmF/qWgA25wZU="
}
Save and close the file when you are finished.
Next, start the Consul service and enable it to start at system reboot with the following command:
systemctl start consul
systemctl enable consul
Next, verify the status of the Consul with the following command:
● consul.service - Consul Service Discovery Agent
     Loaded: loaded (/etc/systemd/system/consul.service; disabled; preset: enabled)
     Active: active (running) since Sun 2025-05-25 05:51:50 UTC; 5s ago
   Main PID: 16606 (consul)
      Tasks: 8 (limit: 4609)
     Memory: 30.0M (peak: 30.5M)
        CPU: 130ms
     CGroup: /system.slice/consul.service
             └─16606 /usr/local/bin/consul agent -server -ui -advertise=69.87.219.209 -bind=69.87.219.209 -data-dir=/var/lib/consul -node=consul-01 -config-dir=/etc/co>

May 25 05:51:53 ubuntu24 consul[16606]: agent.server.cert-manager: CA has not finished initializing
May 25 05:51:53 ubuntu24 consul[16606]: agent.server.cert-manager: ACLs have not finished initializing
May 25 05:51:54 ubuntu24 consul[16606]: 2025-05-25T05:51:54.339Z [DEBUG] agent.server.cert-manager: ACLs have not finished initializing
May 25 05:51:54 ubuntu24 consul[16606]: 2025-05-25T05:51:54.339Z [DEBUG] agent.server.cert-manager: CA has not finished initializing
May 25 05:51:54 ubuntu24 consul[16606]: agent.server.cert-manager: ACLs have not finished initializing
May 25 05:51:54 ubuntu24 consul[16606]: agent.server.cert-manager: CA has not finished initializing
May 25 05:51:55 ubuntu24 consul[16606]: 2025-05-25T05:51:55.339Z [DEBUG] agent.server.cert-manager: ACLs have not finished initializing
May 25 05:51:55 ubuntu24 consul[16606]: agent.server.cert-manager: ACLs have not finished initializing
May 25 05:51:55 ubuntu24 consul[16606]: 2025-05-25T05:51:55.339Z [DEBUG] agent.server.cert-manager: CA has not finished initializing
May 25 05:51:55 ubuntu24 consul[16606]: agent.server.cert-manager: CA has not finished initializing
At this point, the Consul server is started and listening on port 8500. You can check it with the following command:
ss -plunt | grep 8500
You should get the following output:
tcp LISTEN 0 4096 *:8500 *:* users:(("consul",pid=5511,fd=17))
Step 4 – Configure Nginx as a Reverse Proxy
Next, it is a good idea to install and configure Nginx as a reverse proxy to access the Consul on port 80.
First, install the Nginx server with the following command:
apt-get install nginx -y
Once installed, remove the Nginx default virtual host configuration file:
rm -rf /etc/nginx/sites-enabled/default
Next, create a Consul virtual host configuration file with the following command:
nano /etc/nginx/sites-available/consul.conf
Add the following lines:
server {
listen 80 ;
server_name your-server-ip;
root /var/lib/consul;
location / {
proxy_pass http://127.0.0.1:8500;
proxy_set_header   X-Real-IP $remote_addr;
proxy_set_header   Host      $http_host;
}
}
Save and close the file, then activate the virtual host with the following command:
ln -s /etc/nginx/sites-available/consul.conf /etc/nginx/sites-enabled/
Next, check the Nginx for any syntax errors with the following command:
nginx -t
You should get the following output:
nginx: the configuration file /etc/nginx/nginx.conf syntax is ok
nginx: configuration file /etc/nginx/nginx.conf test is successful
Next, restart the Nginx service with the following command:
systemctl restart nginx
If you get any errors, then you will need to edit the Nginx default server configuration file and set server_names_hash_bucket_size:
nano /etc/nginx/nginx.conf
Add the following line below http {:
server_names_hash_bucket_size 64;
Save and close the file, then restart the Nginx service to apply the changes:
systemctl restart nginx
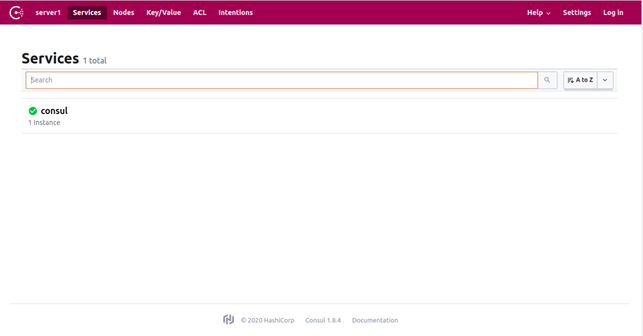
Step 5 – Access Consul Dashboard
Next, open your web browser and access the Consul web interface using the URL http://your-server-ip/ui. You should see the Consul dashboard in the following page:
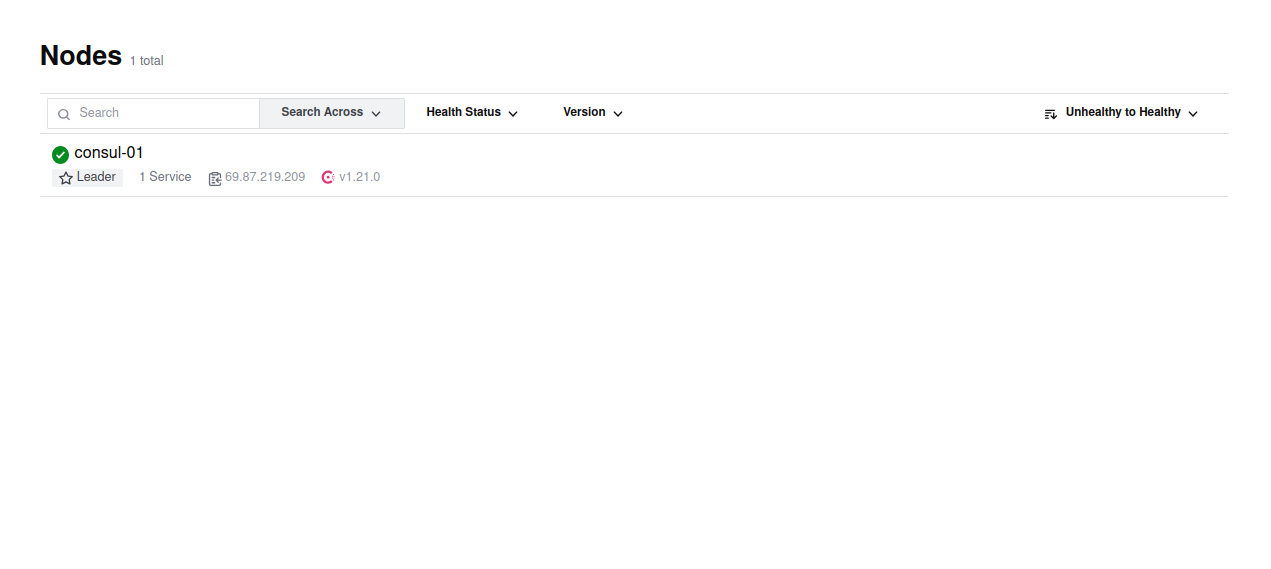
Click on the Nodes to list the active nodes in your server as shown below:
Conclusion
Congratulations! You have successfully installed Consul server on Ubuntu 24.04. You can now add more client nodes to the Consul server and start managing them from the Consul dashboard. For more information, you can visit the Consul documentation. Get started with Consul on VPS Hosting from Atlantic.Net!