Monit is a utility to designed to manage and monitor filesystems, directories, files, programs, and processes over a UNIX system for changes in size, checksum, and timestamp. Monit not only undertakes automatic repair and maintenance, but also executes meaningful casual actions when error situations arise. Just as an example, Monit can start a process if it ceases to run, restart a process if it fails to respond, and halt a process if it uses too many resources. An easy-to-configure control file, which is based on a token-oriented, free-format syntax, is used for controlling Monit. Monit also sends customizable alert messages as notifications regarding error conditions.
In this tutorial, we will learn how to install the Monit monitoring tool on Ubuntu 20.04.
Step 1 – Install Monit
By default, Monit is available in the Ubuntu 20.04 default repository. You can install it with the following command:
apt-get update -y
apt-get install monit -y
Once Monit is installed, the Monit service will be started automatically. You can check the status of Monit with the following command:
systemctl status monit
You should get the following output:
monit.service - LSB: service and resource monitoring daemon
Loaded: loaded (/etc/init.d/monit; generated)
Active: active (running) since Thu 2020-10-01 09:35:07 UTC; 17s ago
Docs: man:systemd-sysv-generator(8)
Tasks: 1 (limit: 2353)
Memory: 1.6M
CGroup: /system.slice/monit.service
└─40909 /usr/bin/monit -c /etc/monit/monitrc
Oct 01 09:35:07 ubuntu2004 systemd[1]: Starting LSB: service and resource monitoring daemon...
Oct 01 09:35:07 ubuntu2004 monit[40893]: * Starting daemon monitor monit
Oct 01 09:35:07 ubuntu2004 monit[40893]: ...done.
Oct 01 09:35:07 ubuntu2004 systemd[1]: Started LSB: service and resource monitoring daemon.
Step 2 – Configure Monit
The Monit default configuration file is located at /etc/monit/monitrc. Monit provides a web-based interface to monitor Monit through the web browser.
By default, the Monit web interface is disabled, so you will need to enable it and set the admin password. You can do this by editing the file /etc/monit/monitrc.
nano /etc/monit/monitrc
Uncomment and set the Monit admin password as shown below:
set httpd port 2812 and
allow admin:adminpassword
Save and close the file when you are finished, then check for syntax errors with the following command:
monit -t
You should get the following output:
Control file syntax OK
Next, restart the Monit service to apply the changes:
systemctl restart monit
At this point, Monit is started and listening on port 2812. You can check it with the following command:
ss -plunt | grep 2812
You should see the following output:
tcp LISTEN 0 1024 0.0.0.0:2812 0.0.0.0:*
users:(("monit",pid=41867,fd=6))
tcp LISTEN 0 1024 [::]:2812 [::]:*
users:(("monit",pid=41867,fd=7))
Now, open your web browser and access the Monit web interface using the URL http://your-server-ip:2812. You should see the Monit login page:

Provide your admin username and password, then click on the Sign–in button. You should see the Monit dashboard on the following page:
You can also verify the status of your system with the following command:
monit status
You should get the following output:
Monit 5.26.0 uptime: 2m

System 'ubuntu2004'
status OK
monitoring status Monitored
monitoring mode active
on reboot start
load average [0.17] [0.30] [0.30]
cpu 7.8%us 5.1%sy 0.1%wa
memory usage 794.3 MB [40.0%]
swap usage 1.8 MB [0.4%]
uptime 5h 21m
boot time Thu, 01 Oct 2020 04:19:36
data collected Thu, 01 Oct 2020 09:40:29
Step 3 – Monitor Apache and MariaDB with Monit
Monit woks by continuously monitoring different services in your system. If any service goes down Monit, automatically start it.
In this section, we will install Apache and MariaDB and monitor both services using Monit.
First, install Apache and MariaDB with the following command:
apt-get install apache2 mariadb-server -y
Next, enable the Apache and MariaDB monitoring with the following command:
ln -s /etc/monit/conf-available/apache2 /etc/monit/conf-enabled/
ln -s /etc/monit/conf-available/mysql /etc/monit/conf-enabled/
Now, restart the Monit service to apply the changes:
systemctl restart monit
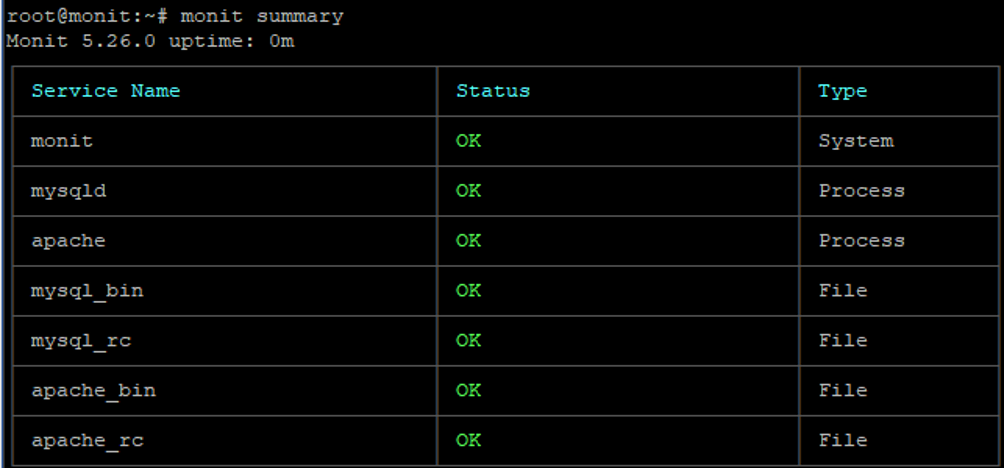
You can now check the status of the Apache and MariaDB using the Monit command-line utility:
monit summary
You should get the following output:
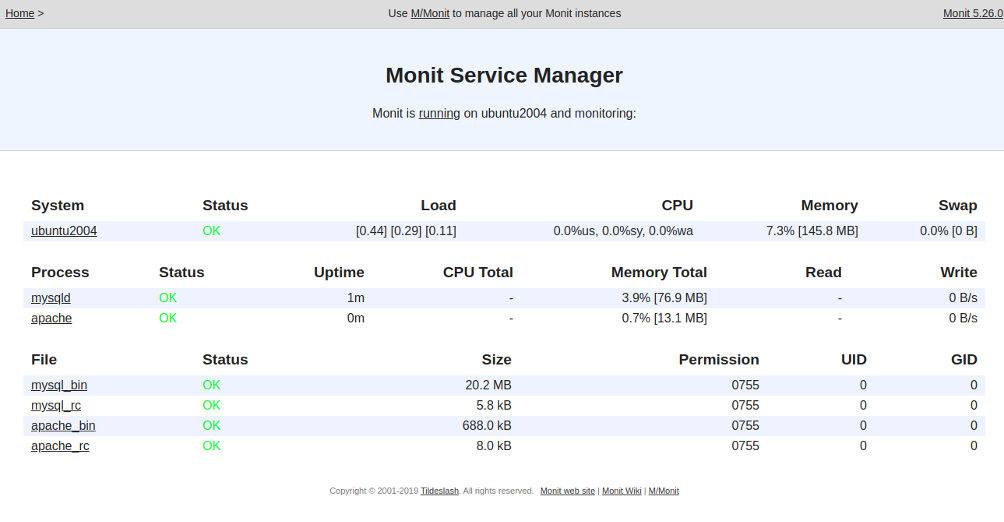
Now, go to the Monit web interface and refresh the page. You should see the status of all services in the following page:
Next, stop the Apache service and check whether the Monit starts it automatically or not.
You can stop the Apache service with the following command:
systemctl stop apache2
Now, check the Monit log file and see how Monit starts the Apache service:
tail -f /var/log/monit.log
You should get the following output:
[UTC Oct 1 09:58:06] error : 'apache' process is not running
[UTC Oct 1 09:58:06] info : 'apache' trying to restart
[UTC Oct 1 09:58:06] info : 'apache' start: '/etc/init.d/apache2 start'
[UTC Oct 1 10:00:06] info : 'apache' process is running with pid 4404
.
Wait some time, then run the following command to check the status of the Apache service.
monit summary apache
You should see that Apache is started and in listening status:
Monit 5.26.0 uptime: 6m
┌─────────────────────────────────┬────────────────────────────┬───────────────┐
│ Service Name │ Status │ Type │
├─────────────────────────────────┼────────────────────────────┼───────────────┤
│ apache │ OK │ Process │
└─────────────────────────────────┴────────────────────────────┴───────────────┘
Conclusion
In this guide, you learned how to install and configure Monit on Ubuntu 20.04. You also learned how to configure Monit to monitor different services. You can now use Monit in the production environment and monitor your desired services. Try Monit on VPS Hosting from Atlantic.Net using the tutorial above!