OTRS, also known as “Open Ticket Request System,” is a free, open-source, web-based ticket system written in Perl. It is used by many companies to improve operations related to their customer support, help desk, call center, and other such functions. It allows customers to register and create a ticket via the customer portal. OTRS is a powerful alternative to other popular ticketing systems.
In this post, we will show you how to install OTRS on Rocky Linux 8.
Step 1 – Install Required Packages
First, you will need to install the EPEL repository and other dependencies to your system. You can install them by running the following command:
dnf update -y
dnf install epel-release -y
dnf install gcc expat-devel procmail mod_perl perl perl-core -y
Next, install the Apache and MariaDB server using the following command:
dnf install httpd mariadb-server -y
Once both packages are installed, start the Apache and MariaDB service and enable them to start at system reboot:
systemctl start httpd mariadb
systemctl enable httpd mariadb
Next, edit the MariaDB configuration file:
nano /etc/my.cnf.d/mariadb-server.cnf
Add the following lines inside the [mysqld] section:
max_allowed_packet=256M
character-set-server=utf8
collation-server=utf8_general_ci
innodb_buffer_pool_size=4G
innodb_log_file_size=1G
Save and close the file, then restart the MariaDB service to apply the changes:
systemctl restart mariadb
Step 2 – Install OTRS
First, create a dedicated user to run OTRS using the following command:
useradd otrs
Next, add the OTRS user to the Apache group using the following command:
usermod -G apache otrs
Next, download the latest version of OTRS using the following command:
wget https://otrscommunityedition.com/download/otrs-community-edition-6.0.32.zip
Once OTRS is downloaded, unzip the downloaded file with the following command:
unzip otrs-community-edition-6.0.32.zip
Next, move the extracted directory to /opt with the following command:
mv otrs-community-edition-6.0.32 /opt/otrs
Next, set proper ownership to the OTRS directory:
chown -R otrs:otrs /opt/otrs
Step 3 – Install Required Perl Modules for OTRS
Next, you will need to install several Perl modules to extend the OTRS functionality. You can check all necessary modules by running the following script:
perl /opt/otrs/bin/otrs.CheckModules.pl
This will list all necessary and optional modules.
Now, run the following commands one by one to install all modules:
cpan Crypt::Eksblowfish::Bcrypt
cpan Date::Format
cpan DateTime
cpan DBD::ODBC
cpan DBD::Oracle
cpan DBD::Pg
cpan Encode::HanExtra
cpan JSON::XS
cpan Mail::IMAPClient
cpan Authen::SASL
cpan Authen::NTLM
cpan Moo
cpan Net::DNS
cpan Net::LDAP
cpan Template
cpan Template::Stash::XS
cpan Text::CSV_XS
cpan XML::LibXML
cpan XML::LibXSLT
cpan XML::Parser
cpan YAML::XS
Note: You may wish to wrap the above commands into a bash shell script to speed up the process. To do this, type:
nano installer.sh
Then copy the commands above. Make sure you save and quit. Now, type:
chmod 660 installer
To run the script, type:
sh installer.sh
Next, rename the OTRS default configuration file using the following command:
cp /opt/otrs/Kernel/Config.pm.dist /opt/otrs/Kernel/Config.pm
Next, check all the required OTRS modules using the following command:
perl -cw /opt/otrs/bin/cgi-bin/index.pl
perl -cw /opt/otrs/bin/cgi-bin/customer.pl
perl -cw /opt/otrs/bin/otrs.Console.pl
Next, set appropriate permissions using the following command:
perl /opt/otrs/bin/otrs.SetPermissions.pl
Step 4 – Create an Apache Configuration File
OTRS provides a pre-configured Apache virtual host configuration file. You can link it to the Apache configuration directory using the following command:
ln -s /opt/otrs/scripts/apache2-httpd.include.conf /etc/httpd/conf.d/otrs_apache.conf
Next, restart the Apache and MariaDB services to apply the changes:
systemctl restart httpd
systemctl restart mariadb
Step 5 – Create a Systemd Service File for OTRS
Next, you will need to create a systemd service file for OTRS. You can create it using the following command:
nano /etc/systemd/system/otrs.service
Add the following lines:
[Unit]
Description=OTRS: Open-source Ticket Request System, Copyright (C) 2001-2016 OTRS AG
Documentation=https://otrs.github.io/doc/manual/admin/stable/en/html/
Requires=crond.service httpd.service mariadb.service

[Service]
Type=oneshot
RemainAfterExit=yes
ExecStart=/opt/otrs/bin/otrs.Daemon.pl start
ExecStart=/opt/otrs/bin/Cron.sh start
ExecStop=/opt/otrs/bin/Cron.sh stop
ExecStop=/opt/otrs/bin/otrs.Daemon.pl stop
User=otrs
Group=apache

[Install]
WantedBy=multi-user.target
Save and close the file, then reload the systemd daemon to apply the changes:
systemctl daemon-reload
Next, start and enable the OTRS service using the following command:
systemctl start otrs
systemctl enable otrs
Step 6 – Access OTRS Web Interface
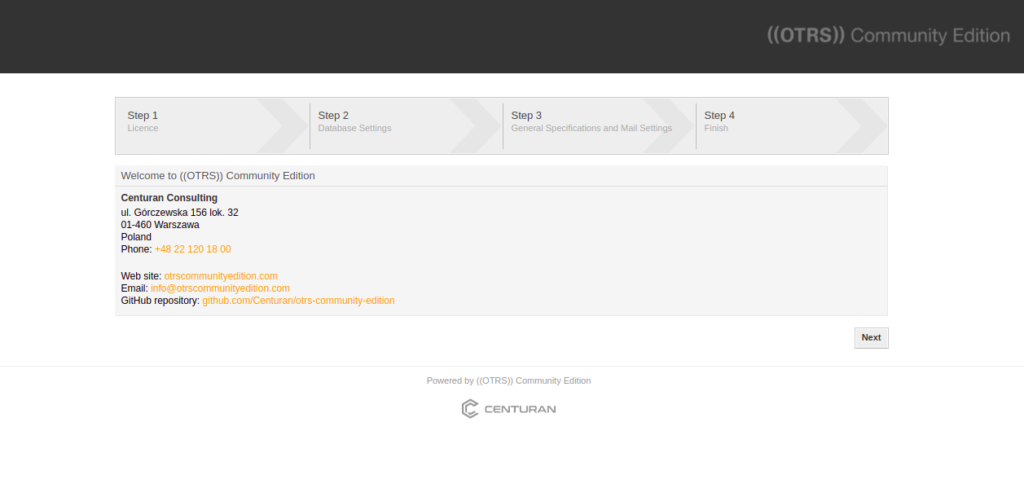
Now, open your web browser and access OTRS using the URL http://your-server-ip/otrs/installer.pl. You should see the following screen:
Click on the Next button. You should see the License agreement screen:
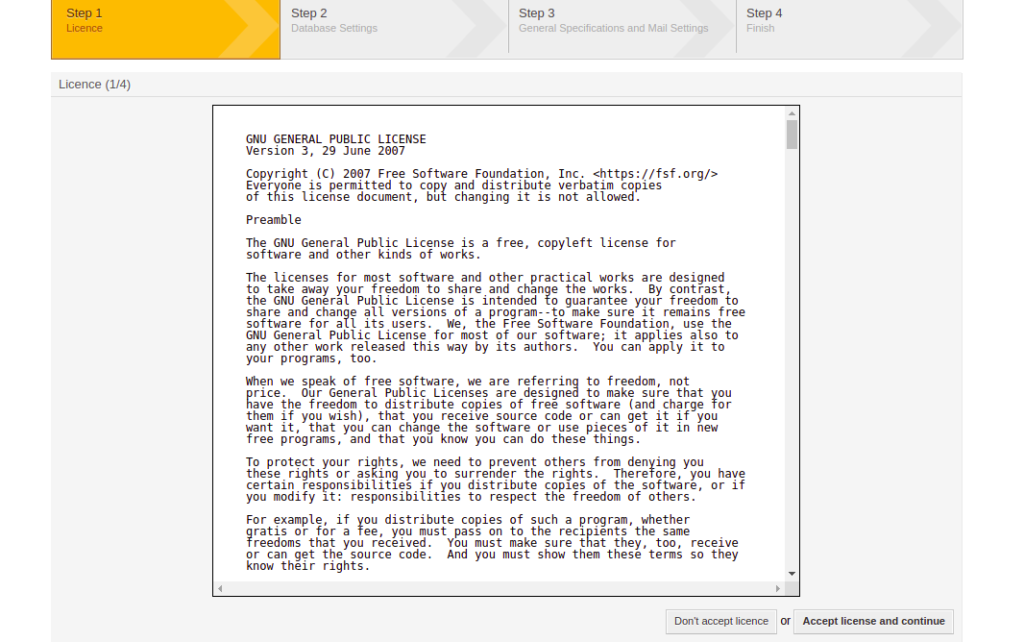
Click on the Accept license and continue button. You should see the database setting screen.
Provide root as the username, leave the password field blank, and click on the Check database settings. You should see the following screen:
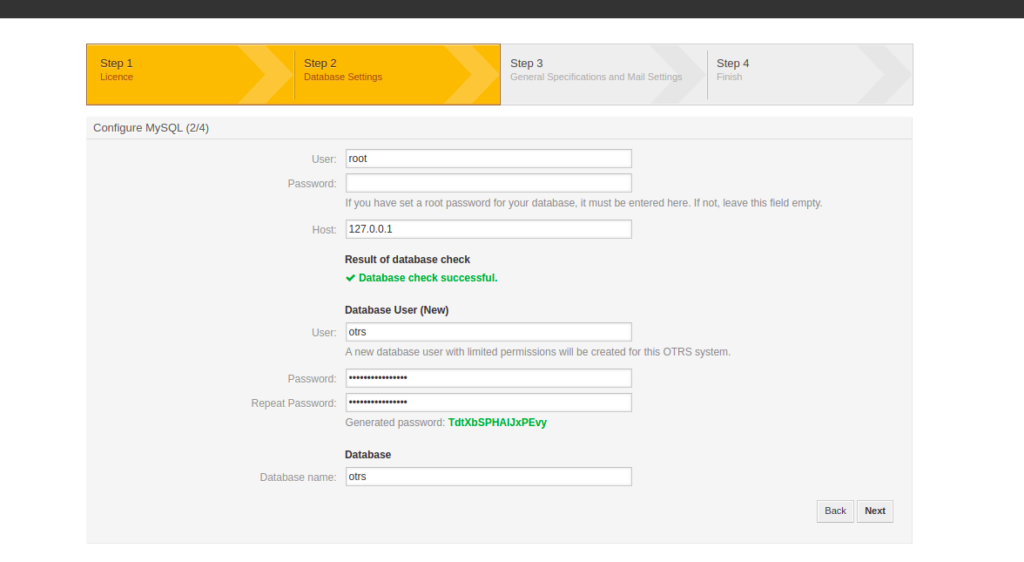
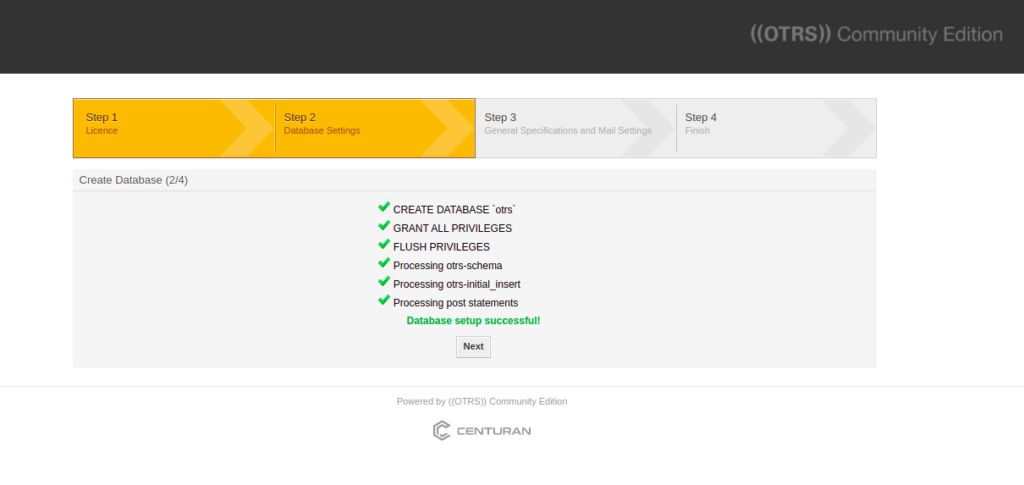
Click on the Next button to create a database and user. You should see the following screen:
Click on the Next button. You should see the general configuration screen:
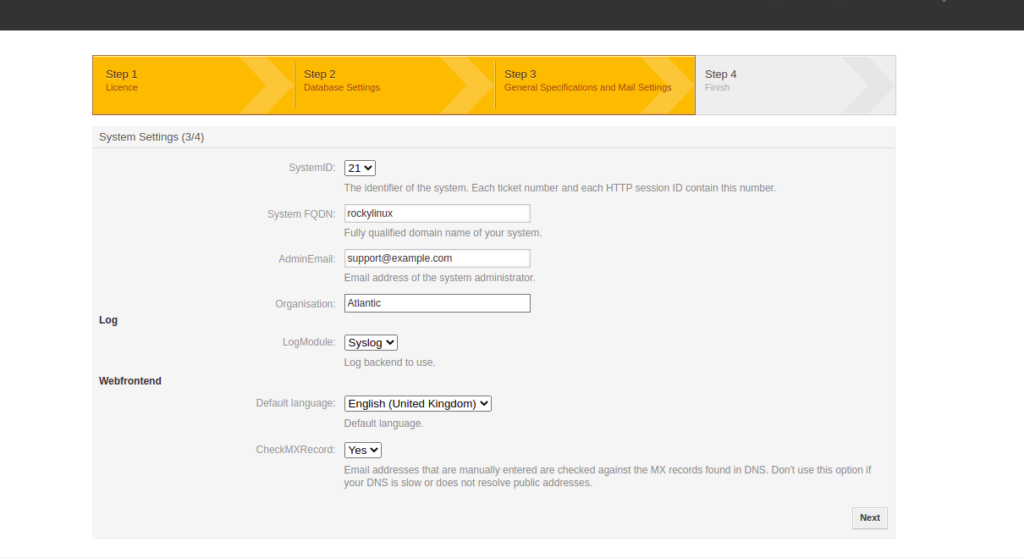
Provide all necessary configurations and click on the Next button. You should see the following screen:
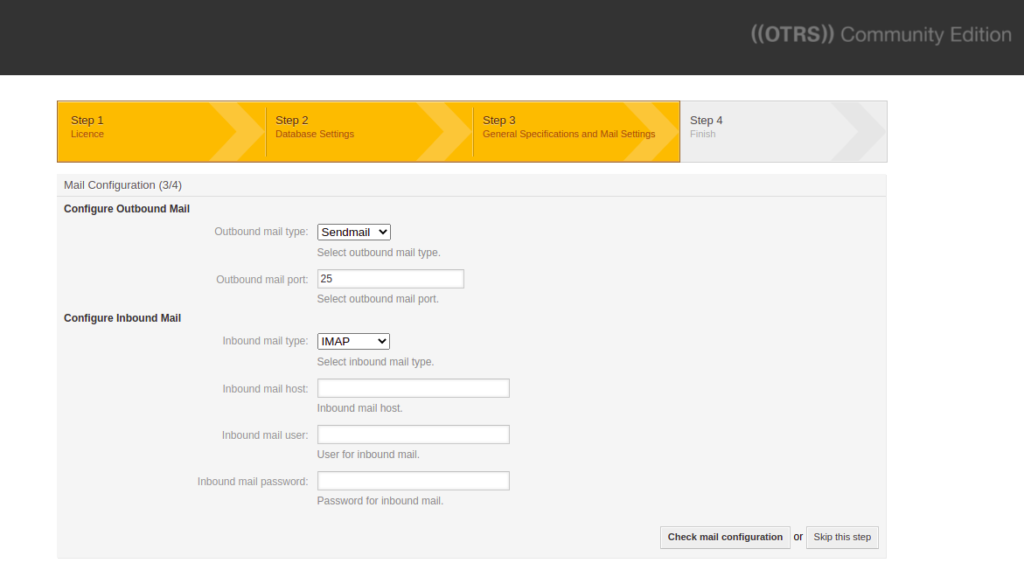
Provide your SMTP configuration or click on the “Skip this Step” button. You should see the following screen:
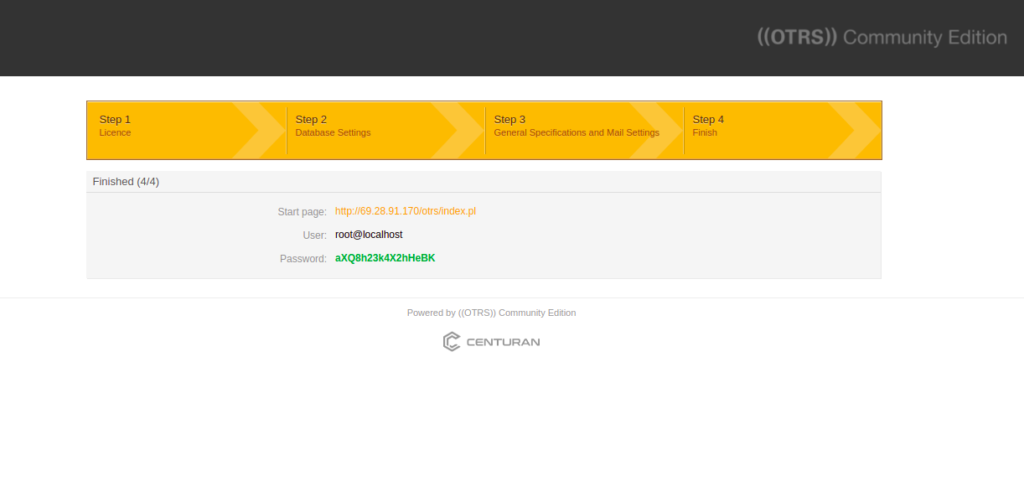
Click on the Startup page link. You will be redirected to the OTRS login:
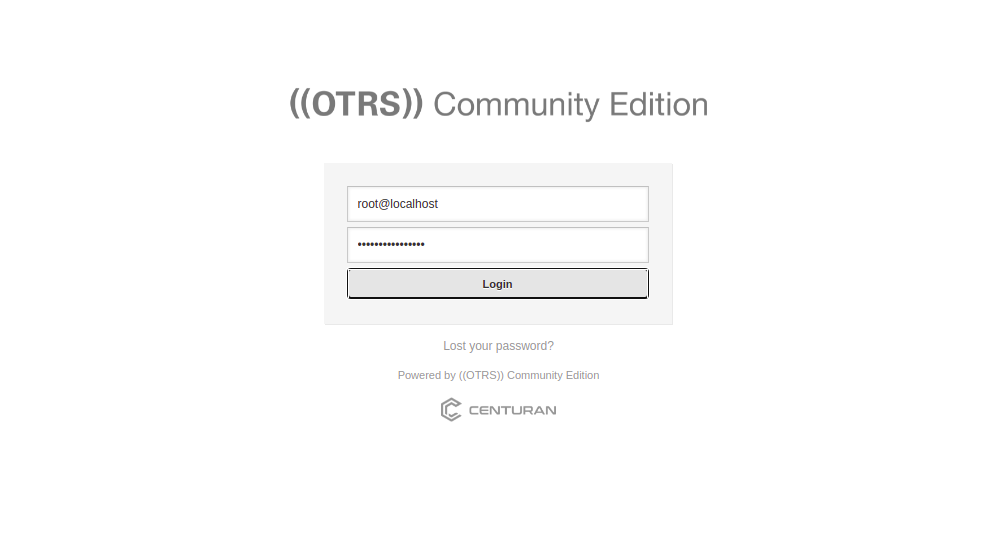
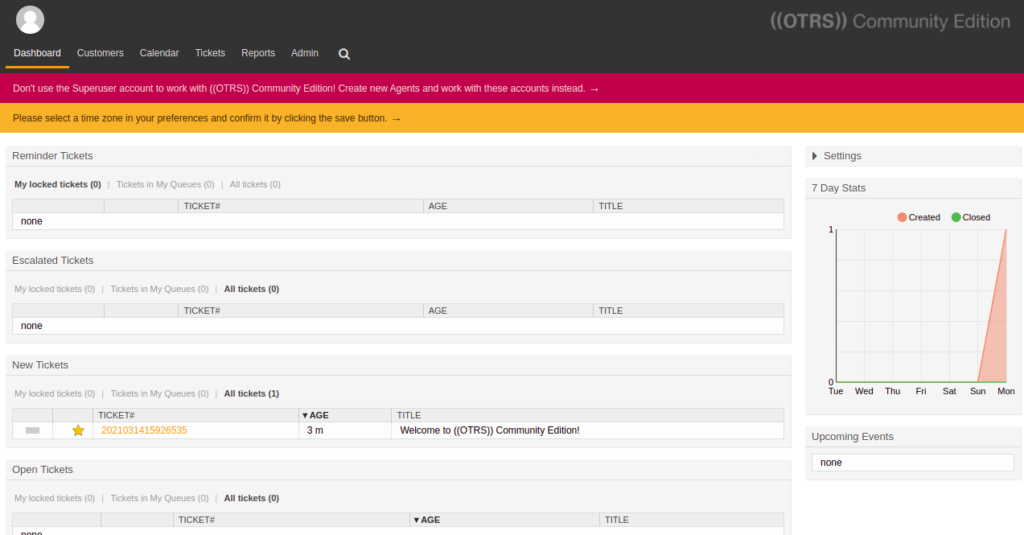
Provide your admin username and password and click on the Login button. You should see the OTRS dashboard:
Now, open your command-line interface to restart the OTRS service.
systemctl restart otrs
Conclusion
Congratulations! You have successfully installed the OTRS ticketing system on Rocky Linux 8. You can now create your own online ticketing system using OTRS. Give it a try on VPS hosting from Atlantic.Net!