Apache is free, open-source, and the most widely used web server, largely because it is capable of working in different environments. Apache has the ability to manage different processes to serve an HTTP protocol request including processing the request, opening a socket, and handling new events.
These tasks are performed by the Apache Multi-Processing Module (MPM).
What Is Apache MPM?
Apache MPM (Multi-Processing Modules) are Apache modules used for creating child processes in Apache. They allow more requests to be served simultaneously by passing off some processing work to listener threads, freeing up worker threads to serve new requests. Using PHP-FPM with MPM Event in an Apache webserver decreases the website page loading time and allows the webserver to handle more concurrent connections.
In this tutorial, we will learn how to configure Apache with MPM Event and PHP-FPM on Ubuntu 20.04.
Step 1 – Install LAMP Server
First, install the Apache web server, and MariaDB with the following command:
apt-get install apache2 mariadb-server -y
Next, add the PHP repository using the following command.
apt install software-properties-common
add-apt-repository ppa:ondrej/php -y
Next, install PHP with other required dependencies using the following command.
apt install php7.4 libapache2-mod-php7.4 php7.4-mysql php7.4-gd php7.4-curl php7.4-xml
Once the LAMP server is installed, you can proceed to the next step.
Step 2 – Change the Multi-Processing Module
Before starting, you will need to switch the MPM from pre-fork to event and remove the php7.4 module connection between PHP and Apache.
First, stop the Apache service and disable the php7.4 module with the following command:
systemctl stop apache2
a2dismod php7.4
Next, disable the Pre-fork MPM module with the following command:
a2dismod mpm_prefork
Next, enable the Event MPM module with the following command:
a2enmod mpm_event
Once you are finished, you can proceed to the next step.
Step 3 – Configure Apache to Use the FastCGI Process Manager
In this section, we will install the PHP-FPM processor and proxy modules so Apache can communicate with PHP.
First, install the PHP-FPM with the following command:
apt-get install php7.4-fpm -y
Once installed, you will need to install libapache2-mod-fcgid library in order to communicate Apache and PHP.
You can install it with the following command:
apt-get install libapache2-mod-fcgid -y
Once installed, you will need to enable the PHP-FPM, Proxy and FastCGI Proxy module in Apache webserver.
You can enable them with the following command:
a2enconf php7.4-fpm
a2enmod proxy
a2enmod proxy_fcgi
Next, restart the Apache service to apply the changes:
systemctl restart apache2
Now, verify the MPM module with the following command:
apachectl -M | grep 'mpm'
You should get the following output:
mpm_event_module (shared)
Next, verify the Proxy and FastCGI Proxy module with the following command:
apachectl -M | grep 'proxy'
You should get the following output:
 proxy_module (shared)
 proxy_fcgi_module (shared)
Step 4 – Verify FastCGI Process Manager
At this point, Apache web server is configured to use the FastCGI Process Manager. It’s time to verify if PHP is using the FastCGI Process Manager.
First, create an info.php file inside the Apache document root directory:
nano /var/www/html/info.php
Add the following lines:
<?php phpinfo(); ?>
Save and close the file when you are finished.
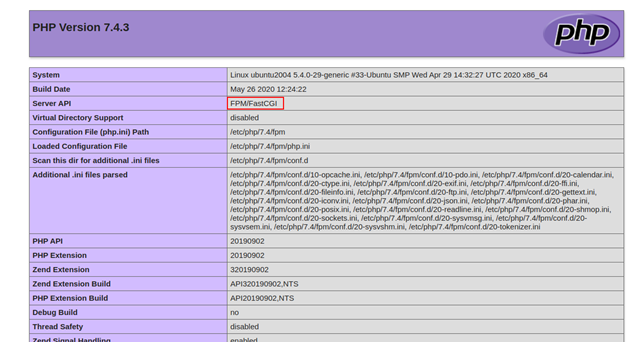
Next, open your web browser and type the URL http://your-server-ip/info.php. You should see the following screen:

In the above page, you should see that Apache web server is using FPM/FastCGI.
Conclusion
In the above guide, we learned how to configure Apache with MPM Event and PHP-FPM on Ubuntu 20.04. Now, PHP-FPM will handle the PHP code and improve overall resource utilization. Give it a shot on your VPS Hosting account from Atlantic.Net!

