Graylog is a powerful platform for simplified log management of structured or unstructured data. Additionally, it is useful for debugging applications.
Graylog is broadly based upon Scala, MongoDB, and Elasticsearch. It has a main server to receive data from the clients that may be installed over different servers. Similarly, Graylog features a web interface for the visualization of data. It facilitates work over the logs that the main server aggregates.
Graylog is primarily used as a stash for logs for any web application in use. Alternately, Graylog is also effective when working with raw strings, such as Syslog.
In this tutorial, we will show you how to install the Graylog Monitoring server on CentOS 8.
Step 1 – Install Required Dependencies
Before starting, you will need to install Java and other required dependencies on your server.
First, install the EPEL repository with the following command:
dnf install epel-release -y
Next, install the Java using the following command:
dnf install -y java-1.8.0-openjdk-headless -y
Once Java is installed, you can verify it with the following command:
java -version
You should get the following output:
openjdk version "1.8.0_265"
OpenJDK Runtime Environment (build 1.8.0_265-b01)
OpenJDK 64-Bit Server VM (build 25.265-b01, mixed mode)
Next, install other required packages with the following command:
dnf install wget pwgen perl-Digest-SHA -y
Step 2 – Install Elasticsearch
Graylog uses Elasticsearch to store log messages and its search function. By default, the latest version of Elasticsearch is not available in the CentOS 8 default repository, so you will need to add the Elasticsearch repo to your system.
First, import the GPG key with the following command:
rpm --import https://artifacts.elastic.co/GPG-KEY-elasticsearch
Next, create Elasticsearch repo with the following command:
nano /etc/yum.repos.d/elasticsearch.repo
Add the following lines:
[elasticsearch-6.x]
name=Elasticsearch repository for 6.x packages
baseurl=https://artifacts.elastic.co/packages/oss-6.x/yum
gpgcheck=1
gpgkey=https://artifacts.elastic.co/GPG-KEY-elasticsearch
enabled=1
autorefresh=1
type=rpm-md
Save and close the file then install the Elasticsearch with the following command:
dnf install elasticsearch-oss -y
Once the Elasticsearch is installed, edit the Elasticsearch main configuration file:
nano /etc/elasticsearch/elasticsearch.yml
Define your cluster name and add another line as shown below:
cluster.name: my-graylog
action.auto_create_index: false
Save the file, then reload the systemd daemon and enable Elasticsearch to start at system reboot with the following command:
systemctl daemon-reload
systemctl enable elasticsearch
Next, restart the Elasticsearch service with the following command:
systemctl restart elasticsearch
You can now check the Elasticsearch response using the following command:
curl -X GET http://localhost:9200
If everything is correct, you should get the following output:
{
"name" : "7FL0524",
"cluster_name" : "my-graylog",
"cluster_uuid" : "C4OvK0Y_TjCiVzBiHbz0pA",
"version" : {
"number" : "6.8.12",
"build_flavor" : "oss",
"build_type" : "rpm",
"build_hash" : "7a15d2a",
"build_date" : "2020-08-12T07:27:20.804867Z",
"build_snapshot" : false,
"lucene_version" : "7.7.3",
"minimum_wire_compatibility_version" : "5.6.0",
"minimum_index_compatibility_version" : "5.0.0"
},
"tagline" : "You Know, for Search"
}
Step 3 – Install MongoDB Server
Graylog uses MongoDB to store configurations and meta information. By default, MongoDB is not available in the CentOS 8 standard repository, so you will need to create a repository for MongoDB.
You can create it with the following command:
nano /etc/yum.repos.d/mongodb-org-4.0.repo
Add the following lines:
[mongodb-org-4]
name=MongoDB Repository
baseurl=https://repo.mongodb.org/yum/redhat/8/mongodb-org/4.2/x86_64/
gpgcheck=1
enabled=1
gpgkey=https://www.mongodb.org/static/pgp/server-4.2.asc
Save and close the file, then update the repository with the following command:
dnf update -y
Next, install the MongoDB server with the following command:
dnf install mongodb-org -y
Once MongoDB is installed, start the MongoDB service and enable it to start at system reboot:
systemctl start mongod
systemctl enable mongod
Step 4 – Install and Configure Graylog Server
By default, the Graylog server package is not available in the CentOS 8 standard repository, so you will need to create a repo for Graylog.
You can install the Graylog repo using the following command:
dnf install https://packages.graylog2.org/repo/packages/graylog-3.2-repository_latest.rpm -y
Once the repository is created, you can install the Graylog server with the following command:
dnf install graylog-server -y
After installing Graylog server, you will need to generate a secret key for Graylog. You can generate it with the following command:
pwgen -N 1 -s 96
Output:
un5R8H7vmoq1japNYvHD2pEkawKyBzZpWeFsfVEk4Ustl5sWPtcdMbgTV18mHyqBnBK0sk83fcEmceTtyNzxntWqWhNPYe9N
You will also need to generate a secure password for Graylog. You can generate it with the following command:
echo -n your-password | shasum -a 256
You should get the following output:
616384da8ed2fb86db3462ec827bc433256324e323a2438f48ae32930e707065 -
Note: You can use this password “your-password” to log in to the Graylog web interface.
Next, edit the Graylog main configuration file and define your secret key, password, and other settings:
nano /etc/graylog/server/server.conf
Change the following lines:
password_secret = un5R8H7vmoq1japNYvHD2pEkawKyBzZpWeFsfVEk4Ustl5sWPtcdMbgTV18mHyqBnBK0sk83
fcEmceTtyNzxntWqWhNPYe9N
root_username = admin
root_password_sha2 = 616384da8ed2fb86db3462ec827bc433256324e323a2438f48ae32930e707065
root_timezone = UTC
http_bind_address = your-server-ip:9000
Save and close the file, then reload the systemd daemon with the following command:
systemctl daemon-reload
Next, start the Graylog service and enable it to start at system reboot with the following command:
systemctl start graylog-server
systemctl enable graylog-server
You can check the Graylog server log to verify whether the Graylog server is started or not:
tail -f /var/log/graylog-server/server.log
If the Graylog server is started successfully, you should get the following output:
2020-10-02T11:46:15.649-04:00 INFO [InputSetupService] Triggering launching persisted inputs,
node transitioned from Uninitialized [LB:DEAD] to Running [LB:ALIVE]
2020-10-02T11:46:15.654-04:00 INFO [ServerBootstrap] Graylog server up and running.
At this point, the Graylog server is started and listening on port 9000.
Step 5 – Access Graylog Interface
Now, you can access the Graylog web interface using the URL http://your-server-ip:9000. You should see the Graylog login page:

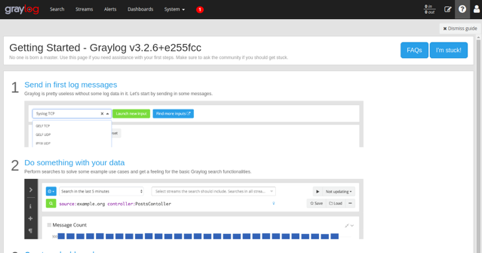
Provide your admin username and password and click on the Sign–in button. You should see the Graylog dashboard on the following page:
Conclusion
Congratulations! You have successfully installed and configured the Graylog server on CentOS 8. You can now configure your Graylog server to receive Rsyslog logs from external servers. For more information, you can visit the Graylog documentation. Get started with Graylog today on VPS Hosting from Atlantic.Net.
* This post is for informational purposes only and does not constitute professional, legal, financial, or technical advice. Each situation is unique and may require guidance from a qualified professional.
Readers should conduct their own due diligence before making any decisions.