Table of Contents
- 1 - Basic Server Preparation
- 2 - Build out the LAMP Web Server
- 3 - Configure PHP
- 4 - Configure Apache2
- 5 - Install and Configure Memcached
- 6 - Install the Mailserver Packages
- 7 - Creating a MySQL Database for the EMail Server
- 8.1 - Installing Postfix Admin
- 8.2 - Configuring Postfix Admin
- 9 - Adding User Accounts (mailboxes) to Postfix Admin
- 10 - Create a System User To Handle Virtual Mail Directories
- 11 - Configuring Dovecot
- 12 - Configuring Amavis, ClamAV, and SpamAssassin
- 13 - Configuring Postfix
- 14 – Reverse DNS Lookup
- 15 – Install RoundCube Webmail

Verified and tested 8/12/15
Introduction
In this how-to article, we will walk you through building a complete mail server on Ubuntu 14.04 with Postfix. Building a Linux mail server from ground up can be a painful process unless you do it day in and day out, but we are going to show you how to do it as painlessly as we can.
A mail server usually consists of a range of different packages that handle SMTP, POP3/IMAP, storage of the mail, and spam-related tasks, and they must all talk together. Here is an outline of the packages and goals for this how-to article.
Outline of Packages and Configuration Steps
1 – Basic Server Preparation
2 – Build out the LAMP Web Server
3 – Configure PHP
4 – Configure Apache2
5 – Install and Configure Memcached
6 – Install the mail server Packages
7 – Creating a MySQL Database for the Mail Server
8.1 – Installing Postfix Admin
8.2 – Configuring Postfix Admin
9 – Adding User Accounts (mailboxes) to Postfix Admin
10 – Create a system user to handle Virtual Mail Directories
11 – Configuring Dovecot
12 – Configuring Spam and Anti-Virus Filters
13 – Configuring Postfix
14 – Reverse DNS Lookup
15 – Install RoundCube Webmail
Prerequisites
– Fully updated Ubuntu 14.04 Server, if you do not have an Ubuntu server running on a server like Atlantic.Net’s Linux cloud servers.
– Access to the domain name for which you will set up mail (we will be using “example.tld” in the examples in this article).
.
1 – Basic Server Preparation
The base installation of Ubuntu is comes with a limited set of packages, so the first thing we want to do is install the tools we’ll be using to complete all tasks.
First, make sure that you are logged in as the root user account.
sudo su -
Now, let’s install the basic tools so that we can download files, and edit configuration files easily.
apt-get install wget nano ssl-cert
- wget: package for retrieving files using HTTP, HTTPS and FTP, the most widely-used Internet protocols.
- nano: command line text editor with easy to use controls.
- ssl-cert: package that enables the ability to create SSL certificates.
Next, we are going to update the hostname and domain name of the server so that when you send email it will match the reverse pointer DNS record that we set up with your hosting provider. We will also update the /etc/hostname file. Make sure to replace example with your real hostname and domain name.
hostname mail.example.tld
echo "mail.example.tld" > /etc/hostname
Now we are going to manually edit the /etc/hosts configuration file so that it matches the name we just entered.
nano /etc/hosts
Edit the first line and add your FQDN (fully qualified domain name) just after the 127.0.0.1 IP address.
127.0.0.1 mail.example.tld localhost
We are now going to update the default SSL certificate on the server so that it matches our new hostname. If you purchased an SSL certificate for your mail server, you can skip this step.
make-ssl-cert generate-default-snakeoil --force-overwrite
This command tells the server to regenerate the default system SSL certificate and forces it to overwrite the original CRT and KEY files.
We have now completed the Basic Server Preparation and can move on to installing our web server services.
2 – Build out the LAMP Web Server
During this step, we are going to install the “LAMP” packages. LAMP stands for Linux, Apache, MySQL, and PHP. These packages combined will enable your server to provide dynamic web services with MySQL connectivity.
First, let’s install the packages. This is called a task package installation.
apt-get install lamp-server^
To see a list of the packages that are included in this group install, you can execute the following:
tasksel --task-packages lamp-server
As these packages are being installed, the server will ask you to enter a password for your MySQL database installation. This password will be set for the “root” user account of the MySQL database. Make sure that this password is a secure password, and make sure that you document the password used as you will need it again throughout this article.
After all the packages are installed, we will be ready to install some additional PHP modules. These additional modules will enable your server to support APC User Cache for PHP 5, memcached, cURL, an XML parser, and GD image processing.
apt-get install php-apc php5-memcache php5-curl php5-gd php-xml-parser php5-imap
3 – Configure PHP
We are now going to update the configuration of PHP. The default configuration is usually sufficient for most systems; however, we want to make sure that PHP does not expose information to potential attackers. We are going to edit the file /etc/php5/apache2/php.ini.
nano /etc/php5/apache2/php.ini
Locate the variable expose_php and update the value from On to Off. With nano, you can search by pressing CTRL-W and then enter your search word.
367  ;;;;;;;;;;;;;;;;;
368  ; Miscellaneous ;
369  ;;;;;;;;;;;;;;;;;
370
371  ; Decides whether PHP may expose the fact that it is installed on the server
372  ; (e.g. by adding its signature to the Web server header).  It is no security
373  ; threat in any way, but it makes it possible to determine whether you use PHP
374  ; on your server or not.
375  ; http://php.net/expose-php
376  expose_php = Off
377
4 – Configure Apache2
We are now ready to move on to customizing the configuration of the Apache web services. The end result for Apache is that it will serve a single website with a couple of running web applications: Webmail (RoundCube) and Postfix Admin. All traffic will be directed to HTTPS (secured) web services.
First, we are going to minimize the information that Apache exposes to the public. Using nano, we are going to edit the configuration file /etc/apache2/conf-available/security.conf.
nano /etc/apache2/conf-available/security.conf
Search for the configuration variable ServerTokens and set the value from OS to Prod.
# ServerTokens
# This directive configures what you return as the Server HTTP response
# Header. The default is 'Full' which sends information about the OS-Type
# and compiled in modules.
# Set to one of:  Full | OS | Minimal | Minor | Major | Prod
# where Full conveys the most information, and Prod the least.
#ServerTokens Minimal
ServerTokens Prod
#ServerTokens Full
Now search for the configuration variable ServerSignature and set the value from On to Off.
# Optionally add a line containing the server version and virtual host
# name to server-generated pages (internal error documents, FTP directory
# listings, mod_status and mod_info output etc., but not CGI generated
# documents or custom error documents).
# Set to "EMail" to also include a mailto: link to the ServerAdmin.
# Set to one of:  On | Off | EMail
ServerSignature Off
#ServerSignature On
You can now save and exit this configuration file.
We are now going to enable the additional modules rewrite, and ssl in Apache so that we can redirect default HTTP traffic to the HTTPS port as well as support SSL certificates within Apache.
a2enmod rewrite ssl
a2ensite default-ssl
We are now moving on to customize the website configuration. These files are located in the directory /etc/apache2/sites-available. We are going to update the existing default configuration files to support SSL services.
First, edit the configuration file 000-default.conf. You can replace the existing configuration with the below, just replace the ServerName variable with your hostname.
nano /etc/apache2/sites-available/000-default.conf
<VirtualHost *:80>
        # The ServerName directive sets the request scheme, hostname and port that
        # the server uses to identify itself. This is used when creating
        # redirection URLs. In the context of virtual hosts, the ServerName
        # specifies what hostname must appear in the request's Host: header to
        # match this virtual host. For the default virtual host (this file) this
        # value is not decisive as it is used as a last resort host regardless.
        # However, you must set it for any further virtual host explicitly.
        ServerName mail.example.tld

        DocumentRoot /var/www/html

        <Directory "/var/www/html">
           Options FollowSymLinks
           AllowOverride All
        </Directory>

        # Available loglevels: trace8, ..., trace1, debug, info, notice, warn,
        # error, crit, alert, emerg.
        # It is also possible to configure the loglevel for particular
        # modules, e.g.
        LogLevel info ssl:warn

        ErrorLog ${APACHE_LOG_DIR}/error.log
        CustomLog ${APACHE_LOG_DIR}/access.log combined

        # For most configuration files from conf-available/, which are
        # enabled or disabled at a global level, it is possible to
        # include a line for only one particular virtual host. For example the
        # following line enables the CGI configuration for this host only
        # after it has been globally disabled with "a2disconf".
        #Include conf-available/serve-cgi-bin.conf
</VirtualHost>
You can now save and exit this configuration file.
If you have not purchased your own SSL certificate, the system default SSL configuration file default-ssl.conf will work for our needs. However, if you have purchased a custom SSL certificate, you will need to edit the configuration file and update the variables SSLCertificateFile, SSLCertificateKeyFile and SSLCertificateChainFile to point to the location where you have saved your certificate and key files (consult your certificate authority or vendor for additional configuration assistance).
We are now going to create an .htaccess configuration file that will force visitors to your web server to use the HTTPS (SSL) protocol.
nano /var/www/html/.htaccess
Copy and paste the following variables into the .htaccess configuration.
RewriteEngine On
RewriteCond %{SERVER_PORT} 80
RewriteRule ^(.*) https://%{HTTP_HOST}/$1 [L]
These configuration variables tell Apache to enable the mod_rewrite engine, and then to redirect visitors on HTTP (port 80) to the HTTPS (port 443) URL.
5 – Install and Configure Memcached
Memcached is a high-performance, distributed memory object caching system. This package will help speed up dynamic web applications, such as RoundCube and Postfix Webadmin.
First, let’s install the package using apt-get.
apt-get install memcached
For smaller systems, the default configuration is usually sufficient. It locks down access to the localhost and provides sufficient memory allocation values. However, if you are building a larger server that may get heavy usage, you will most likely want to change the memory allocation values to be higher than the default of 64M.
The memcached configuration files is located at /etc/memcached.conf.
6 – Install the Mailserver Packages
We are now ready to install the mail server packages. Again, these are located in a tasksel package group.
apt-get install mail-server^
To see a list of the packages that are included in this group install, you can execute the following:
tasksel --task-packages mail-server
During the package installation, Postfix will ask you a series of questions:
- Installation configuration type —
You will want to select “Internet Site” as the configuration type. - Hostname of the mail server —
Make sure to enter the same hostname (FQDN) that you used in Step #1 - Create a self-signed SSL Certificate —
Select the ‘Yes’ option - Setup the SSL Certificate Common Name —
Enter the same hostname (FQDN) that you used in Step #1
We are now going to install the remainder of the packages that are needed for the mail server to support MySQL based users as well as the Spam and AntiVirus detection packages. (Note: these packages could be installed via a single apt-get install command, with each package name separated by a space, but they are presented here as separate commands for ease of reading.)
apt-get install postfix-mysql dovecot-mysql dovecot-imapd postgrey
apt-get install amavis clamav clamav-daemon spamassassin
apt-get install php5-imap
This next set of optional packages extends the abilities of the anti-spam and antivirus detection packages by allowing greater inspection of attached files that come in to your mail server.
apt-get install libnet-dns-perl pyzor razor
apt-get install arj bzip2 cabextract cpio file gzip nomarch pax unzip zip
Now, let’s restart the Apache2 services so that it will see the new modules we have provided it.
service apache2 restart
7 – Creating a MySQL Database for the EMail Server
We are now ready to create the database for our user accounts and other mail server functions.
To begin, we need to log into the MySQL database service as the root user. You will need that password that you first entered in Step #2.
mysql -u root -p
You will now see a different command line prompt (mysql>). This is the MySQL CLI console where you can manage your MySQL server databases and tables.
First, we are going to create a new database named “mail”, and then we will create a system user account with full permissions to this new database. Make sure to replace the <secure password> variable with another *new* secure password for this account. Do not use the same password that you used for the root user account.
create database mail;
grant all on mail.* to 'mail'@'localhost' identified by '<secure password>';
flush privileges;
exit;
We have now setup the database that will be used by your mail server services.
8.1 – Installing Postfix Admin
Postfix Admin is a web-based management tool created for Postfix. It is a PHP-based application that handles Postfix-style virtual domains and users that are stored in MySQL or PostgreSQL.
First, we need to download the latest release of the application. This example will download version 2.92–always check the version on the provider’s website to make sure you are getting the latest release.
cd /tmp
wget http://downloads.sourceforge.net/project/postfixadmin/postfixadmin/postfixadmin-2.92/postfixadmin-2.92.tar.gz
We are now going to extract the application and copy it to the HTML directory /var/www/html/postfixadmin on our server.
tar -xvf postfixadmin-2.92.tar.gz
cp -r postfixadmin-2.92/ /var/www/html/postfixadmin
Now we need to update the permissions of this new folder so that the www-data user account has access to it.
chown -R www-data:www-data /var/www/html/postfixadmin
8.2 – Configuring Postfix Admin
We now have some configurations to update in the Postfix Admin files. First, we will modify the config.inc.php file so that it knows how to communicate with the database that we just created in Step #7.
nano /var/www/html/postfixadmin/config.inc.php
Search for the variable 'configured' and reset the value from false to true.
$CONF['configured'] = true;
Now search for the variable 'database_' and replace the values for your MySQL server configuration. Make sure to replace the variable <your secure password> with the password for the database user “mail” that you entered in Step #7.
$CONF['database_type'] = 'mysqli';
$CONF['database_host'] = 'localhost';
$CONF['database_user'] = 'mail';
$CONF['database_password'] = '<your secure password>';
$CONF['database_name'] = 'mail';
Now search for the variable 'admin_email' and replace the value with the email address you will setup for your administrator email account.
$CONF['admin_email'] = 'sysadmin@example.tld';
Now search for the variable 'domain_path' and replace the value from ‘YES‘ to ‘NO‘.
$CONF['domain_path'] = 'NO';
Now search for the variable 'domain_in_mailbox' and replace the value from ‘NO‘ to ‘YES‘.
$CONF['domain_in_mailbox'] = 'YES';
These last configuration variables do not define the path to where the actual user mailbox data will be stored on the server. These will be defined later during the Dovecot configuration steps.
You are now ready to save the configuration file, but do not exit yet!
We are now going to open a web browser enter the URL of your mail server, pointing directly to the setup.php configuration page. Make sure to replace mail.example.tld with your real server hostname.
http://mail.example.tld/postfixadmin/setup.php
When you access the URL, the script will automatically check the server and confirm that all the prerequisite modules are installed and working.
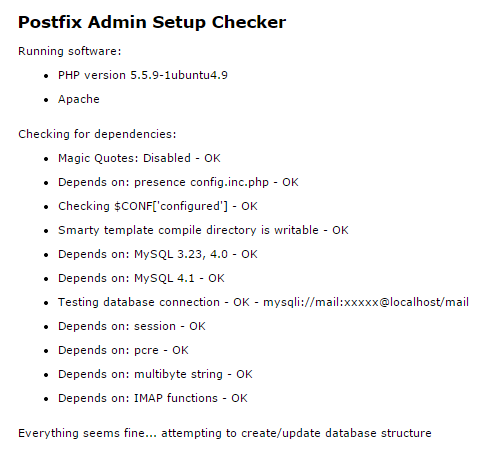
Postfix Admin setup checker output
Once the checks are completed, you will be prompted to enter a setup password. This password is used to create master admin accounts for the Postfix Admin web interface.
Enter a secure password and press the “Generate Password Hash” button.
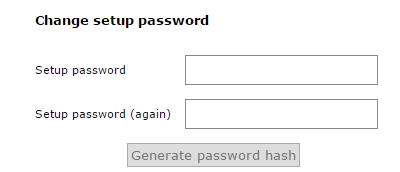 Postfix Admin generate password hash

Postfix Admin example password hash
Do NOT close the web browser yet! We are coming back here in a few minutes.
After generating the password hash, we will then need to update the config.inc.php file again with this password. Search for the variable 'setup_password' and replace the value with the one generated from the script.
// In order to setup Postfixadmin, you MUST specify a hashed password here.
// To create the hash, visit setup.php in a browser and type a password into the field,
// on submission it will be echoed out to you as a hashed value.
$CONF['setup_password'] = '<enter your hashed password here>';
You can now save and exit the configuration file.
We are now ready to return to the web browser and generate the “super admin” account for the Postfix Admin portal.
When you clicked the ‘Generate Password Hash’ button, the form fields changed to look like the example below. You can now fill out the form to generate a super admin account.
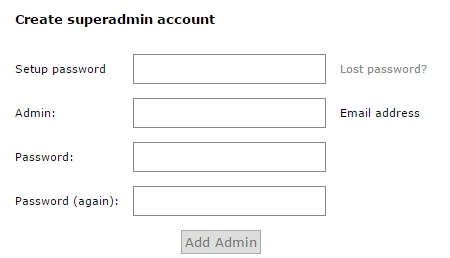
Creating a superadmin account with Postfix Admin
9 – Adding User Accounts (mailboxes) to Postfix Admin
We are now ready to create a virtual user account on our mail server. To do this, we will return to the Postfix Admin URL in our web browser and enter the URL of your mail server. Make sure to replace mail.example.tld with your real server hostname.
https://mail.example.tld/postfixadmin/
You will now be able to log in to the Postfix Admin portal where you can manage virtual domains and virtual user accounts. Enter the super admin username and password that you created above during the Postfix Admin configuration, and then press the “Login” button.
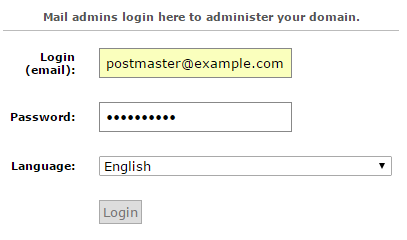
Admin login for Postfix Admin
Once you are logged into the Postfix Admin portal, you will see a menu at the top of the page.
The menu options provide the ability to manage your Postfix mail server virtual domains and users and to view log files.
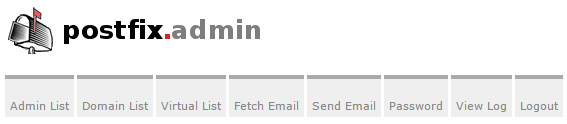
Postfix Admin menu
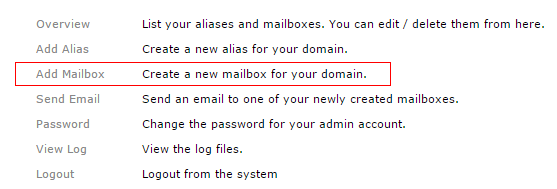
Postfix Admin Add Mailbox option
To create a user mailbox, click quick link “Add Mailbox”. You will now be taken to the “Add Mailbox Wizard” screen. Fill out the details in the form and press the “Add Mailbox” button once completed. The wizard will create your first virtual user (mailbox) account.
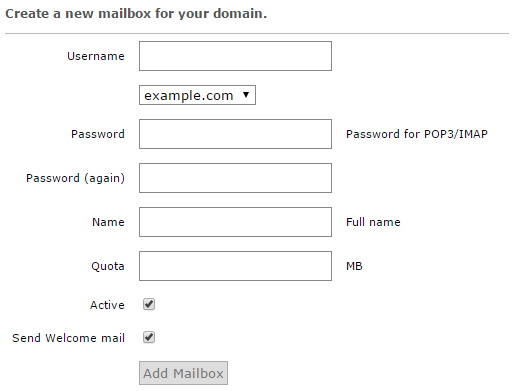
Creating a new mailbox in Postfix Admin
10 – Create a System User To Handle Virtual Mail Directories
Virtual users are those that don’t technically exist on your Linux server, and they don’t use the standard Linux methods for authentication or mail delivery and storage. Your mail server virtual user accounts are defined within the database created by Postfix Admin rather than existing as system user accounts. So we have to create a single system user account that will handle services like mail storage and Dovecot authentication.
First, let’s create a system user account called vmail and give it permissions to the required directories. This system account will be responsible for the backend operations for mailbox storage and services.
useradd -r -u 150 -g mail -d /var/vmail -s /sbin/nologin -c "Virtual MailDir Handler" vmail
mkdir -p /var/vmail
chown vmail:mail /var/vmail
chmod 770 /var/vmail
An explanation of the above commands:
- We created the system user account
vmail, assigned the home directory as/var/vmail, and restricted the ability for this account to login via shell or console. - We then manually created the home directory
/var/vmailfor the new system user account. - We then set the owner and group for the
/var/vmaildirectory. - We then gave full permissions to the system user
vmailand the security groupmailassigned to the directory/var/vmail.
11 – Configuring Dovecot
Dovecot is an open-source IMAP and POP3 email server written with security in mind. Dovecot has many built-in features, which you can view at their public website, http://www.dovecot.org.
Dovecot will be responsible for managing the IMAP and POP3 connections, managing local mail directories, and receiving the incoming mail handed off from the Postfix SMTP mail server process. Dovecot will also manage the authentication for SMTP connections. Many different files within the /etc/dovecot directory handle Dovecot configuration.
First, let’s configure Dovecot to use the database set up by Postfix Admin. We will first edit the configuration file /etc/dovecot/conf.d/auth-sql.conf.ext
nano /etc/dovecot/conf.d/auth-sql.conf.ext
Edit or update the contents to have the following configuration.
# Look up user passwords from a SQL database as
# defined in /etc/dovecot/dovecot-sql.conf.ext
passdb {
  driver = sql
  args = /etc/dovecot/dovecot-sql.conf.ext
}
# Look up user information from a SQL database as
# defined in /etc/dovecot/dovecot-sql.conf.ext
userdb {
  driver = sql
  args = /etc/dovecot/dovecot-sql.conf.ext
}
Once done, save and exit the configuration file.
SQL Configuration File
Now we are going to back up the original SQL configuration file /etc/dovecot/dovecot-sql.conf.ext and create a new configuration file for Dovecot to use.
mv /etc/dovecot/dovecot-sql.conf.ext /etc/dovecot/dovecot-sql.conf.ext.original
nano /etc/dovecot/dovecot-sql.conf.ext
Now copy the below content into the configuration file and update the values for the mail database you set up in Step 7.
# Database driver: mysql, pgsql, sqlite
driver = mysql

# Database Connection:
#   connect = host=192.168.1.1 dbname=users
#   connect = host=sql.example.com dbname=virtual user=virtual password=blarg
#   connect = /etc/dovecot/authdb.sqlite
#
connect = host=localhost dbname=mail user=mail password=<your secure password>

# Default password scheme.
#
# List of supported schemes is in
# http://wiki2.dovecot.org/Authentication/PasswordSchemes
#
# Weak but common encryption scheme:
default_pass_scheme = MD5-CRYPT
#
# Comment the above out and uncomment below
# for stronger encryption:
#default_pass_scheme - SHA256-CRYPT


# Define the query to obtain a user password.
password_query = \
  SELECT username as user, password, '/var/vmail/%d/%n' as userdb_home, \
  'maildir:/var/vmail/%d/%n' as userdb_mail, 150 as userdb_uid, 8 as userdb_gid \
  FROM mailbox WHERE username = '%u' AND active = '1'

# Define the query to obtain user information.
user_query = \
  SELECT '/var/vmail/%d/%n' as home, 'maildir:/var/vmail/%d/%n' as mail, \
  150 AS uid, 8 AS gid, concat('dirsize:storage=', quota) AS quota \
  FROM mailbox WHERE username = '%u' AND active = '1'
Once done, save and exit this configuration file.
Authentication Definition File
We are now going to back up the authentication definition file /etc/dovecot/conf.d/10-auth.conf and create a new one.
mv /etc/dovecot/conf.d/10-auth.conf /etc/dovecot/conf.d/10-auth.conf.original
nano /etc/dovecot/conf.d/10-auth.conf
Now copy the below content into the definition file.
# Disable LOGIN command and all other plaintext authentications unless
# SSL/TLS is used (LOGINDISABLED capability). Note that if the remote IP
# matches the local IP (ie. you're connecting from the same computer), the
# connection is considered secure and plaintext authentication is allowed.
disable_plaintext_auth = yes

# Space separated list of wanted authentication mechanisms:
#   plain login digest-md5 cram-md5 ntlm rpa apop anonymous gssapi otp skey
#   gss-spnego
# NOTE: See also disable_plaintext_auth setting.
auth_mechanisms = plain login

##
## Password and user databases
##

#
# Password database is used to verify user's password (and nothing more).
# You can have multiple passdbs and userdbs. This is useful if you want to
# allow both system users (/etc/passwd) and virtual users to login without
# duplicating the system users into virtual database.
#
# <doc/wiki/PasswordDatabase.txt>
#
# User database specifies where mails are located and what user/group IDs
# own them. For single-UID configuration use "static" userdb.
#
# <doc/wiki/UserDatabase.txt>

# Use the SQL database configuration rather than any of the others.
!include auth-sql.conf.ext
Once done, save and exit the file.
Mail Definition File
Next, we are going to tell Dovecot where to store the virtual users’ mail. We will be backing up the mail definition file /etc/dovecot/conf.d/10-mail.conf and creating a new one.
mv /etc/dovecot/conf.d/10-mail.conf /etc/dovecot/conf.d/10-mail.conf.original
nano /etc/dovecot/conf.d/10-mail.conf
Now copy the below content into the definition file.
# Location for users' mailboxes. The default is empty, which means that Dovecot
# tries to find the mailboxes automatically. This won't work if the user
# doesn't yet have any mail, so you should explicitly tell Dovecot the full
# location.
#
# If you're using mbox, giving a path to the INBOX file (eg. /var/mail/%u)
# isn't enough. You'll also need to tell Dovecot where the other mailboxes are
# kept. This is called the "root mail directory", and it must be the first
# path given in the mail_location setting.
#
# There are a few special variables you can use, eg.:
#
#   %u - username
#   %n - user part in user@domain, same as %u if there's no domain
#   %d - domain part in user@domain, empty if there's no domain
#   %h - home directory
#
# See doc/wiki/Variables.txt for full list. Some examples:
#
#   mail_location = maildir:~/Maildir
#   mail_location = mbox:~/mail:INBOX=/var/mail/%u
#   mail_location = mbox:/var/mail/%d/%1n/%n:INDEX=/var/indexes/%d/%1n/%n
#
# <doc/wiki/MailLocation.txt>
#
mail_location = maildir:/var/vmail/%d/%n

# System user and group used to access mails. If you use multiple, userdb
# can override these by returning uid or gid fields. You can use either numbers
# or names. <doc/wiki/UserIds.txt>
mail_uid = vmail
mail_gid = mail

# Valid UID range for users, defaults to 500 and above. This is mostly
# to make sure that users can't log in as daemons or other system users.
# Note that denying root logins is hardcoded to dovecot binary and can't
# be done even if first_valid_uid is set to 0.
#
# Use the vmail user uid here.
first_valid_uid = 150
last_valid_uid = 150

# If you need to set multiple mailbox locations or want to change default
# namespace settings, you can do it by defining namespace sections.
#
# You can have private, shared and public namespaces. Private namespaces
# are for user's personal mails. Shared namespaces are for accessing other
# users' mailboxes that have been shared. Public namespaces are for shared
# mailboxes that are managed by sysadmin. If you create any shared or public
# namespaces you'll typically want to enable ACL plugin also, otherwise all
# users can access all the shared mailboxes, assuming they have permissions
# on filesystem level to do so.
namespace inbox {
  # Namespace type: private, shared or public
  #type = private

  # Hierarchy separator to use. You should use the same separator for all
  # namespaces or some clients get confused. '/' is usually a good one.
  # The default however depends on the underlying mail storage format.
  #separator =

  # Prefix required to access this namespace. This needs to be different for
  # all namespaces. For example "Public/".
  #prefix =

  # Physical location of the mailbox. This is in same format as
  # mail_location, which is also the default for it.
  #location =

  # There can be only one INBOX, and this setting defines which namespace
  # has it.
  inbox = yes

  # If namespace is hidden, it's not advertised to clients via NAMESPACE
  # extension. You'll most likely also want to set list=no. This is mostly
  # useful when converting from another server with different namespaces which
  # you want to deprecate but still keep working. For example you can create
  # hidden namespaces with prefixes "~/mail/", "~%u/mail/" and "mail/".
  #hidden = no

  # Show the mailboxes under this namespace with LIST command. This makes the
  # namespace visible for clients that don't support NAMESPACE extension.
  # "children" value lists child mailboxes, but hides the namespace prefix.
  #list = yes

  # Namespace handles its own subscriptions. If set to "no", the parent
  # namespace handles them (empty prefix should always have this as "yes")
  #subscriptions = yes
}
Once done, save and exit the file.
SSL Definition File
If you have an SSL certificate that you would like to install, you will need to modify the Dovecot SSL definition file /etc/dovecot/conf.d/10-ssl.conf with your valid certificate. Remember, you will have to also include your CA certificate bundle if one has been provided by the certificate issuer.
Dovecot Master Definition File
We are now going to update the Dovecot master definition file /etc/dovecot/10-master.conf to include the system user account and the postfix settings.
nano /etc/dovecot/conf.d/10-master.conf
Search for the config definition service auth and replace the definition block with the following.
service auth {
  # auth_socket_path points to this userdb socket by default. It's typically
  # used by dovecot-lda, doveadm, possibly imap process, etc. Users that have
  # full permissions to this socket are able to get a list of all usernames and
  # get the results of everyone's userdb lookups.
  #
  # The default 0666 mode allows anyone to connect to the socket, but the
  # userdb lookups will succeed only if the userdb returns an "uid" field that
  # matches the caller process's UID. Also if caller's uid or gid matches the
  # socket's uid or gid the lookup succeeds. Anything else causes a failure.
  #
  # To give the caller full permissions to lookup all users, set the mode to
  # something else than 0666 and Dovecot lets the kernel enforce the
  # permissions (e.g. 0777 allows everyone full permissions).
  unix_listener auth-userdb {
    mode = 0600
    user = vmail
    group = mail
  }

  # Postfix smtp-auth
  unix_listener /var/spool/postfix/private/auth {
    mode = 0660
    # Assuming the default Postfix userid and groupid
    user = postfix
    group = postfix
  }

}
Once done, save and exit the file.
LDA Definition File
In some cases, you may have to explicitly define the postmaster email address for your server. To do this, you will need to edit the LDA definition file /etc/dovecot/conf.d/15-lda.conf. If you see errors messages like Invalid settings: postmaster_address setting not given showing up in the mail server logs, then this configuration change is the likely fix for that error.
nano /etc/dovecot/conf.d/15-lda.conf
Search for the definition postmaster_address and update the value to include your domain’s postmaster account.
# Address to use when sending rejection mails.
# Default is postmaster@<your domain>. %d expands to recipient domain.
#postmaster_address =
postmaster_address = postmaster@example.tld
Once done, save and exit the file.
We now need to update the Dovecot configuration directory to be accessible to the Dovecot service account as well as the vmail system account.
chown -R vmail:dovecot /etc/dovecot
chmod -R o-rwx /etc/dovecot
You have now completed the configuration of the Dovecot service and we can now move on to the antivirus and anti-spam services.
[Back to top]
12 – Configuring Amavis, ClamAV, and SpamAssassin
What are these packages ?
– Amavis is an interface between Postfix and content filtering packages such as SpamAssassin and ClamAV.
– ClamAV is a high-performance antivirus engine for detecting trojans, viruses, malware & other malicious threats.
– SpamAssassin is a high-performance anti-spam platform famous for its Bayesian spam filtering capabilities. It gives system administrators a filter to classify messages and block unsolicited bulk email.
We will now walk you through the process of installing some protection for your mail server. For the most part, the default configurations are sufficient for a good line of defense against spam and viruses getting through your mail server. If you have special requirements, you can, of course, spend a good amount of time crafting intricate processing rules.
Let’s first create the two system user accounts, amavis and clamav, and allow them to collaborate together.
adduser clamav amavis
adduser amavis clamav
We are now going to enable the Amavis daemon by editing the /etc/amavis/conf.d/15-content_filter_mode configuration file.
nano /etc/amavis/conf.d/15-content_filter_mode
By default, the Amavis software is disabled. To enable the Amavis software, all you need to do is remove the comment tags from the bypass configuration lines.
use strict;

# You can modify this file to re-enable SPAM checking through spamassassin
# and to re-enable antivirus checking.

#
# Default antivirus checking mode
# Please note, that anti-virus checking is DISABLED by
# default.
# If You wish to enable it, please uncomment the following lines:

@bypass_virus_checks_maps = (
   %bypass_virus_checks, @bypass_virus_checks_acl, $bypass_virus_checks_re);

#
# Default SPAM checking mode
# Please note, that anti-spam checking is DISABLED by
# default.
# If You wish to enable it, please uncomment the following lines:

@bypass_spam_checks_maps = (
   %bypass_spam_checks, @bypass_spam_checks_acl, $bypass_spam_checks_re);

1;  # ensure a defined return
Once done, you can save and exit the file.
We are now going to enable the SpamAssassin software by editing the /etc/default/spamassassin configuration file.
nano /etc/default/spamassassin
First, locate the variable ENABLED=0 in the configuration file and change the value to 1.
# Change to one to enable spamd
ENABLED=1
Now search for the variable CRON=0 in the configuration file and change the value to 1.
# Cronjob
# Set to anything but 0 to enable the cron job to automatically update
# spamassassin's rules on a nightly basis
CRON=1
We are now going to set up Amavis to use the database from Postfix Admin to identify mail that is arriving for local delivery. By default, SpamAssassin and Amavis will only check mail that is determined to be arriving for local delivery. Because we are set up to use virtual user mailboxes, we have to tell the services where to locate the user accounts.
To do this, we need to update the configuration file /etc/amavis/conf.d/50-user.
nano /etc/amavis/conf.d/50-user
Replace the contents of this configuration file with the below. Be sure to update the MySQL database password to use the password for the database user “mail” that you entered in Step #7.
use strict;

#
# Place your configuration directives here.  They will override those in
# earlier files.
#
# See /usr/share/doc/amavisd-new/ for documentation and examples of
# the directives you can use in this file
#

# Three concurrent processes. This should fit into the RAM available on an
# AWS micro instance. This has to match the number of processes specified
# for Amavis in /etc/postfix/master.cf.
$max_servers  = 3;

# Add spam info headers if at or above that level - this ensures they
# are always added.
$sa_tag_level_deflt  = -9999;

# Check the database to see if mail is for local delivery, and thus
# should be spam checked.
@lookup_sql_dsn = (
    ['DBI:mysql:database=mail;host=127.0.0.1;port=3306',
     'mail',
     '<your secure password>']);
$sql_select_policy = 'SELECT domain from domain WHERE CONCAT("@",domain) IN (%k)';

# Uncomment to bump up the log level when testing.
# $log_level = 2;

#------------ Do not modify anything below this line -------------
1;  # ensure a defined return
Once done, save and exit the configuration file.
We will now need to restart the Amavis and SpamAssassin services so that they see the new configuration settings.
service amavis restart
services spamassassin restart
13 – Configuring Postfix
We are now ready to configure the Postfix mail server. Postfix handles all of the incoming and outgoing mail via the SMTP protocol, and we are going to configure it to integrate will all of the other software packages that we have just configured.
From a high level view, we are needing Postfix to hand off incoming mail to the SpamAssassin and ClamAV scanners for filtering, and then to pass unblocked mail messages on to the Dovecot services for final mailbox delivery. Postfix will also authenticate the virtual users who connect via SMTP in order to send email messages.
We are going to create a definition file for Postfix to identify users and mailboxes. Please note that the “hosts” directive in these configuration files must be exactly the same as the “bind-address” in the /etc/mysql/my.cnf configuration files.
First, let’s look up the value of the bind-address in the MySQL configuration files.
cat /etc/mysql/my.cnf | grep bind-address
<< output >>
bind-address            = 127.0.0.1
Now that we have the configuration value, we are going to create the required Postfix definition files.
Copy and paste the content for each file. Make sure to update the password value with the password for the database user “mail” that you entered in Step #7.
/etc/postfix/mysql_virtual_alias_domainaliases_maps.cf
nano /etc/postfix/mysql_virtual_alias_domainaliases_maps.cf
user = mail
password = <your secure password>
hosts = 127.0.0.1
dbname = mail
query = SELECT goto FROM alias,alias_domain WHERE alias_domain.alias_domain = '%d' AND alias.address=concat('%u', '@', alias_domain.target_domain) AND alias.active = 1
Once done, save and exit the configuration file.
/etc/postfix/mysql_virtual_alias_maps.cf
nano /etc/postfix/mysql_virtual_alias_maps.cf
user = mail
password = <your secure password>
hosts = 127.0.0.1
dbname = mail
table = alias
select_field = goto
where_field = address
additional_conditions = and active = '1'
Once done, save and exit the configuration file.
/etc/postfix/mysql_virtual_domains_maps.cf
nano /etc/postfix/mysql_virtual_domains_maps.cf
user = mail
password = <your secure password>
hosts = 127.0.0.1
dbname = mail
table = domain
select_field = domain
where_field = domain
additional_conditions = and backupmx = '0' and active = '1'
Once done, save and exit the configuration file.
/etc/postfix/mysql_virtual_mailbox_domainaliases_maps.cf
nano /etc/postfix/mysql_virtual_mailbox_domainaliases_maps.cf
user = mail
password = <your secure password>
hosts = 127.0.0.1
dbname = mail
query = SELECT maildir FROM mailbox, alias_domain
  WHERE alias_domain.alias_domain = '%d'
  AND mailbox.username=concat('%u', '@', alias_domain.target_domain )
  AND mailbox.active = 1
Once done, save and exit the configuration file.
/etc/postfix/mysql_virtual_mailbox_maps.cf
nano /etc/postfix/mysql_virtual_mailbox_maps.cf
user = mail
password = <your secure password>
hosts = 127.0.0.1
dbname = mail
table = mailbox
select_field = CONCAT(domain, '/', local_part)
where_field = username
additional_conditions = and active = '1'
Once done, save and exit the configuration file.
We are now going to create the Postfix header-checking directives. These directives remove certain headers when relaying mail through the system. This helps improve privacy for sending users by removing specific headers like origin IP Address and the mail software identifiers. Copy and paste the below content into the file.
nano /etc/postfix/header_checks
/^Received:/                 IGNORE
/^User-Agent:/               IGNORE
/^X-Mailer:/                 IGNORE
/^X-Originating-IP:/         IGNORE
/^x-cr-[a-z]*:/              IGNORE
/^Thread-Index:/             IGNORE
Once done, save and exit.
We are now ready to make some changes to the system default Postfix /etc/postfix/main.cf configuration file.
This file contains a large amount of complex choices and options for a Postfix server installation. It is far beyond the scope of this article to explain every option or best practice available, so we strongly suggest that you read through the Postfix configuration options
/usr/share/postfix/main.cf.distor the software vendor online manual. O’Reilly has also published a very good book named Postfix: The Definitive Guide.
First, we are going to create a backup of the original main.cf configuration file and then create a new copy of the file.
mv /etc/postfix/main.cf /etc/postfix/main.cf.original
nano /etc/postfix/main.cf
Now, copy the below content into the /etc/postfix/main.cf configuration file.
# See /usr/share/postfix/main.cf.dist for a commented, more complete version

# The first text sent to a connecting process.
smtpd_banner = $myhostname ESMTP $mail_name
biff = no
# appending .domain is the MUA's job.
append_dot_mydomain = no
readme_directory = no

# SASL parameters
# ---------------------------------
# Use Dovecot to authenticate.
smtpd_sasl_type = dovecot
# Referring to /var/spool/postfix/private/auth
smtpd_sasl_path = private/auth
smtpd_sasl_auth_enable = yes
broken_sasl_auth_clients = yes
smtpd_sasl_security_options = noanonymous
smtpd_sasl_local_domain =
smtpd_sasl_authenticated_header = yes

# TLS parameters
# ---------------------------------

# Replace this with your SSL certificate path if you are using one.
smtpd_tls_cert_file=/etc/ssl/certs/ssl-cert-snakeoil.pem
smtpd_tls_key_file=/etc/ssl/private/ssl-cert-snakeoil.key
# The snakeoil self-signed certificate has no need for a CA file. But
# if you are using your own SSL certificate, then you probably have
# a CA certificate bundle from your provider. The path to that goes
# here.
#smtpd_tls_CAfile=/path/to/ca/file

smtp_tls_note_starttls_offer = yes
smtpd_tls_loglevel = 1
smtpd_tls_received_header = yes
smtpd_tls_session_cache_timeout = 3600s
tls_random_source = dev:/dev/urandom
#smtpd_tls_session_cache_database = btree:${data_directory}/smtpd_scache
#smtp_tls_session_cache_database = btree:${data_directory}/smtp_scache

# Note that forcing use of TLS is going to cause breakage - most mail servers
# don't offer it and so delivery will fail, both incoming and outgoing. This is
# unfortunate given what various governmental agencies are up to these days.

# These are Postfix 2.2 only.
#
# Enable (but don't force) use of TLS on incoming smtp connections.
smtpd_use_tls = yes
smtpd_enforce_tls = no
# Enable (but don't force) use of TLS on outgoing smtp connections.
smtp_use_tls = yes
smtp_enforce_tls = no

# These are Postfix 2.3 and later.
#
# Enable (but don't force) all incoming smtp connections to use TLS.
smtpd_tls_security_level = may
# Enable (but don't force) all outgoing smtp connections to use TLS.
smtp_tls_security_level = may

# See /usr/share/doc/postfix/TLS_README.gz in the postfix-doc package for
# information on enabling SSL in the smtp client.

# SMTPD parameters
# ---------------------------------

# Uncomment the next line to generate "delayed mail" warnings
#delay_warning_time = 4h
# will it be a permanent error or temporary
unknown_local_recipient_reject_code = 450
# how long to keep message on queue before return as failed.
# some have 3 days, I have 16 days as I am backup server for some people
# whom go on holiday with their server switched off.
maximal_queue_lifetime = 7d
# max and min time in seconds between retries if connection failed
minimal_backoff_time = 1000s
maximal_backoff_time = 8000s
# how long to wait when servers connect before receiving rest of data
smtp_helo_timeout = 60s
# how many address can be used in one message.
# effective stopper to mass spammers, accidental copy in whole address list
# but may restrict intentional mail shots.
smtpd_recipient_limit = 16
# how many error before back off.
smtpd_soft_error_limit = 3
# how many max errors before blocking it.
smtpd_hard_error_limit = 12

# This next set are important for determining who can send mail and relay mail
# to other servers. It is very important to get this right - accidentally producing
# an open relay that allows unauthenticated sending of mail is a Very Bad Thing.
#
# You are encouraged to read up on what exactly each of these options accomplish.

# Requirements for the HELO statement
smtpd_helo_restrictions = permit_mynetworks, warn_if_reject reject_non_fqdn_hostname, reject_invalid_hostname, permit

# Requirements for the sender details
smtpd_sender_restrictions = permit_sasl_authenticated, permit_mynetworks, warn_if_reject reject_non_fqdn_sender, reject_unknown_sender_domain, reject_unauth_pipelining, permit
# Requirements for the connecting server
# This is primarily the RBL (Realtime Blacklist) Filtering
smtpd_client_restrictions = reject_rbl_client b.barracudacentral.org, reject_rbl_client zen.spamhaus.org, reject_rbl_client spam.dnsbl.sorbs.net
# Requirement for the recipient address. Note that the entry for
# "check_policy_service inet:127.0.0.1:10023" enables Postgrey.
smtpd_recipient_restrictions = reject_unauth_pipelining, permit_mynetworks, permit_sasl_authenticated, reject_non_fqdn_recipient, reject_unknown_recipient_domain, reject_unauth_destination, check_policy_service inet:127.0.0.1:10023, permit
smtpd_data_restrictions = reject_unauth_pipelining

# This is a new option as of Postfix 2.10+, and is required in addition to
# smtpd_recipient_restrictions for things to work properly in this setup.
smtpd_relay_restrictions = reject_unauth_pipelining, permit_mynetworks, permit_sasl_authenticated, reject_non_fqdn_recipient, reject_unknown_recipient_domain, reject_unauth_destination, check_policy_service inet:127.0.0.1:10023, permit

# require proper helo at connections
smtpd_helo_required = yes
# waste spammers time before rejecting them
smtpd_delay_reject = yes
disable_vrfy_command = yes

# General host and delivery info
# ----------------------------------

myhostname = mail.example.com
myorigin = /etc/hostname
# Some people see issues when setting mydestination explicitly to the server
# subdomain, while leaving it empty generally doesn't hurt. So it is left empty here.
# mydestination = mail.example.com, localhost
mydestination =
# If you have a separate web server that sends outgoing mail through this
# mailserver, you may want to add its IP address to the space-delimited list in
# mynetworks, e.g. as 111.222.333.444/32.
mynetworks = 127.0.0.0/8 [::ffff:127.0.0.0]/104 [::1]/128
mailbox_size_limit = 0
recipient_delimiter = +
inet_interfaces = all
mynetworks_style = host

# This specifies where the virtual mailbox folders will be located.
virtual_mailbox_base = /var/vmail
# This is for the mailbox location for each user. The domainaliases
# map allows us to make use of Postfix Admin's domain alias feature.
virtual_mailbox_maps = mysql:/etc/postfix/mysql_virtual_mailbox_maps.cf, mysql:/etc/postfix/mysql_virtual_mailbox_domainaliases_maps.cf
# and their user id
virtual_uid_maps = static:150
# and group id
virtual_gid_maps = static:8
# This is for aliases. The domainaliases map allows us to make
# use of Postfix Admin's domain alias feature.
virtual_alias_maps = mysql:/etc/postfix/mysql_virtual_alias_maps.cf, mysql:/etc/postfix/mysql_virtual_alias_domainaliases_maps.cf
# This is for domain lookups.
virtual_mailbox_domains = mysql:/etc/postfix/mysql_virtual_domains_maps.cf

# Integration with other packages
# ---------------------------------------

# Tell postfix to hand off mail to the definition for dovecot in master.cf
virtual_transport = dovecot
dovecot_destination_recipient_limit = 1

# Use amavis for virus and spam scanning
content_filter = amavis:[127.0.0.1]:10024

# Header manipulation
# --------------------------------------

# Getting rid of unwanted headers. See: https://posluns.com/guides/header-removal/
header_checks = regexp:/etc/postfix/header_checks
# getting rid of x-original-to
enable_original_recipient = no
Once done, save and exit.
We are now ready to move on to the Postfix /etc/postfix/master.cf configuration file. This configuration file also contains a large amount of complex choices and options for a Postfix server installation that is far beyond the scope of this article to explain.
We are going to create a backup of the original master.cf configuration file and then create a new file.
mv /etc/postfix/master.cf /etc/postfix/master.cf.original
nano /etc/postfix/master.cf
Now, copy the below content into the /etc/postfix/master.cf configuration file.
#
# Postfix master process configuration file.  For details on the format
# of the file, see the master(5) manual page (command: "man 5 master").
#
# Do not forget to execute "postfix reload" after editing this file.
#
# ==========================================================================
# service type  private unpriv  chroot  wakeup  maxproc command + args
#               (yes)   (yes)   (yes)   (never) (100)
# ==========================================================================

# SMTP on port 25, unencrypted.
smtp      inet  n       -       -       -       -       smtpd
#smtp      inet  n       -       -       -       1       postscreen
#smtpd     pass  -       -       -       -       -       smtpd
#dnsblog   unix  -       -       -       -       0       dnsblog
#tlsproxy  unix  -       -       -       -       0       tlsproxy

# SMTP with TLS on port 587.
submission inet n       -       -       -       -       smtpd
  -o syslog_name=postfix/submission
  -o smtpd_tls_security_level=encrypt
  -o smtpd_sasl_auth_enable=yes
  -o smtpd_enforce_tls=yes
  -o smtpd_client_restrictions=permit_sasl_authenticated,reject_unauth_destination,reject
  -o smtpd_sasl_tls_security_options=noanonymous

# SMTP over SSL on port 465.
smtps     inet  n       -       -       -       -       smtpd
  -o syslog_name=postfix/smtps
  -o smtpd_tls_wrappermode=yes
  -o smtpd_sasl_auth_enable=yes
  -o smtpd_tls_auth_only=yes
  -o smtpd_client_restrictions=permit_sasl_authenticated,reject_unauth_destination,reject
  -o smtpd_sasl_security_options=noanonymous,noplaintext
  -o smtpd_sasl_tls_security_options=noanonymous

#628       inet  n       -       -       -       -       qmqpd
pickup    fifo  n       -       -       60      1       pickup
  -o content_filter=
  -o receive_override_options=no_header_body_checks
cleanup   unix  n       -       -       -       0       cleanup
qmgr      fifo  n       -       n       300     1       qmgr
#qmgr     fifo  n       -       n       300     1       oqmgr
tlsmgr    unix  -       -       -       1000?   1       tlsmgr
rewrite   unix  -       -       -       -       -       trivial-rewrite
bounce    unix  -       -       -       -       0       bounce
defer     unix  -       -       -       -       0       bounce
trace     unix  -       -       -       -       0       bounce
verify    unix  -       -       -       -       1       verify
flush     unix  n       -       -       1000?   0       flush
proxymap  unix  -       -       n       -       -       proxymap
proxywrite unix -       -       n       -       1       proxymap
smtp      unix  -       -       -       -       -       smtp
relay     unix  -       -       -       -       -       smtp
#       -o smtp_helo_timeout=5 -o smtp_connect_timeout=5
showq     unix  n       -       -       -       -       showq
error     unix  -       -       -       -       -       error
retry     unix  -       -       -       -       -       error
discard   unix  -       -       -       -       -       discard
local     unix  -       n       n       -       -       local
virtual   unix  -       n       n       -       -       virtual
lmtp      unix  -       -       -       -       -       lmtp
anvil     unix  -       -       -       -       1       anvil
scache    unix  -       -       -       -       1       scache
#
# ====================================================================
# Interfaces to non-Postfix software. Be sure to examine the manual
# pages of the non-Postfix software to find out what options it wants.
#
# Many of the following services use the Postfix pipe(8) delivery
# agent.  See the pipe(8) man page for information about ${recipient}
# and other message envelope options.
# ====================================================================
#
# maildrop. See the Postfix MAILDROP_README file for details.
# Also specify in main.cf: maildrop_destination_recipient_limit=1
#
maildrop  unix  -       n       n       -       -       pipe
  flags=DRhu user=vmail argv=/usr/bin/maildrop -d ${recipient}
#
# ====================================================================
#
# Recent Cyrus versions can use the existing "lmtp" master.cf entry.
#
# Specify in cyrus.conf:
#   lmtp    cmd="lmtpd -a" listen="localhost:lmtp" proto=tcp4
#
# Specify in main.cf one or more of the following:
#  mailbox_transport = lmtp:inet:localhost
#  virtual_transport = lmtp:inet:localhost
#
# ====================================================================
#
# Cyrus 2.1.5 (Amos Gouaux)
# Also specify in main.cf: cyrus_destination_recipient_limit=1
#
#cyrus     unix  -       n       n       -       -       pipe
#  user=cyrus argv=/cyrus/bin/deliver -e -r ${sender} -m ${extension} ${user}
#
# ====================================================================
# Old example of delivery via Cyrus.
#
#old-cyrus unix  -       n       n       -       -       pipe
#  flags=R user=cyrus argv=/cyrus/bin/deliver -e -m ${extension} ${user}
#
# ====================================================================
#
# See the Postfix UUCP_README file for configuration details.
#
uucp      unix  -       n       n       -       -       pipe
  flags=Fqhu user=uucp argv=uux -r -n -z -a$sender - $nexthop!rmail ($recipient)
#
# Other external delivery methods.
#
ifmail    unix  -       n       n       -       -       pipe
  flags=F user=ftn argv=/usr/lib/ifmail/ifmail -r $nexthop ($recipient)
bsmtp     unix  -       n       n       -       -       pipe
  flags=Fq. user=bsmtp argv=/usr/lib/bsmtp/bsmtp -t$nexthop -f$sender $recipient
scalemail-backend unix  -       n       n       -       2       pipe
  flags=R user=scalemail argv=/usr/lib/scalemail/bin/scalemail-store ${nexthop} ${user} ${extension}
mailman   unix  -       n       n       -       -       pipe
  flags=FR user=list argv=/usr/lib/mailman/bin/postfix-to-mailman.py
  ${nexthop} ${user}

# The next two entries integrate with Amavis for anti-virus/spam checks.
amavis      unix    -       -       -       -       3       smtp
  -o smtp_data_done_timeout=1200
  -o smtp_send_xforward_command=yes
  -o disable_dns_lookups=yes
  -o max_use=20
127.0.0.1:10025 inet    n       -       -       -       -       smtpd
  -o content_filter=
  -o local_recipient_maps=
  -o relay_recipient_maps=
  -o smtpd_restriction_classes=
  -o smtpd_delay_reject=no
  -o smtpd_client_restrictions=permit_mynetworks,reject
  -o smtpd_helo_restrictions=
  -o smtpd_sender_restrictions=
  -o smtpd_recipient_restrictions=permit_mynetworks,reject
  -o smtpd_data_restrictions=reject_unauth_pipelining
  -o smtpd_end_of_data_restrictions=
  -o mynetworks=127.0.0.0/8
  -o smtpd_error_sleep_time=0
  -o smtpd_soft_error_limit=1001
  -o smtpd_hard_error_limit=1000
  -o smtpd_client_connection_count_limit=0
  -o smtpd_client_connection_rate_limit=0
  -o receive_override_options=no_header_body_checks,no_unknown_recipient_checks

# Integration with Dovecot - hand mail over to it for local delivery, and
# run the process under the vmail user and mail group.
dovecot      unix   -        n      n       -       -   pipe
  flags=DRhu user=vmail:mail argv=/usr/lib/dovecot/dovecot-lda -d $(recipient)
Once done, save and exit.
We are now ready to restart all of the mail services and test the server.
service postfix restart
service spamassassin restart
service clamav-daemon restart
service amavis restart
service dovecot restart
While testing your new mail server, make sure to watch the log files closely for any errors or unusual responses.
The mail server log files are located here:
- General Logging:
/var/log/mail.log - Error Logging:
/var/log/mail.err
14 – Reverse DNS Lookup
You will now need to set up reverse DNS lookup for your mail server.
Reverse DNS is IP-address-to-domain-name mapping – the opposite of forward (normal) DNS which maps domain names to IP addresses. Reverse DNS is mostly used by people for such things as tracking where a website visitor came from or where an email message originated, for example. Reverse DNS is also important for mail server applications. Many email servers on the Internet are configured to reject incoming emails from any IP address which does not have reverse DNS record configured.
Unless you also administer your own DNS server, you can update reverse DNS with your ISP (Internet Service Provider) or via the hosting provider of your server.
15 – Install RoundCube Webmail
Now we are going to install the RoundCube Webmail application. This application will allow your remote users to connect to their mailbox through a web browser.
apt-get install roundcube roundcube-mysql roundcube-plugins roundcube-plugins-extra
During the installation process, the system will ask you the prerequisite install questions. Note: you will need the password for the MySQL root user you set up in Step 2.
Configure database for roundcube with dbconfig-common?
  >> Select 'YES'

Database type to be used by roundcube:
 >> Select 'mysql'

Password of the database's administrative user:
 >> Enter the 'root' MySQL password that you created.

MySQL application password for roundcube:
 >> Enter a new secure password for the RoundCube application to use.
Once you are finished with the pre-installation questions, you should see the following output. Double check the output to make sure there are not errors posted during the installation process.
dbconfig-common: writing config to /etc/dbconfig-common/roundcube.conf

Creating config file /etc/dbconfig-common/roundcube.conf with new version

Creating config file /etc/roundcube/debian-db.php with new version
granting access to database roundcube for roundcube@localhost: success.
verifying access for roundcube@localhost: success.
creating database roundcube: success.
verifying database roundcube exists: success.
populating database via sql...  done.
dbconfig-common: flushing administrative password

Creating config file /etc/roundcube/main.inc.php with new version
apache2_invoke: Enable configuration roundcube.conf
 * Reloading web server apache2
 *
 * Reloading web server apache2
 *
Setting up roundcube (0.9.5-4) ...
Setting up roundcube-plugins (0.9.5-4) ...
Setting up roundcube-plugins-extra (0.9.2-20130819) ...
Processing triggers for dictionaries-common (1.20.5) ...
aspell-autobuildhash: processing: en [en-common]
aspell-autobuildhash: processing: en [en-variant_0]
aspell-autobuildhash: processing: en [en-variant_1]
aspell-autobuildhash: processing: en [en-variant_2]
aspell-autobuildhash: processing: en [en-w_accents-only]
aspell-autobuildhash: processing: en [en-wo_accents-only]
aspell-autobuildhash: processing: en [en_CA-variant_0]
aspell-autobuildhash: processing: en [en_CA-variant_1]
aspell-autobuildhash: processing: en [en_CA-w_accents-only]
aspell-autobuildhash: processing: en [en_CA-wo_accents-only]
aspell-autobuildhash: processing: en [en_GB-ise-w_accents-only]
aspell-autobuildhash: processing: en [en_GB-ise-wo_accents-only]
aspell-autobuildhash: processing: en [en_GB-ize-w_accents-only]
aspell-autobuildhash: processing: en [en_GB-ize-wo_accents-only]
aspell-autobuildhash: processing: en [en_GB-variant_0]
aspell-autobuildhash: processing: en [en_GB-variant_1]
aspell-autobuildhash: processing: en [en_US-w_accents-only]
aspell-autobuildhash: processing: en [en_US-wo_accents-only]
Setting up aspell (0.60.7~20110707-1ubuntu1) ...
Processing triggers for dictionaries-common (1.20.5) ...
Setting up aspell-en (7.1-0-1) ...
Processing triggers for libc-bin (2.19-0ubuntu6.6) ...
Processing triggers for dictionaries-common (1.20.5) ...
root@host#
Next, we need to customize some of the RoundCube configuration files. First, we are going to add the RoundCube application into our current Apache configuration files using path alias directives. The default configuration file is installed at /etc/apache2/conf-available/roundcube.conf
nano /etc/apache2/conf-available/roundcube.conf
We now need to remove the two comment flags in front of the alias directives. If you would like to use a different alias name, you can change that here as well. The default alias will use the URL http://<your-server-url>/roundcube/
    Alias /roundcube/program/js/tiny_mce/ /usr/share/tinymce/www/
    Alias /roundcube /var/lib/roundcube
Once done, save and exit the file.
Now we are going to modify the /etc/roundcube/main.inc.php configuration file. This file is where you can customize the RoundCube advanced settings.
nano /etc/roundcube/main.inc.php
Locate the following directives and update the values to match the following.
$rcmail_config['default_host'] = 'localhost';
$rcmail_config['default_port'] = 143;
$rcmail_config['smtp_server'] = 'localhost';
$rcmail_config['smtp_port'] = 25;
$rcmail_config['smtp_user'] = '%u';
$rcmail_config['smtp_pass'] = '%p';
$rcmail_config['force_https'] = true;
$rcmail_config['use_https'] = true;
Once done, save and exit the configuration file.
We are now going to enable the php5-mcrypt module in Apache. This will allow for the RoundCube webmail session to use encrypted login sessions. You will also need to restart the Apache service.
php5enmod mcrypt
service apache2 restart
You should now be able to use your new RoundCube webmail application for sending and receiving message.
Congratulations!
You have now setup a fully functional and secure mail server.
* This post is for informational purposes only and does not constitute professional, legal, financial, or technical advice. Each situation is unique and may require guidance from a qualified professional.
Readers should conduct their own due diligence before making any decisions.