Introduction
File Level Recovery, a feature included with Atlantic.Net’s Cloud Server daily backup feature, will attach a file level backup to your Cloud Sever so that you can recover individual files from the selected backup. Note that backups attached longer than 24 hours are billed at 20 cents per GB per month until they are detached through the control panel.
This guide will cover how to attach, mount, and detach your File Level Recovery backup points and assumes you are already connected to your Server via SSH or RDP.
What you will learn in this guide:
Attaching a File Level Recovery Backup
Mounting a File Level Recovery Backup
Detaching a File Level Recovery Backup
Attaching a File Level Recovery Backup
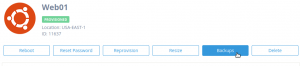
Step 1: Visit the Cloud Server Details Page in the Atlantic.Net Cloud Control Panel
In the Atlantic.Net Control Panel, click on "Servers", then click the name of the Server you wish to recover backup data from. Next click on the "Backup" option at the top of the page.
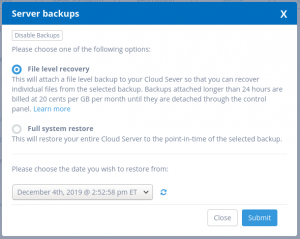
You will now be presented with the option of choosing File Level Recovery or Full System Restore. Select "File Level Recovery", choose the date of the backup you wish to attach to your server so you can recover files, then press "Submit".
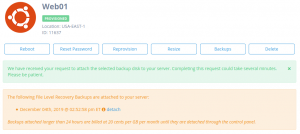
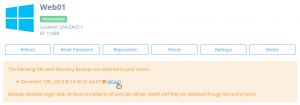
You will now see that the File Level Recovery Backup you selected is now attached to your Cloud Server in the control panel
Mounting a File Level Recovery Backup
After attaching the File Level Recovery backup in the Atlantic.Net Cloud Control Panel, follow the steps below to mount your File Level Recovery backup in your Cloud Server.
Mounting a File Level Recovery Backup in Linux
Mounting a File Level Recovery Backup in Windows
Mounting a File Level Recovery Backup in Linux
Step 1: Locate the Attached File Level Recovery Backup
The easiest way to locate your File Level Recovery Backup in your Linux Server is to run the “ls” command on the “/dev/disk/by-id/” directory. The “/dev/disk/by-id/” directory provides persistent device names based on SCSI identifiers that won’t change across reboots. All File Level Recovery Backups begin with the SCSI identifier “scsi-0AN_Recovery_” followed by a timestamp that approximates when your File Level Recovery Backup was taken.
root@Web01:~# ls /dev/disk/by-id/scsi-0AN_Recovery_*
/dev/disk/by-id/scsi-0AN_Recovery_1.2019-12-05-145246  /dev/disk/by-id/scsi-0AN_Recovery_1.2019-12-05-145246-part1
Step 2: Mount the File Level Recovery
The last step before we can begin recovering files from the File Level Recovery Backup is to mount it in a directory.
Let’s create a directory
root@Web01:~# mkdir -p /mnt/recovery
Now mount the File Recovery Backup partition in the directory using the mount command
root@Web01:~# mount /dev/disk/by-id/scsi-0AN_Recovery_1.2019-12-05-145246-part1 /mnt/recovery
We can now view our File Level Recovery Backup is mounted and ready for use
root@Web01:~# ls /mnt/recovery
bin  boot  dev  etc  home  initrd.img  initrd.img.old  lib  lib64  lost+found  media  mnt  opt  proc  recover  root  run  sbin  snap  srv  swapfile  sys  tmp  usr  var  vmlinuz  vmlinuz.old
Your volume is now ready to use.
Mounting a File Level Recovery Backup in Windows
Step 1: Open Disk Management
Windows 2008 Server:
While logged into your Cloud Server, Click on the Start Button, Administrative Tools, Computer Management, Disk Management.
Windows 2012 Server and above:
While logged into your Cloud Server, Right-click on the Windows Button and select "Disk Management"
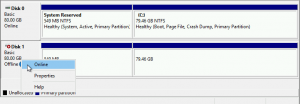
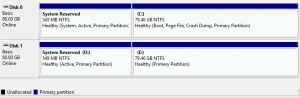
Step 3: Bring the File Level Recovery Backup online
In the lower pane, right-click all the way to the left under the disk name and select "Online".
Your File Level Recovery Backup should now display in a healthy state and be ready for your use
Detaching a File Level Recovery Backup
When you are done recovering files from your File Level Recovery Backup, you should always unmount the File Level Recovery Backup in your Cloud Server before issuing a detach request in the Atlantic.Net Cloud Control Panel.
Detaching a File Level Recovery Backup in Linux
Detaching a File Level Recovery Backup in Windows
Detaching a File Level Recovery Backup in Linux
Step 1: Unmount the File Level Recovery in Linux
First we need to determine if the File Level Recovery is mounted. To do this we will use the list block command “lsblk” with the “mountpoint” flag and the path to our File Level Recovery Backup.
Note: Remember the path to our File Level Recovery Backup is always “/dev/disk/by-id/scsi-0AN_Recovery_” followed by timestamp that approximates when your File Level Recovery Backup was taken.
root@Web01:~# lsblk -o mountpoint /dev/disk/by-id/scsi-0AN_Recovery_1.2019-12-05-145246-part1
MOUNTPOINT
/mnt/recovery
The output shows us that our File Level Recovery Backup is mounted on “/mnt/recovery”. If you don’t see anything listed under “MOUNTPOINT”, then your File Level Recovery Backup is not mounted and you can skip to Step 2 below.
Now we can unmount the Volume using the “umount” command
root@Web01:~# umount /mnt/recovery/
And we can confirm the Volume is no longer mounted by running the “lsblk” command with the “mountpoint” flag and the path to our Volume again.
root@Web01:~# lsblk -o mountpoint /dev/disk/by-id/scsi-0AN_Recovery_1.2019-12-05-145246-part1
MOUNTPOINT
You can now issue a detach command from the Atlantic.Net Control Panel
Step 2: Detach the Volume from the Cloud Server
In the Atlantic.Net Control Panel, click on "Servers", click the name of the Server you want to detach the File Level Recovery from, then click the "detach" link next to the File Level Recovery Backup you wish to detach.
Your File Level Recovery is now detached from your Cloud Server.
Detaching a File Level Recovery Backup in Windows
First we need to determine if the File Level Recovery is mounted.
Step 1: Open Disk Management
Windows 2008 Server:
Click on the Start Button, Administrative Tools, Computer Management, Disk Management.
Windows 2012 Server and above:
Right-click on the Windows Button and select "Disk Management"
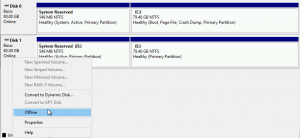
Step 2: Bring the File Level Recovery Backup Offline
Note: You can skip to Step 3 if the File Level Recovery Backup is not currently attached to the Cloud Server
In the lower pane, right-click all the way to the left under the disk name and select "Offline".
Step 3: Detach the Volume from the Cloud Server
In the Atlantic.Net Control Panel, click on "Servers", click the name of the Server you want to detach the File Level Recovery from, then click the "detach" link next to the File Level Recovery Backup you wish to detach.
Your File Level Recovery is now detached from your Cloud Server.
* This post is for informational purposes only and does not constitute professional, legal, financial, or technical advice. Each situation is unique and may require guidance from a qualified professional.
Readers should conduct their own due diligence before making any decisions.