WP-CLI is the official command-line tool used for managing WordPress. WP-CLI allows you to install and update themes, plugins and configure multisite installations without using a web browser. It can boost productivity and speed up the development process, since performing certain tasks using the command-line is much easier than using a graphical interface.
WP-CLI allows you to perform commands that are not supported through the standard WordPress back-end. One of the most important benefits of WP-CLI is its efficiency; for a multi-site environment, you don’t need to log in to each account to take care of basic tasks.
In this tutorial, we will show you how to install and use WP-CLI to manage WordPress.
Install WP-CLI
By default, WP-CLI is not available in the Ubuntu default repository, so you will need to download it from their website. You can download it with the following command:
wget https://raw.githubusercontent.com/wp-cli/builds/gh-pages/phar/wp-cli.phar
Once the download is completed, move the downloaded file to the /usr/bin directory:
mv wp-cli.phar /usr/bin/wpcli
Next, provide execution permission with the following command:
chmod +x /usr/bin/wpcli
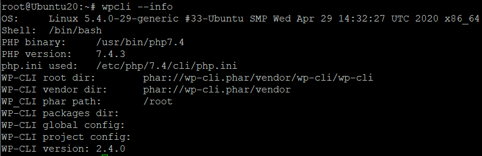
Next, verify the WP-CLI installation using the following command:
wpcli --info
You should get the following output:
Manage Plugins with WP-CLI
WP-CLI allows you to search, install, and activate the WordPress plugins as per your need.
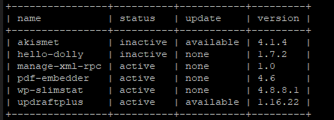
To list the installed WordPress plugins, run the wp-cli command as a www-data user inside the WordPress document root directory:
cd /var/www/html/
sudo -u www-data wpcli plugin list
You should get something similar to the following output:
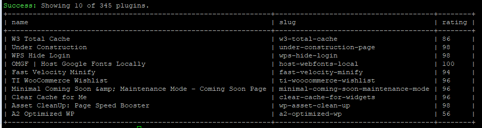
If you want to install caching plugin, first search for the plugin with the following command:
sudo -u www-data wpcli plugin search w3-total-cache
You should see the following list:
Now, install the w3-total-cache plugin from the above list using the following command:
sudo -u www-data wpcli plugin install w3-total-cache
You should get the following output:
![]()
Next, activate the installed plugin with the following command:
sudo -u www-data wpcli plugin activate w3-total-cache
You should see the following output:
![]()
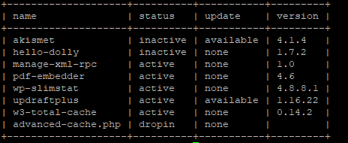
Now, verify the installed plugins with the following command:
sudo -u www-data wpcli plugin list
You should get the following list:
Manage Themes with WP-CLI
You can also search for, install, and activate a WordPress theme using the WP-CLI.
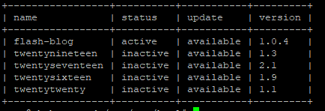
First, list the installed WordPress themes in your system using the following command:
sudo -u www-data wpcli theme list
You should get the following output:
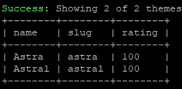
Next, search your for desired theme with the following command:
sudo -u www-data wpcli theme search astra
You should get the following list:
Now, install the theme from the above list using the following command:
sudo -u www-data wpcli theme install astra
Once installed, you should get the following output:
Installing Astra (2.4.5)
Downloading installation package from https://downloads.wordpress.org/theme/astra.2.4.5.zip...
Unpacking the package...
Installing the theme...
Theme installed successfully.
Success: Installed 1 of 1 themes.
Now, activate the installed theme using the following command:
sudo -u www-data wpcli theme activate astra
You should see the following output:
Success: Switched to 'Astra' theme.
Manage Post With WP-CLI
You can also create, edit and manage WordPress posts with WP-CLI.
List all posts in your system using the following command:
sudo -u www-data wpcli post list
You should see the following list:
+----+--------------+-------------+---------------------+-------------+
| ID | post_title | post_name | post_date | post_status |
+----+--------------+-------------+---------------------+-------------+
| 1 | Hello world! | hello-world | 2020-06-21 05:01:58 | publish |
+----+--------------+-------------+---------------------+-------------+
Next, create and publish a new post with title “Install Django Ubuntu 20.04” using the following command:
sudo -u www-data wpcli post create --post_status=publish --post_title="Install Django Ubuntu
20.04" --edit
This will open the vim editor. Add the following contents:
In this tutorial, we will learn how to install Django on an Ubuntu 20.04 server.
Save and close the vim editor when you are finished.
You can now verify your newly created post using the following command:
sudo -u www-data wpcli post list
You should get the following output:
+----+-----------------------------+-----------------------------+---------------------+-------------+
| ID | post_title | post_name | post_date | post_status |
+----+-----------------------------+-----------------------------+---------------------+-------------+
| 5 | Install Django Ubuntu 20.04 | install-django-ubuntu-20-04 | 2020-06-21 05:31:36 | publish |
| 1 | Hello world! | hello-world | 2020-06-21 05:01:58 | publish |
+----+-----------------------------+-----------------------------+---------------------+-------------+
Manage Database with WP-CLI
You can also manage the WordPress database with WP-CLI.
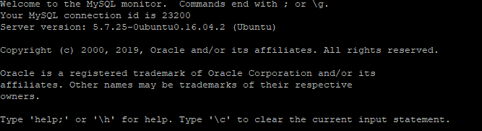
You can connect to the WordPress database using the following command:
sudo -u www-data wpcli db cli
You should see the following output:
Now, exit from the database with the following command:
MariaDB [wordpress]> EXIT
You can also query about your users using the following command:
sudo -u www-data wpcli db query "SELECT user_login,ID FROM wp_users;"
You should get the following output:
+------------+----+
| user_login | ID |
+------------+----+
| admin | 1 |
+------------+----+
Update WordPress with WP-CLI
If you want to update your WordPress installation, run the following command:
sudo -u www-data wpcli core update
You should see the following output:
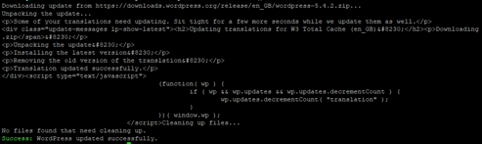
To update your WordPress database, run the following command:
sudo -u www-data wpcli core update-db
You should see the following output:
![]()
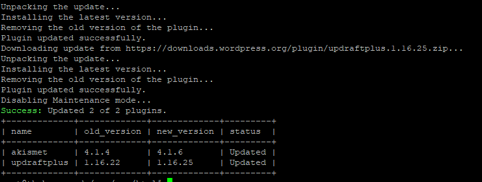
To update all plugins, run the following command:
sudo -u www-data wpcli plugin update --all
You should see the following output:
Conclusion
In this guide, you learned how to manage WordPress with WP-CLI. WP-CLI is a very useful tool that makes WordPress administration much easier. See if it helps you to perform your day-to-day WordPress administration tasks on your VPS Hosted WordPress installation from Atlantic.Net.