Atlantic.Net’s Cloud Portal includes a DNS management module that enables you to manage DNS records for your domains. DNS records tell people where your domain is hosted so they can reach it by name instead of just by server IP. This tutorial will show you how to manage these settings in the Atlantic.Net Cloud Portal.
Pre-Setup
First, we will want to make sure you have a domain to add to the DNS Manager. Domains can be purchased from domain registrars such as GoDaddy or Network Solutions, and they will also control which name servers can use your domain. In this case, the cloud name servers you want to point your domain to are:
-
ns1.quickroutedns.com
-
ns2.quickroutedns.com
-
ns3.quickroutedns.com
To change the name servers for your GoDaddy account, you can see their guide here.
To change the name servers for your Network Solutions account, you can see their guide here.
Once your name servers have been changed to the cloud, we can add the DNS records to the cloud name servers. Start by logging into the Atlantic.Net Cloud Portal.
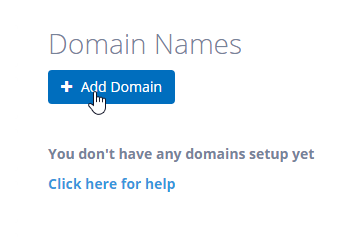
On the Domain Names page, click on ‘Add Domain’ to get started adding your domain.
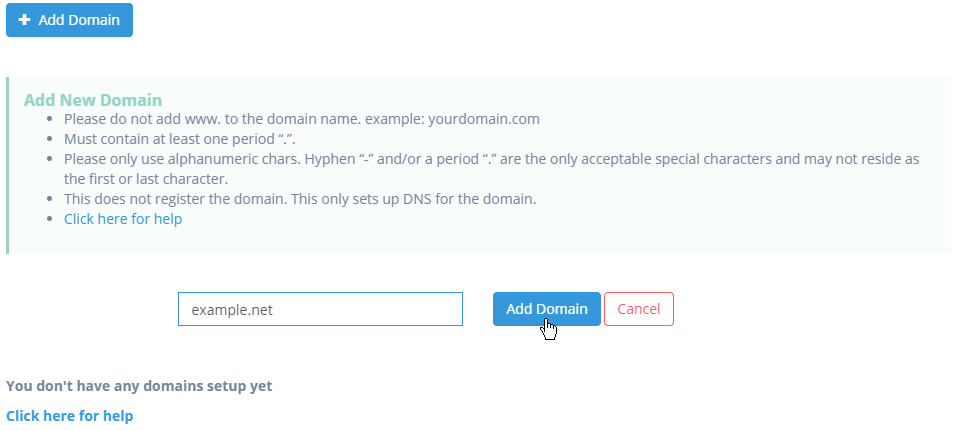
As seen in the below image, a new entry field will appear. Enter in your domain name (in this example, example.net). Note: Only add the top-level domain name here. For example, you would enter in example.net, not www.example.net.
After adding your domain, you will get a popup that says ‘Domain created successfully!‘ like the picture below.

After hitting ‘OK’ on the popup, you will go back to the Domain Names page with a list of your domains. There are buttons next to each labeled ‘Manage‘ and ‘Delete.’ ‘Delete‘ will delete the domain and all associated DNS records from the system, and’ Manage‘ will take you to the management page for that domain.
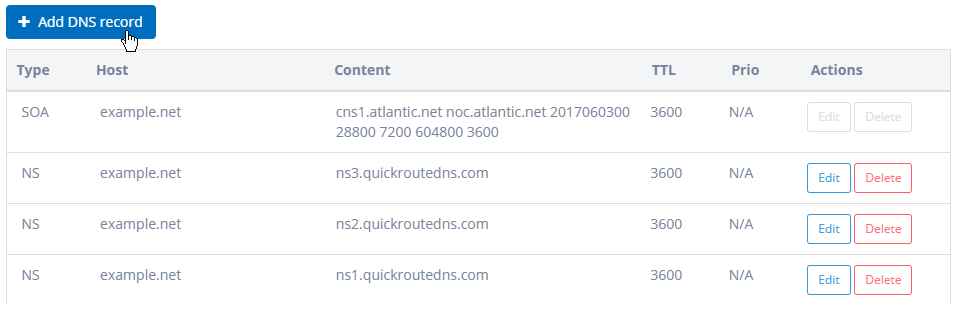
This makes the DNS zone where all records are kept for that particular domain. However, our site isn’t accessible yet. To point people to our site appropriately, we’ll need to add DNS records in the DNS zone.
Common DNS Setups
Basic Website
For a basic website, we’ll be setting up two A records for your website. The two most common ways people access a website are example.net and www.example.net. We will need to add an A record for each one of these. We have to do this so anyone can access the site with or without the www.
- Log in to https://cloud.atlantic.net/.
- Click on ‘DNS.’
- Click on ‘Manage.’

- Click ‘Add DNS Record‘ to add a new record.
 This page contains pre-made records. Do not change any of these records.
- In the Type column, choose ‘A/AAAA‘.
- Leave the Host field empty.
- In the Content column, enter your server IP address.
- Click ‘Add’.

The record is successfully added when you see the following popup:
We’ll be doing the same thing for your ‘www‘ record.
- Click on ‘Add DNS Record.’
- Choose in the Type column, choose ‘A/AAAA’.
- In the Host field, type ‘www.’
- In the Content field, enter your server IP address.
- Click ‘Add‘.
You’ve successfully added records for your website.
Note: The records may take a few minutes to make their way to the rest of the world or propagate. While our side knows the records were added, those records then have to propagate to all other name servers that any other computer is using. This process can take up to 72 hours to complete globally but is usually done locally within 5-15 minutes. We can test our newly created record by either going to the site or checking a DNS propagation tool such as WhatsMyDNS.
WhatsMyDNS checks an array of name servers across the globe for the requested record. While some may not pop up yet, give it some time, and the same IP should come up across all name servers. It can check a variety of records which we’ll cover in this guide.
Mail Server
Setting up a mail server will require one A record, an MX record, an SPF record, and a PTR record. The MX record will tell other computers where to send mail being sent to your domain. The SPF record is used for the security of your emails and domain.
- Click on ‘DNS.’
- Next to your domain, click ‘Manage.’
- Click on ‘Add DNS Record.’
- In the Type column, choose ‘A/AAAA‘.
- In the Host column, enter ‘mail.’
- In the Content column, enter your server IP address.
- Click ‘Add‘.

To add an MX record:
- Click on ‘Add DNS Record.’
- In the Type column, choose ‘MX.’
- In the Host column, enter ‘@.’
- In the Content column, enter the host field of the A record you just added.

To add an SPF record:
- Generate an SPF record from spfwizard net.
- Click on ‘Add DNS Record.’
- In the Type column, choose ‘TXT.’
- In the Host column, enter ‘mail.’
- In the Content column, enter the contents of your generated SPF record.
- Click ‘Add‘.
 Make sure to include the quotation marks provided with your output.
The PTR record, also known as a pointer record, works in reverse to the A record. Instead of pointing a domain to an IP, it points an IP to a domain. Because of this, a PTR will need to be set up on the ISP side to get the IP pointed to the domain when requested. To add a PTR record:
- On the left-hand side of the cloud control panel, click on ‘Server PTRs.’
- Locate the IP address you need to set up a PTR for.
- In the Points To section, enter your mail domain name.
- Click ‘Save Changes.’


You have successfully added your PTR record. To check if the PTR was added successfully, you can go directly to the server IP in a browser, and it should redirect to the domain immediately.
Note: Atlantic.net’s cloud control panel can only control the IPs that Atlantic.Net controls.
You’ve successfully added DNS records for your mail server.
Advanced DNS Guide
While most DNS records are relatively straightforward with entering something in the ‘Host’ field and something else in the ‘Content’ field, others require a bit more definition before using it. If you want to know about DNS regarding site security or have questions about the other records available, we’ll talk about those here. These are all extraneous records that aren’t necessary to keep a site up and running.
The SRV Record
The SRV record, also known as a Service record, is used to specify the hostname and port of an application or program running on a server. This is a more complicated setup and is only usually required by a handful of services such as SIP (Session Initiation Protocol) for VoIP services or any service that requires indication specifically through DNS prior to opening a communication channel.
- Click on ‘DNS.’
- Next to your domain, click ‘Manage.’
- Click on ‘Add DNS Record.’
- In the Type column, choose ‘A/AAAA‘.
- In the Host column, enter your server name.
- In the Content column, enter your server IP address.
- Click ‘Add‘.
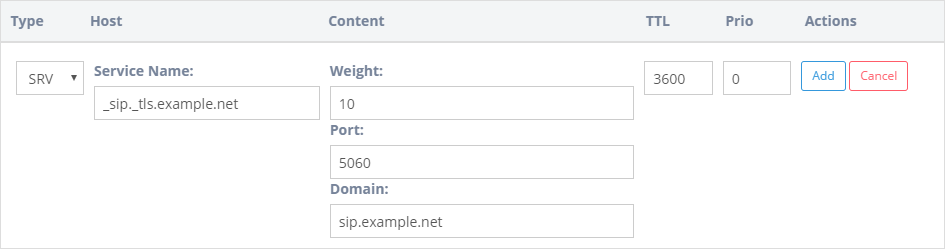
 To add the SRV record:
- Click on ‘Add DNS Record.’
- In the Type column, choose ‘SRV.’
- In the Service Name field, enter your service in the correct syntax: _service._proto.name
- In the Weight field, enter 10 (modify as needed).
- In the Port field, enter the port listening for that service.
- In the Domain field, enter the A record you just entered.
- Click ‘Add‘.
 Remember, the SRV record requires an A/AAAA record to be attached to, and you will need to add that record first for the SRV record to work.
You have successfully added your SRV record.
The DKIM Record
The DKIM record, more commonly known as a domain key, is another form of TXT record used to verify the sender of emails. Domain keys use an encryption method embedded into each email that should be sent only by the authorized server to authenticate with the DKIM record. It’s essentially a check and balance system for all emails that say they belong to a domain.
- Create a private key, a public key, and a text entry for the host field at dkimcore org.
- Configure your local mail server to use the provided private key.
- Click ‘Add DNS Record.’
- In the Type field, choose ‘TXT.’
- In the Host field, enter the previously provided text entry for the host field.
- In the Content field, enter the previously provided public key in Bind9 format.
- Click ‘Add‘.
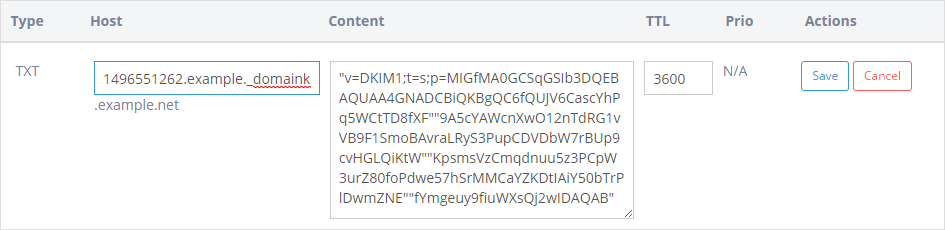 You can expand the ‘Content’ field by clicking and dragging on the two lines in the bottom right-hand corner of the field.
You have successfully added a DKIM record.
Note: Once the DKIM record is added, you can confirm the record’s validity by using an online tool such as keycheck.
The DMARC Record
DMARC records are for email as well with an extra feature; DMARC is also a reporting record. DMARC will tell a mail server what to do when an email is blocked or rejected. This can include notifying the authenticated sender so they can look further into possible abuse of their domain.
- Create a DMARC record from https://dmarcian.com/dmarc-inspector/
- Click ‘Add DNS Record.’
- In the Type column, choose ‘TXT.’
- In the Host column, enter ‘_dmarc.’
- In the Content column, enter the content of your generated DMARC record.
- Click ‘Add‘.

Note: DMARC will only report based on the settings you chose in the questionnaire when creating the record. The same link provides a DMARC inspector where you can enter your domain to check your DMARC record, along with a breakdown of each section of that record.
Troubleshooting
Online Tools
Many online sources can help determine whether DNS records are set up correctly, most notably WhatsMyDNS noted earlier in this how-to. Using WhatsMyDNS, you can check each record listed here. The only thing to note would be that WhatsMyDNS does not differentiate the TXT records (SPF, DKIM, and DMARC), and it will only provide the output for those records, not whether or not they are working as needed.
MXToolbox is another resource that will help in checking DNS records, mainly MX records. They also provide other services, including blacklist checks against a long list of blacklists, SMTP Diagnostics (some email providers require strict SMTP settings, including some DNS settings), and a Domain Health Report, which can determine what can be done to improve DNS configuration.
Proprietary System Tools
Another convenient tool is the default DNS tools that come with most operating systems. Windows comes with the ‘nslookup’ command, which can perform DNS queries directly from your system, and Linux systems also have the ‘dig’ command, which allows for similar requests. You can find a guide on using ‘nslookup’ here and one for ‘dig’ here.
NS Records Not Set to Atlantic.Net’s Cloud DNS Servers
When adding records, you may also come across the following message in the DNS Manager:
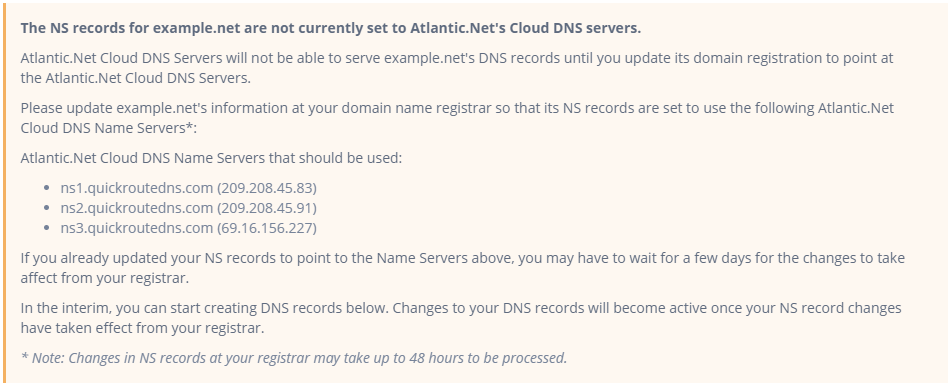
This error is pretty straightforward. As mentioned earlier, for any record (except PTR) placed in the DNS Manager to work, you will need to set the nameservers for your domain to the cloud name servers in your domain registrar’s setting. Otherwise, our cloud name servers will not be the authoritative name servers for your domain and can’t respond to DNS queries unless specified. If you still see this message in your DNS Manager after you’ve changed the settings at your registrar, be patient, as changes at registrars may also take time to propagate.
Should you have any trouble with the cloud DNS Manager, you can contact our technical support at any time via email at [email protected], phone at 1-800-540-4686 option 2, or LiveChat anywhere on the site.
Learn more about our VPS hosting services and VPS hosting price.