ArangoDB is a free, open-source, and native graph database system developed by ArangoDB Inc. It is a multi-model database system that natively supports graphs, documents, and searches. Compared to other NoSQL databases, ArangoDB stores data as documents, key/value pairs, or graphs. It uses a declarative query language called AQL (ArangoDB Query Language). ArangoDB provides both a command line interface and a web-based interface.
In this post, we will show you how to install and use ArangoDB on Oracle Linux 8.
Step 1 – Install ArangoDB
By default, the ArangoDB package is not included in the Oracle Linux default repo, so you will need to create a repo for it. You can download the ArangoDB repo using the following command:
cd /etc/yum.repos.d/
curl -OL https://download.arangodb.com/arangodb35/RPM/arangodb.repo
Next, install the ArangoDB with the following commands:
dnf update -y
dnf install arangodb3-3.5.0 -y
After the successful installation, you can verify the ArangoDB version using the following command:
arangodb --version
You should see the following output:
Version 0.14.12, build bbe2973
Step 2 – Secure ArangoDB Installation
Next, you will need to run the arango-secure-installation script to set the root password for ArangoDB. You can run it with the following command:
arango-secure-installation
You should see the following output:
Please enter password for root user:
Repeat password:
2022-08-23T07:25:09Z [10283] INFO [a1c60] {syscall} file-descriptors (nofiles) hard limit is 262144, soft limit is 262144
2022-08-23T07:25:10Z [10283] INFO [95cab] Password changed.
2022-08-23T07:25:10Z [10283] INFO [7da27] {startup} server will now shut down due to upgrade, database initialization or admin restoration.
Step 3 – Manage ArangoDB Service
By default, the ArangoDB service is managed by systemd. You can manage it easily using the systemctl command.
To start the ArangoDB service, run the following command:
systemctl start arangodb3
To enable the ArangoDB service to start at system reboot, run the following command:
systemctl enable arangodb3
You can verify the status of the ArangoDB using the following command:
systemctl status arangodb3
You should get the following output:
● arangodb3.service - ArangoDB database server
   Loaded: loaded (/etc/systemd/system/arangodb3.service; disabled; vendor preset: disabled)
   Active: active (running) since Tue 2022-08-23 03:25:23 EDT; 7s ago
  Process: 10424 ExecStartPre=/bin/chmod 700 /var/lib/arangodb3-apps (code=exited, status=0/SUCCESS)
  Process: 10422 ExecStartPre=/bin/chown -R arangodb:arangodb /var/lib/arangodb3-apps (code=exited, status=0/SUCCESS)
  Process: 10420 ExecStartPre=/bin/chmod 700 /var/lib/arangodb3 (code=exited, status=0/SUCCESS)
  Process: 10417 ExecStartPre=/bin/chown -R arangodb:arangodb /var/lib/arangodb3 (code=exited, status=0/SUCCESS)
  Process: 10416 ExecStartPre=/bin/chmod 700 /var/log/arangodb3 (code=exited, status=0/SUCCESS)
  Process: 10414 ExecStartPre=/bin/chown -R arangodb:arangodb /var/log/arangodb3 (code=exited, status=0/SUCCESS)
  Process: 10412 ExecStartPre=/usr/bin/install -g arangodb -o arangodb -d /var/run/arangodb3 (code=exited, status=0/SUCCESS)
  Process: 10410 ExecStartPre=/usr/bin/install -g arangodb -o arangodb -d /var/tmp/arangodb3 (code=exited, status=0/SUCCESS)
 Main PID: 10426 (arangod)
    Tasks: 24 (limit: 131072)
   Memory: 251.9M
   CGroup: /system.slice/arangodb3.service
           └─10426 /usr/sbin/arangod --pid-file /var/run/arangodb3/arangod.pid --temp.path /var/tmp/arangodb3 --log.foreground-tty true

Aug 23 03:25:23 oraclelinux8 arangod[10426]: 2022-08-23T07:25:23Z [10426] WARNING [e8b68] {memory} /sys/kernel/mm/transparent_hugepage/enable>
Aug 23 03:25:23 oraclelinux8 arangod[10426]: 2022-08-23T07:25:23Z [10426] WARNING [f3108] {memory} execute 'sudo bash -c "echo madvise > /sys>
Aug 23 03:25:23 oraclelinux8 arangod[10426]: 2022-08-23T07:25:23Z [10426] WARNING [f3108] {memory} execute 'sudo bash -c "echo madvise > /sys>
Aug 23 03:25:24 oraclelinux8 arangod[10426]: 2022-08-23T07:25:24Z [10426] INFO [43396] {authentication} Jwt secret not specified, generating.>
Aug 23 03:25:24 oraclelinux8 arangod[10426]: 2022-08-23T07:25:24Z [10426] INFO [144fe] using storage engine rocksdb
Aug 23 03:25:24 oraclelinux8 arangod[10426]: 2022-08-23T07:25:24Z [10426] INFO [3bb7d] {cluster} Starting up with role SINGLE
Aug 23 03:25:24 oraclelinux8 arangod[10426]: 2022-08-23T07:25:24Z [10426] INFO [a1c60] {syscall} file-descriptors (nofiles) hard limit is 131>
Aug 23 03:25:24 oraclelinux8 arangod[10426]: 2022-08-23T07:25:24Z [10426] INFO [3844e] {authentication} Authentication is turned on (system o>
Aug 23 03:25:24 oraclelinux8 arangod[10426]: 2022-08-23T07:25:24Z [10426] INFO [6ea38] using endpoint 'http+tcp://127.0.0.1:8529' for non-enc>
Aug 23 03:25:24 oraclelinux8 arangod[10426]: 2022-08-23T07:25:24Z [10426] INFO [cf3f4] ArangoDB (version 3.5.0 [linux]) is ready for business>
lines 1-27/27 (END)
Step 4 – How to Use ArangoDB
ArangoDB provides a command line utility called arangosh to manage the ArangoDB via the command line.
To connect to the ArangoDB shell, run the following command:
arangosh
You will be asked to provide your root password to connect to the ArangoDB shell as shown below:
Please specify a password:

                                       _
  __ _ _ __ __ _ _ __   __ _  ___  ___| |__
 / _` | '__/ _` | '_ \ / _` |/ _ \/ __| '_ \
| (_| | | | (_| | | | | (_| | (_) \__ \ | | |
 \__,_|_|  \__,_|_| |_|\__, |\___/|___/_| |_|
                       |___/

arangosh (ArangoDB 3.5.0 [linux] 64bit, using jemalloc, build tags/v3.5.0-0-gc42dbe8547, VPack 0.1.33, RocksDB 6.2.0, ICU 58.1, V8 7.1.302.28, OpenSSL 1.1.0k  28 May 2019)
Copyright (c) ArangoDB GmbH

Command-line history will be persisted when the shell is exited. You can use `--console.history false` to turn this off
Connected to ArangoDB 'http+tcp://127.0.0.1:8529, version: 3.5.0 [SINGLE, server], database: '_system', username: 'root'

Please note that a new minor version '3.7.11' is available
Type 'tutorial' for a tutorial or 'help' to see common examples
127.0.0.1:8529@_system>
Next, create a database named testdb using the following command:
db._createDatabase("testdb");
To create a user called testuser and set a password, run the following command:
var users = require("@arangodb/users");
users.save("testuser@localhost", "password");
You should see the following output:
{
  "user" : "testuser@localhost",
  "active" : true,
  "extra" : {
  },
  "code" : 201
}
To grant privileges to the database and user, run the following command:
users.grantDatabase("testuser@localhost", "testdb");
To verify all databases, run the following command:
db._databases();
You should see the following output:
[
  "_system",
  "testdb"
]
To exit from the ArangoDB shell, run the following command:
exit
Run the following command to connect to the ArangoDB using the user and database which we have created above:
arangosh --server.username "testuser@localhost" --server.database testdb
You should get the ArangoDB shell in the following output:
Please specify a password:

                                       _
  __ _ _ __ __ _ _ __   __ _  ___  ___| |__
 / _` | '__/ _` | '_ \ / _` |/ _ \/ __| '_ \
| (_| | | | (_| | | | | (_| | (_) \__ \ | | |
 \__,_|_|  \__,_|_| |_|\__, |\___/|___/_| |_|
                       |___/

arangosh (ArangoDB 3.5.0 [linux] 64bit, using jemalloc, build tags/v3.5.0-0-gc42dbe8547, VPack 0.1.33, RocksDB 6.2.0, ICU 58.1, V8 7.1.302.28, OpenSSL 1.1.0k  28 May 2019)
Copyright (c) ArangoDB GmbH

Command-line history will be persisted when the shell is exited. You can use `--console.history false` to turn this off
Connected to ArangoDB 'http+tcp://127.0.0.1:8529, version: 3.5.0 [SINGLE, server], database: 'testdb', username: 'testuser@localhost'

Please note that a new minor version '3.7.11' is available
Type 'tutorial' for a tutorial or 'help' to see common examples
127.0.0.1:8529@testdb>
Step 5 – Access ArangoDB Web Interface
By default, the ArangoDB web interface is accessible only from the localhost. You will need to edit the ArangoDB configuration file for remote access.
nano /etc/arangodb3/arangod.conf
Find the following line:
endpoint = tcp://127.0.0.1:8529
And replace it with the following line:
endpoint = tcp://your-server-ip:8529
Save and close the file, then restart the ArangoDB service to apply the changes:
systemctl restart arangodb3
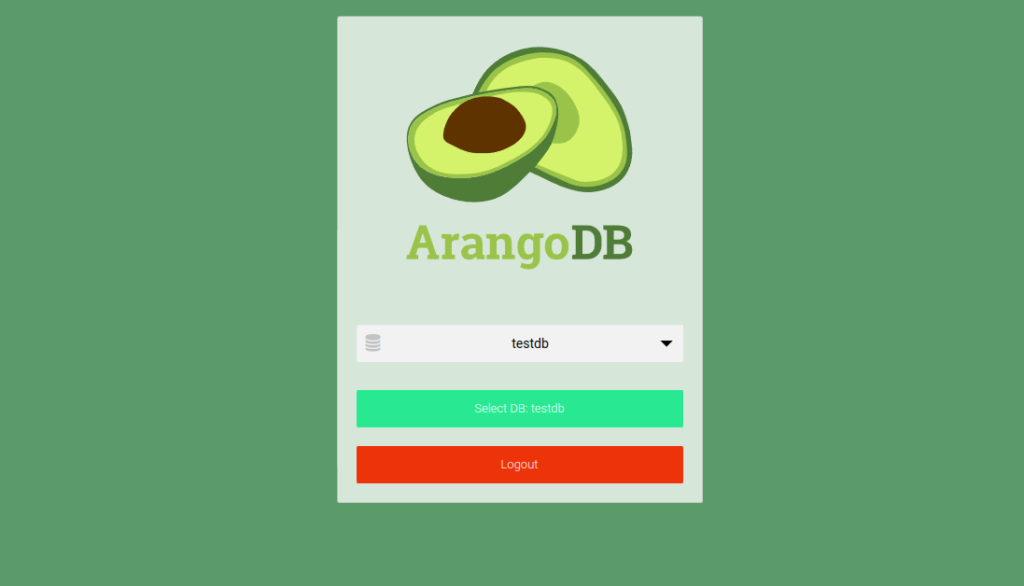
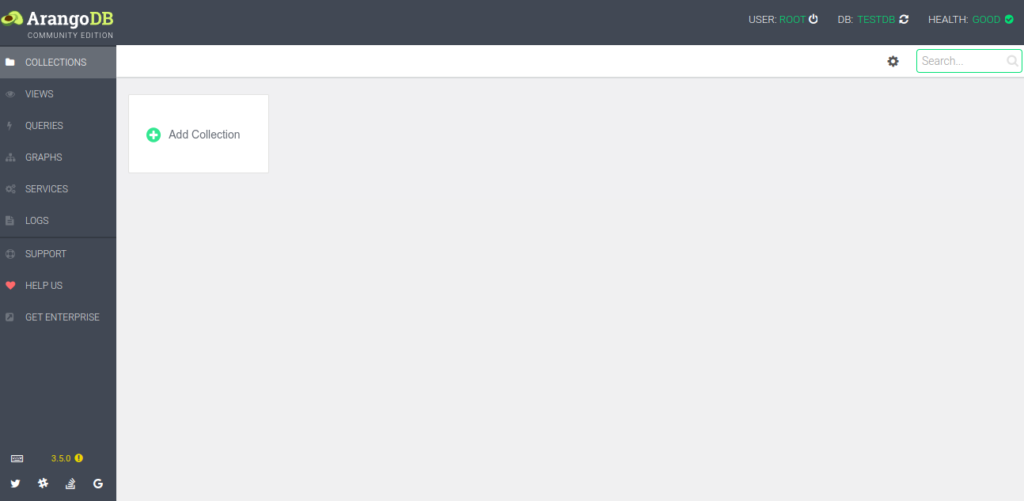
Now, open your web browser and type the URL http://your-server-ip:8529. You should see the ArangoDB login page:

Provide your ArangoDB root username and password and click on the Login button. You should see the ArangoDB dashboard on the following page:
Conclusion
In this guide, we explained how to install ArangoDB on Oracle Linux 8. We also explained how to use the ArangoDB shell to create a database and user. ArangoDB is a very good alternative to MongoDB and can be used in a mission-critical environment. Get started with ArangoDB on VPS Hosting from Atlantic.Net!