Introduction
In this how-to article, we will walk you through the installation of a secure BIND9 authoritative DNS server on CentOS 7
What is BIND?
BIND is open source software that implements the Domain Name System (DNS) protocols for the Internet. It is a reference implementation of those protocols, but it is also production-grade software, suitable for use in high-volume and high-reliability applications.
– ISC (Internet Systems Consortium)
Outline of Configuration Steps
- Basic Server Preparation.
- Installation of the BIND software packages.
- Configuration of the BIND software packages.
- Adding a test zone (domain)
- Testing your DNS server
Prerequisites
Before you begin this how-to article, you will need to make sure that you have these prerequisites done first.
– CentOS 7 Server – If you do not have a server available, you can spin one up in via our VPS hosting services page.
– Your preferred text editor installed – We will be using nano in this tutorial.
1 – Basic Server Preparation
First, make sure that you are logged in as the root user account.
sudo su -
Next, we are going to make sure the core operating system is fully updated.
yum update -y
Now that your system is fully updated, we will update the firewall (enabled by default) to allow DNS (TCP Port 53 / UDP Port 53) to access your server.
firewall-cmd --permanent --zone public --add-port 53/tcp
firewall-cmd --permanent --zone public --add-port 53/udp
firewall-cmd --reload
2 – Installation of the BIND DNS Software Packages
We are now ready to install the BIND software packages on your server.
yum install -y bind bind-utils bind-chroot
- bind : The Berkeley Internet Name Domain (BIND) DNS (Domain Name System) server
- bind-utils : Utilities for querying DNS name servers
- bind-chroot : A chroot runtime environment for the ISC BIND DNS server
Now that you have the required BIND software packages installed, we are ready to start the BIND services and set them to start automatically upon a server reboot.
systemctl start named
systemctl enable named
3 – Configuration of the BIND DNS Server
Upon starting the BIND DNS server, the chroot package automatically mounts all the configuration files in the /var/named/chroot directory of your server. When you run BIND (or any other process) in a chroot jail, the process is simply unable to see any part of the filesystem outside the jail.
For reference, the base directory you will be working in for any BIND configurations is /var/named/chroot
First, let’s change to that directory for the remainder of these steps.
cd /var/named/chroot
Now, let’s create some directories and a configuration setting file for your new server and set the ownership. These directories will be used to store forward and reverse zone files for your DNS server.
mkdir var/named/fwd-zones
mkdir var/named/rev-zones

chown -R named:named var/named/fwd-zones
chown -R named:named var/named/rev-zones

touch etc/zones.conf
chown root:named etc/zones.conf
Next, we are going to edit the etc/named.conf configuration file. We will walk you through the entire setup so that you understand what each option is doing for your server.
nano etc/named.conf
Upon initial installation, the default configuration file will be the below (if you would like to jump to final etc/named.conf, you can find it below):
//
// named.conf
//
// Provided by Red Hat bind package to configure the ISC BIND named(8) DNS
// server as a caching only nameserver (as a localhost DNS resolver only).
//
// See /usr/share/doc/bind*/sample/ for example named configuration files.
//

options {
        listen-on port 53 { 127.0.0.1; };
        listen-on-v6 port 53 { ::1; };
        directory       "/var/named";
        dump-file       "/var/named/data/cache_dump.db";
        statistics-file "/var/named/data/named_stats.txt";
        memstatistics-file "/var/named/data/named_mem_stats.txt";
        allow-query     { localhost; };
        recursion yes;

        dnssec-enable yes;
        dnssec-validation yes;
        dnssec-lookaside auto;

        /* Path to ISC DLV key */
        bindkeys-file "/etc/named.iscdlv.key";

        managed-keys-directory "/var/named/dynamic";
};

logging {
        channel default_debug {
                file "data/named.run";
                severity dynamic;
        };
};

zone "." IN {
        type hint;
        file "named.ca";
};

include "/etc/named.rfc1912.zones";
include "/etc/named.root.key";
The available configuration settings and options in BIND are very extensive. In this article we will be covering only the options to setup your server to be an authoritative DNS server and secure your server from recursive DNS amplification attacks.
For a more in-depth explanation of all of these options, we recommend the folks at Zytrax.com.
Listening Options
The first configuration option we are going to change is the listening options for your server. By default, the server is setup to listen only on the local loopback address (127.0.0.1). We are going to change this to listen on all interfaces on your server. Replace the following lines inside the options { } clause of the configuration file.
        listen-on port 53 { any; };
        listen-on-v6 port 53 { any; };
ACLs (Access Control Lists)
We are now going to add some ACL (Access Control List) rules to the configuration. These ACLs will be used to extend the security settings for the query lookup options as well as the recursive query options. The first rule–which we’ll call “allowed-queries”–will be used to allow any source address to query your DNS server. The second rule–we’ll call this one “allowed-recursion”–will be used to restrict recursive lookup to only the localhost address.
Add the below ACL policy rules just above the options { } clause.
// ACL - Allow queries from ANY source address
acl "allowed-queries" {
     any;
};

// ACL - Allow recursion from LOCALHOST only.
acl "allowed-recursion" {
    127.0.0.1;
     ::1;
};

options {
    ...
};
Next, we are going to change the configuration value of the allow-query statement variable to use the new ACL we just created. The allow-query statement defines who (i.e., source networks) are allowed to query your DNS server. Replace the following line inside the options { } clause of the configuration file.
allow-query { "allowed-queries"; };
Restricting Recursion
Now we need to secure the recursion lookup permission on your server. Recursion is a technique in which a DNS server queries other DNS servers on behalf of the requesting client to fully resolve the name, and then sends an answer back to the client. Attackers can use this technique to cause DNS servers with open recursion enabled to unwittingly participate in a DDoS (Distributed Denial of Service) attack. Therefore, if a DNS server in your network is not intended to receive recursive queries, recursion should be disabled on that server or secured not to allow unauthorized sources to use this technique.
By default, the BIND DNS server is configured to allow any source IP to request recursion. We are going to add a configuration variable to restrict who can use this server for recursive requests using the second ACL that we created– “allowed-recursion”. Add the following statement inside the options { } clause of the configuration file, just below the statement recursion yes;.
     recursion yes;
     allow-recursion { "allowed-recursion"; };
We are now going to add an include statement to the configuration file. This statement will be used to include the authoritative zone data (domains) that your server will be configured to respond to. Add the following line below the close of the option { } clause, just after the last include statement.
include "/etc/zones.conf";
We have now completed the configuration changes in the etc/named.conf configuration file. You can now save and exit your changes.
New named.conf File
For review, your etc/named.conf configuration file should now look like the below:
//
// named.conf
//
// Provided by Red Hat bind package to configure the ISC BIND named(8) DNS
// server as a caching only nameserver (as a localhost DNS resolver only).
//
// See /usr/share/doc/bind*/sample/ for example named configuration files.
//

// ACL - Allow queries from ANY source address
acl "allowed-queries" {
     any;
};

// ACL - Allow recursion from LOCALHOST only.
acl "allowed-recursion" {
    127.0.0.1;
    ::1;
};

options {
        listen-on port 53 { any; };
        listen-on-v6 port 53 { any; };
        directory       "/var/named";
        dump-file       "/var/named/data/cache_dump.db";
        statistics-file "/var/named/data/named_stats.txt";
        memstatistics-file "/var/named/data/named_mem_stats.txt";
        allow-query     { "allowed-queries"; };
        recursion yes;
        allow-recursion { "allowed-recursion"; };

        dnssec-enable yes;
        dnssec-validation yes;
        dnssec-lookaside auto;

        /* Path to ISC DLV key */
        bindkeys-file "/etc/named.iscdlv.key";

        managed-keys-directory "/var/named/dynamic";
};

logging {
        channel default_debug {
                file "data/named.run";
                severity dynamic;
        };
};

zone "." IN {
        type hint;
        file "named.ca";
};

include "/etc/named.rfc1912.zones";
include "/etc/named.root.key";
include "/etc/zones.conf";
4 – Adding Your First Zone (Domain)
We are now going to add your first zone that your DNS server will be authoritative for. We will be using a testing domain (example.tld) for this step as the example.
First, we will create a new file in the directory var/named/fwd-zones that we created earlier.
touch var/named/fwd-zones/example.tld.zone;
chown named:named var/named/fwd-zones/example.tld.zone;
Next, we are going to add the example zone record data for this domain. Edit the new file that we just created and add the zone data to the configuration file.
nano var/named/fwd-zones/example.tld.zone
Zone Data
; zone file for example.tld
$TTL 14400     ; 4 hours - default TTL for zone
$ORIGIN example.tld.

;; SOA Resource Record
@             IN      SOA   ns1.example.tld. hostmaster.example.tld. (
                        2015010100 ; se = serial number
                        12h        ; ref = refresh
                        15m        ; ret = update retry
                        3w         ; ex = expiry
                        3h         ; min = minimum
                        )

;; Name Servers
              IN      NS      ns1.example.com.
ns1           IN      A       192.0.2.3

;; Mail Exchange Resource Records
@             IN      MX  10  mail.example.tld.

;; Web Server Resource Records
@             IN      A       192.0.2.3
www           IN      CNAME   @

;; FTP Server Resource Records
ftp           IN      A       192.0.2.3
Once you have made all the changes you need to make, save and exit.
Now we are going to edit the etc/zones.conf configuration file to include the new domain we just created.
nano etc/zones.conf
Now add the below parameters to the configuration file.
zone "example.tld" in {
     type master;
     file "fwd-zones/example.tld.zone";
     allow-transfer { none; };
};
Once done, save and exit this file.
We are now ready to restart your DNS services so that all the new configurations load.
systemctl restart named
If everything restarted successfully, without any errors, you should receive the following response:
Stopping named: .                                          [  OK  ]
Starting named:                                            [  OK  ]
5 – Testing Your DNS Server
We are now ready to test the functionality of your new DNS server. First, we are going to confirm that your DNS server is responding for the zone (domain) that we just created. Execute the following command:
dig example.tld -t ANY @localhost
You should see the below similar response output from your server. The key response values to look for are the ;; ANSWER SECTION: values. This output lets you know that the server has responded to your request with the record data that you entered in the previous steps.
; <<>> DiG 9.8.2rc1-RedHat-9.8.2-0.37.rc1.el6_7.2 <<>> example.tld -t ANY @localhost
;; global options: +cmd
;; Got answer:
;; ->>HEADER<<- opcode: QUERY, status: NOERROR, id: 61421
;; flags: qr aa rd ra; QUERY: 1, ANSWER: 4, AUTHORITY: 0, ADDITIONAL: 1

;; QUESTION SECTION:
;example.tld.                   IN      ANY

;; ANSWER SECTION:
example.tld.            14400   IN      SOA     ns1.example.tld. hostmaster.example.tld. 2015010100 43200 900 1814400 10800
example.tld.            14400   IN      NS      ns1.example.tld.
example.tld.            14400   IN      MX      10 mail.example.tld.
example.tld.            14400   IN      A       192.0.2.3

;; ADDITIONAL SECTION:
ns1.example.tld.        14400   IN      A       192.0.2.3

;; Query time: 0 msec
;; SERVER: 127.0.0.1#53(127.0.0.1)
;; WHEN:
;; MSG SIZE  rcvd: 147
The second test we are going to do is to check that your server is responding to recursive lookups from the localhost. Execute the below command to begin the test:
dig google.com -t ANY @localhost
If the server is setup as expected, you should receive a similar recursive ;; ANSWER SECTION: response.
;; ANSWER SECTION:
google.com.             86400   IN      SOA     ns1.google.com. dns-admin.google.com. 4294967295 7200 1800 1209600 300
google.com.             600     IN      MX      50 alt4.aspmx.l.google.com.
google.com.             600     IN      MX      40 alt3.aspmx.l.google.com.
google.com.             600     IN      MX      10 aspmx.l.google.com.
google.com.             600     IN      MX      20 alt1.aspmx.l.google.com.
google.com.             600     IN      MX      30 alt2.aspmx.l.google.com.
google.com.             3600    IN      TXT     "v=spf1 include:_spf.google.com ~all"
google.com.             86400   IN      TYPE257 \# 19 0005697373756573796D616E7465632E636F6D
google.com.             300     IN      AAAA    2607:f8b0:4008:804::200e
google.com.             300     IN      A       216.58.219.78
google.com.             172800  IN      NS      ns1.google.com.
google.com.             172800  IN      NS      ns3.google.com.
google.com.             172800  IN      NS      ns4.google.com.
google.com.             172800  IN      NS      ns2.google.com.

;; AUTHORITY SECTION:
google.com.             172800  IN      NS      ns4.google.com.
google.com.             172800  IN      NS      ns1.google.com.
google.com.             172800  IN      NS      ns3.google.com.
google.com.             172800  IN      NS      ns2.google.com.

;; ADDITIONAL SECTION:
ns2.google.com.         172800  IN      A       216.239.34.10
ns1.google.com.         172800  IN      A       216.239.32.10
ns4.google.com.         172800  IN      A       216.239.38.10
ns3.google.com.         172800  IN      A       216.239.36.10
The last test that we are going to do is to validate that your server is NOT open to a DNS amplification attack. The folks at openresolver.com have set up a simple test you can use with dig:
dig +short test.openresolver.com TXT @1.2.3.4

      (replace 1.2.3.4 with the IP address or domain name of the DNS server you are testing)
A response of "open-resolver-detected" indicates that you have recursion enabled. No response, in this case, is a good thing.
The openresolver.com site also has a browser-based tool available for testing for this vulnerability.
Upon testing with your public IP address, you should receive the following similar response:
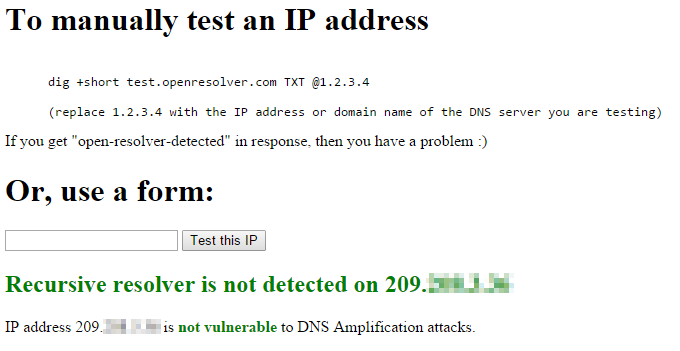
Successful Open Recursive DNS Resolver Test
Congratulations!
You now have an authoritative DNS server configured and running. Thank you for reading! Check out some of the related articles below and thanks for trying our reliable VPS hosting solutions at Atlantic.Net.
* This post is for informational purposes only and does not constitute professional, legal, financial, or technical advice. Each situation is unique and may require guidance from a qualified professional.
Readers should conduct their own due diligence before making any decisions.