Verified and Tested 03/24/2015
Introduction
This guide will take you through using cPHulk brute force protection in cPanel & WHM.
Prerequisites
An Atlantic.Net Cloud server with CentOS 6 and cPanel & WHM. If you do not have a virtual private server, why not spin one up from Atlantic.Net in under 30 seconds.
Using cPHulk on cPanel and WHM
The first step to using cPHulk on your cPanel & WHM server is to first log into the WHM side of the server. To do this, you would want to go to https://your_cloud_IP:2087 and log in using your root credentials. Once logged in, on the search bar at the top left (if you can’t find it, it looks like the image below), type “cphulk”. The side list should filter, and you will see a section called “cPHulk Brute Force Protection”. Click on this section to go to the cPHulk options.
 Search
The basic cPHulk page looks like the below image. We’ll go over the configuration settings page below.
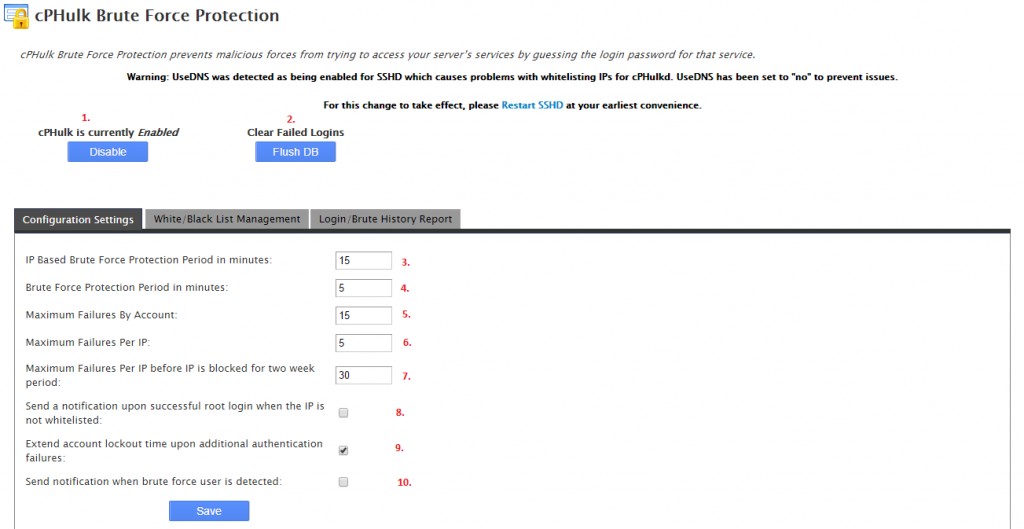
1. cPHulk state. This will tell you whether or not cPHulk is enabled on your server. You can also disable/enable it here.
2. Clear Failed Logins. This will clear the cPHulk database of failed logins. It’s not recommended unless you need to clear out some failed attempts and someone needs access that is locked out.
3. IP Based Brute Force Protection Period in minutes. This option is for how long an IP is blocked by cPHulk for brute forcing.
4. Brute Force Protection Period in minutes. This is the time period that cPHulk will gather and track failed connection attempts for.
5. Maximum Failures By Account. This is how many times someone can fail within the Brute Force Protection Period before the account is locked.
6. Maximum Failures Per IP. This is how many times someone can fail within the Brute Force Protection Period before the IP is blocked.
7. Maximum Failures Per IP before IP is blocked for two week period. This is self-explanatory. How many times an IP can fail before being blocked for 2 weeks.
8. Send a notification upon successful root login when IP is not whitelisted. The server will send you an email if an IP you have not whitelisted logs into the server as root.
9. Extend account lockout time upon additional authentication failures. This means the more you fail to log in after being blocked, the longer you will be blocked for.
10. Send notification when a brute force user is detected. This will send you an email as soon as cPHulk blocks someone trying to log in.
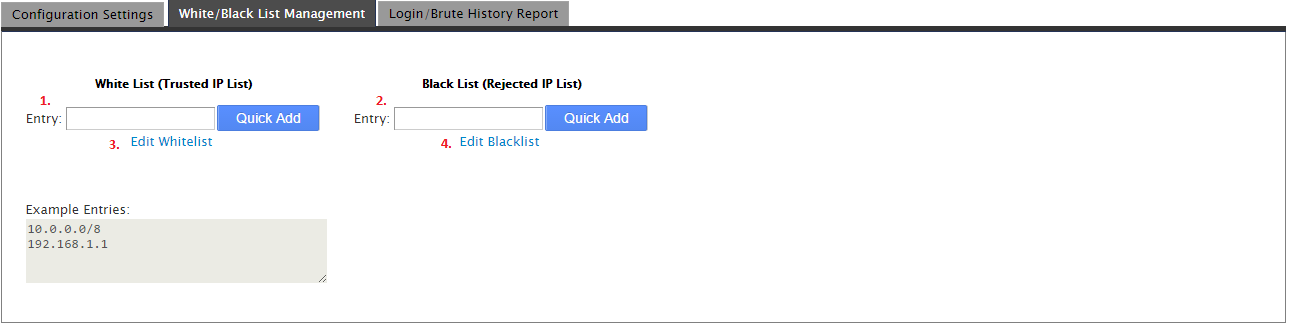
For the white/black list management page see the below.
 White/ Blacklist
1. White List Entry. This will allow you to input an IP or range of IPs into the whitelist. It is recommended that you only add IPs that will be accessing the server that you trust. Mainly your own IP.
2. Black List Entry. This will allow you to input an IP or range of IPs into the blacklist. If you know of an IP or range that you would like to add to the blacklist to stop them from accessing the server, you would enter them here.
3. Edit Whitelist. This will bring you to a new page where you can edit (add/remove) multiple IPs in the whitelist at once. When you are done, you simply click the “Save” button.
4. Edit Blacklist. This will bring you to a new page where you can edit (add/remove) multiple IPs in the blacklist at once. When you are done, you simply click the “Save” button.
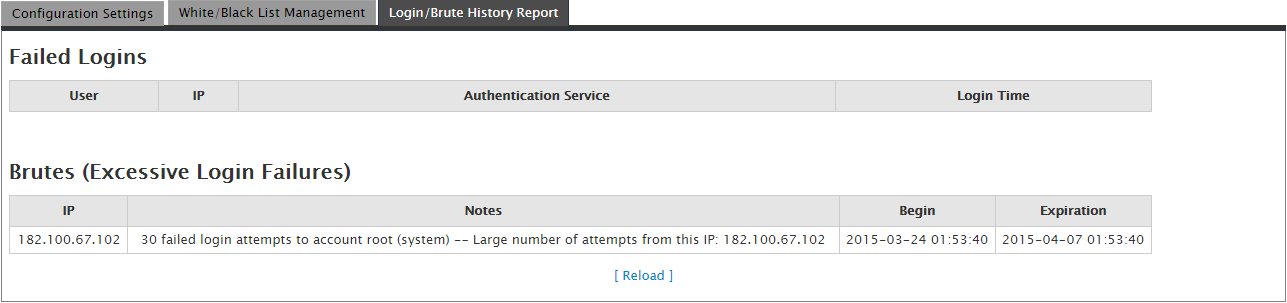
The last configuration page is the Login/Brute History Report page. It provides a history of any failed logins or brute force attempts on your server as you can see below.
 Reporting
cPHulk allows for a good amount of customization to help secure your server from failed logins and brute force attempts. It is recommended that you have it enabled and put your IP in the whitelist. If you find that you have locked yourself out of your server via cPHulk, you can view this page on how to remedy the issue.
* This post is for informational purposes only and does not constitute professional, legal, financial, or technical advice. Each situation is unique and may require guidance from a qualified professional.
Readers should conduct their own due diligence before making any decisions.