Table of Contents
- Introduction
- What Do You Need?
- Server Preparation
- Update Root Password on Debian 8.2
- Create a new user withsudo privileges on Debian 8.2
- Configure SSH Access on Debian 8.2
- Limit Root Access on Debian 8.2
- Create a Private SSH Key on Debian 8.2
- Basic Firewall Rules on Debian 8.2
- NTP Time Sync on Debian 8.2
- Add Swap File on Debian 8.2
- What Next?
Introduction
This how-to will help you with your initial setup on Debian 8.2 so that you can successfully secure your server while giving you the peace of mind knowing your server is protected.
With any server, the primary goal should always be security. Many users are victims of malicious infiltrations on their servers due to the lack of security boundaries established from the beginning. Let us begin on the right path by laying our foundation with security.
What Do You Need?
You need a Debian 8.2 server that is configured with a static IP address. If you do not have a server already, you can visit our virtual private server page and spin a new server up in under 30 seconds.
Server Preparation
To get started, log in to your Debian 8.2 via SSH or the VNC Console in cloud.atlantic.net. Atlantic.Net Cloud servers are setup as minimal installations in order to avoid having unnecessary packages from being installed and never used. Because of this, let’s make sure that your server is fully up-to-date and the sudo service is installed.
apt-get update
apt-get install sudo
With the server up-to-date, we can continue the process and secure your server.
Update Root Password on Debian 8.2
Update the Root Password as you will be the only person who will know it. We recommend a minimum of 8 characters, including lowercase, uppercase, and numbers.
passwd
Create a new user withsudo privileges on Debian 8.2
Creating a new user with sudo privileges will allow you to easily manage your server without having to worry about accidentally making unwanted changes. Let us create the user1!
adduser user1
Fill in the information that applies to the user and confirm the information
root@JVHServer:~# adduser user1
Adding user `user1' ...
Adding new group `user1' (1000) ...
Adding new user `user1' (1000) with group `user1' ...
Creating home directory `/home/user1' ...
Copying files from `/etc/skel' ...
Enter new UNIX password:
Retype new UNIX password:
passwd: password updated successfully
Changing the user information for user1
Enter the new value, or press ENTER for the default
 Full Name []: user1
 Room Number []:
 Work Phone []:
 Home Phone []:
 Other []:
Is the information correct? [Y/n] y
In Debian 8.2 by simply adding your user to the sudo group, will grant sudo privileges for that user by typing sudo before running any command. Let us add the user are to the sudo group.
adduser user1 sudo

Upon completion, you can use the su – user1 command to change the user from root to user1. It is important to remember that you will then have to use sudo before running any command with the user.
Configure SSH Access on Debian 8.2
In Linux systems port 22 is the default port for remote connections via SSH. By changing the ssh port you will increase the security of your server in preventing brute force attacks and unwanted users from reaching your server(I will use Port 5022 for this tutorial). Open your SSH Configuration file, find the Port line, and change Port 22 to your Custom port Save and exit.
sudo nano /etc/ssh/sshd_config
# What ports, IPs and protocols we listen for
Port 22 to 5022
For your system to update the new settings from the SSH Configuration file, we must restart the sshd service.
sudo systemctl restart sshd.service
SSH has now been configured to use Port 5022 and if you attempt to login using Port 22, your login will fail.
Limit Root Access on Debian 8.2
Since we’ve created a new user with root permissions, there’s no need keep the actual root user available and vulnerable over SSH on your server. Let us restrict the root users access to be available on the local server only and granting permission to the new user over SSH.
Open the SSH Configuration file, find the PermitRootLogin line and change it from yes to no.
sudo nano /etc/ssh/sshd_config
PermitRootLogin no
For your system to update the new settings in the SSH Configuration file, we must restart the sshd service.
sudo systemctl restart sshd.service
Create a Private SSH Key on Debian 8.2
Private/Public SSH Keys are great additional features that increase security in the method a server is accessed. However, it takes a bit more effort to setup. The question is, Is your server worth the extra security? If you would like to implement this security feature and additional measures you can continue with the following steps as well, let us proceed and generate the SSH Key.
ssh-keygen
If you want to change the location where the SSH Key will be saved, you can specify it here, if not the default location is OK. Press enter when you are prompted with the following question then enter a passphrase, unless you don’t want one.
Enter file in which to save the key (/home/user1/.ssh/id_rsa):
You will then see the following information on the screen.
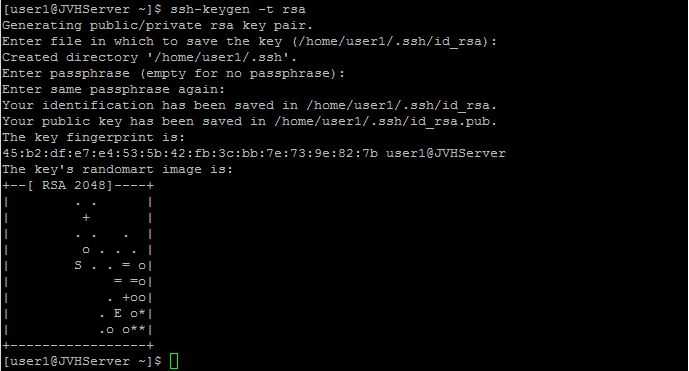
Configuring the SSH Key is crucial, we must copy the full key string to a Word/ Notepad Document. The Key can be viewed in the following location by using the cat command.
cat ~/.ssh/id_rsa.pub
Copy the SSH key beginning with ssh-rsa and ending with user1@yourserver into your Word/ Notepad document so we can add it to the config file. Once the SSH Key is stored safely, we must make more changes on the server. This is where the sudo privileges for your user1, steps in.
su - user1
The directory for the SSH Keys needs limited permissions which only the owner can read, write and execute the file.
sudo chmod 700 .ssh
Within the SSH directory, a file containing the SSH Key must to be added, simply using your editor (in this case VI) the following location:
nano .ssh/authorized_keys
Paste the SSH Key then save and exit using the nano format.
Finally, we have to limit the privileges of the authorized_keys file that we just created so only owner can read and write.
chmod 600 .ssh/authorized_keys
We can now verify that the key is working by closing your session and by typing the following in your SSH Console user1@YOUR.IP.ADD.RESS or your servers hostname. This can be accomplished with the following command:
ifconfig eth0 | grep inet | awk '{ print $2 }'
Furthermore, you can click “here” to see our How To Generate and Use SSH Keys article.
Basic Firewall Rules on Debian 8.2
By default your Atlantic.Net’s Debian 8.2 Server is not loaded with a firewall. However, depending on your preference you may install any of the following: firewalld, iptables, etc. In this part, I will be using Firewalld which uses the firewall-cmd tool in order to configure its rules. We must first install the Firewall service with the following:
sudo apt-get install firewalld
We must now allow our custom SSH Port that was created earlier in order to to access the server publicly. Also, there are several other rules that’s can be used depending the type of server that you wish to deploy.
sudo firewall-cmd --permanent --add-port=5022/tcp
If you have a web server you may want to allow the following rules so your sites could be accessed over the internet.
sudo firewall-cmd --permanent --add-service=http
sudo firewall-cmd --permanent --add-service=https
If you have a mail server, you may want to allow the following rules if you will be using your server for incoming POP3 settings. Port 110 is the standard port and port 995 is for a more secure connection using SSL.
sudo firewall-cmd --permanent --add-service=pop3s
Furthermore, you may want to allow the following rules if you will be using your server for outgoing SMTP settings.
sudo firewall-cmd --permanent --add-service=smtp
Finally, you may want to allow the following rules if you will be using your server with IMAP settings.
sudo firewall-cmd --permanent --add-service=imaps
Save your work and exit.
In order for Firewalld to accept those settings you must restart the firewall.
sudo firewall-cmd --reload
Your settings will have been saved and you are ready to proceed by verifying all the services/ports that are available by running the following:
sudo firewall-cmd --permanent --list-all
NTP Time Sync on Debian 8.2
The NTP (Network Time Protocol) is basically used to synchronize the time and date of computers over the network in order to remain accurate and up to date. Let us begin by installing the NTP service (if it hasn’t been installed already) and configure the service to synchronize with their servers.
sudo apt-get install ntp
Once the NTP service is installed, we need to make sure that the service is ON.
sudo /etc/init.d/ntp start
Having the service ON , it will automatically synchronize the server’s time information with NTP’s server.
Add Swap File on Debian 8.2
A Swap file is simply a small amount of space created on a servers hard drive to simulate Ram. In the event that the server is running low on memory it will look at the hard drive and ease the load tricking the system to think it has more memory. We will set up the swap file on the hard drive to increase the performance of the server just a little bit more.
Begin by checking your resources to make sure we can add the file. When you run the following command you will see the percentage space on your Hard drive that is currently being used.
df -h
When creating a Swap file usually you want to add half of your existing RAM up to 4GB(If you have 1GB of actual Ram then you add a 512MB file). In this part I will be adding a 512MB swap file to the drive. The way that this is calculated is by 1024 x 512MB = 524288 block size.
sudo dd if=/dev/zero of=/swapfile bs=1024 count=524288
Now that we have added a swap file, a Swap file area needs to be created in order to proceed.
sudo mkswap /swapfile
With the Swap file created and the Swap file area added we can go ahead and add permissions to the file so that only the owner can read and write.
sudo chown root:root /swapfile
sudo chmod 600 /swapfile
Now that the swap file has the appropriate permissions we can go ahead and activate the it.
sudo swapon /swapfile
You can verify your newly added Swap file with the following.
sudo swapon -s
In order to make the Swap file always active even after a reboot, we must configure it accordingly.
sudo nano /etc/fstab
Paste the following command at the bottom of the file save your work and exit.
/swapfile swap swap defaults 0 0
Finally, verify if your swap file is activated by typing the following command:
free -m

What Next?
You now have a server with a strong security foundation that will give you the peace of mind knowing that your server is protected. You could begin installing any additional software depending the purpose of the server.
* This post is for informational purposes only and does not constitute professional, legal, financial, or technical advice. Each situation is unique and may require guidance from a qualified professional.
Readers should conduct their own due diligence before making any decisions.