Privoxy is a free and non-caching web proxy server. A web browser uses this proxy server before connecting to the Internet directly. Privoxy is mainly used for security and to improve efficiency through its advanced caching features. Privoxy has advanced filtering capabilities including ad-blocking, web content filtering, modifying web page data and HTTP access, controlling access and blocking unwanted sites, and more.
It is simple, easy to configure, and highly customizable.
In this post, we will show you how to install and configure the Privoxy server on CentOS 8 VPS.
Step 1 – Install Privoxy
By default, the Privoxy package is not included in the CentOS default repo, so you will need to install the EPEL repo to your system. You can install it with the following command:
dnf update -y
dnf install epel-release -y
Once EPEL is installed, you can install the Privoxy server with the following command:
dnf install privoxy -y
Privoxy server stores all their configuration files at /etc/privoxy/. You can check them with the following command:
ls -l /etc/privoxy/
You should see the following output:
-rw-r--r-- 1 root root  84868 Mar  1 12:22 config
-rw-r--r-- 1 root root 109864 Mar  1 12:22 default.action
-rw-r--r-- 1 root root  43970 Feb 25 12:54 default.filter
-rw-r--r-- 1 root root    600 Feb 25 12:54 match-all.action
-rw-r--r-- 1 root root  42259 Feb 25 12:54 regression-tests.action
drwxr-xr-x 2 root root   4096 May 26 02:29 templates
-rw-r--r-- 1 root root   3565 Feb 25 12:54 trust
-rw-r--r-- 1 root root   9012 Feb 25 12:54 user.action
-rw-r--r-- 1 root root      0 Mar  1 12:22 user.filter
Step 2 – Configure Privoxy
By default, the Privoxy server listens to the localhost, so you will need to configure it to listen to the IP address. You can do it by editing the Privoxy default config file:
nano /etc/privoxy/config
Find the following line:
listen-address 127.0.0.1:8118
Change it with the following line:
listen-address your-server-ip:8118
Next, uncomment the following lines:
logdir /var/log/privoxy
logfile logfile

       debug     1 # Log the destination for each request. See also debug 1024.
        debug     2 # show each connection status
        debug     4 # show tagging-related messages
        debug     8 # show header parsing
        debug    16 # log all data written to the network
        debug    32 # debug force feature
        debug    64 # debug regular expression filters#
        debug   128 # debug redirects
        debug   256 # debug GIF de-animation
        debug   512 # Common Log Format
        debug  1024 # Log the destination for requests Privoxy didn't let through, and the reason why.
        debug  2048 # CGI user interface#
        debug  4096 # Startup banner and warnings.
        debug  8192 # Non-fatal errors
        debug 32768 # log all data read from the network
        debug 65536 # Log the applying actions
Save and close the file, then start the Privoxy service using the following command:
systemctl start privoxy
You can check the status of the Privoxy with the following command:
systemctl status privoxy
You should get the following output:
● privoxy.service - Privoxy Web Proxy With Advanced Filtering Capabilities
   Loaded: loaded (/usr/lib/systemd/system/privoxy.service; disabled; vendor preset: disabled)
   Active: active (running) since Wed 2021-05-26 02:34:04 EDT; 5s ago
  Process: 41499 ExecStart=/usr/sbin/privoxy --pidfile /run/privoxy.pid --user privoxy /etc/privoxy/config (code=exited, status=0/SUCCESS)
 Main PID: 41500 (privoxy)
    Tasks: 1 (limit: 12524)
   Memory: 1.4M
   CGroup: /system.slice/privoxy.service
           └─41500 /usr/sbin/privoxy --pidfile /run/privoxy.pid --user privoxy /etc/privoxy/config

May 26 02:34:03 centos8 systemd[1]: Starting Privoxy Web Proxy With Advanced Filtering Capabilities...
May 26 02:34:04 centos8 systemd[1]: Started Privoxy Web Proxy With Advanced Filtering Capabilities.
At this point, the Privoxy server is started and listening on port 8118. You can check it with the following command:
ss -antpl | grep 8118
You should see the following output:
LISTEN 0 128 104.245.32.188:8118 0.0.0.0:* users:(("privoxy",pid=41500,fd=7))
Step 3 – Configure Web Browser to Use Privoxy Proxy
Next, you will need to configure your web browser to the Privoxy server as a proxy server.
First, go to the client system, open your Firefox web browser => and click on Edit => Preferences. You should see the following page:
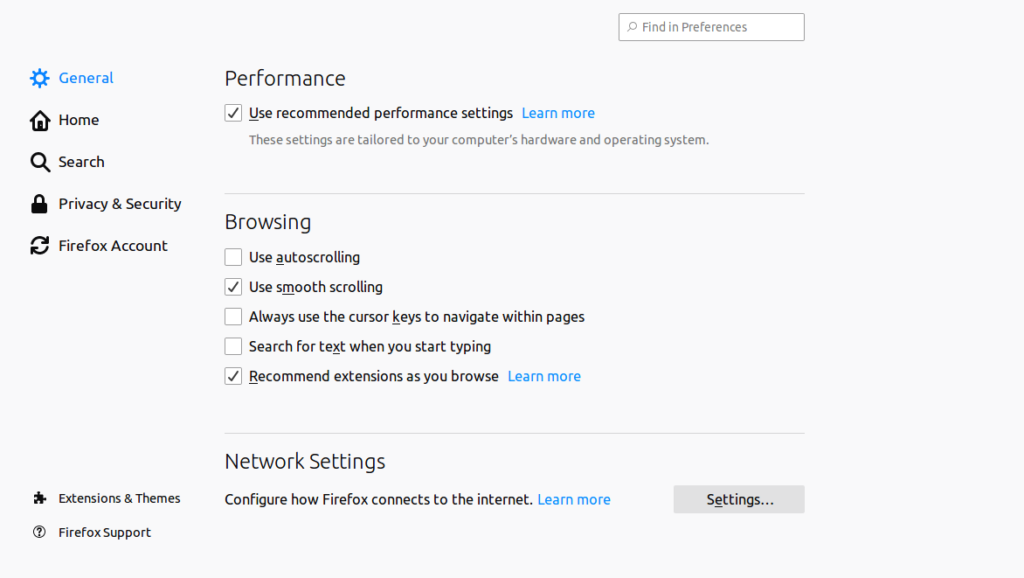
Now, click on Network Settings => Settings. You should see the following page:
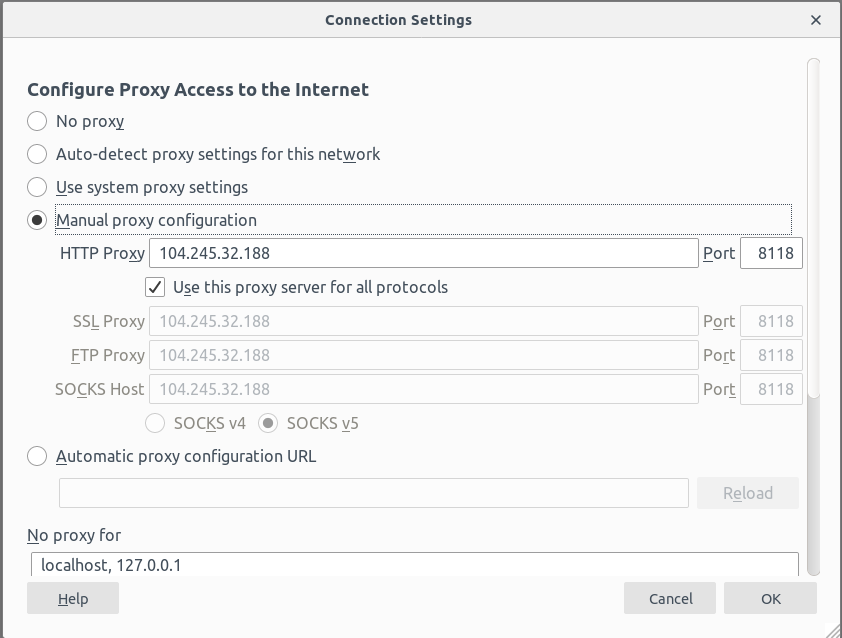
Now, provide your Privoxy server IP and port and click on the Ok button to save the changes.
At this point, your web browser is configured to use the Privoxy server before connecting to the internet.
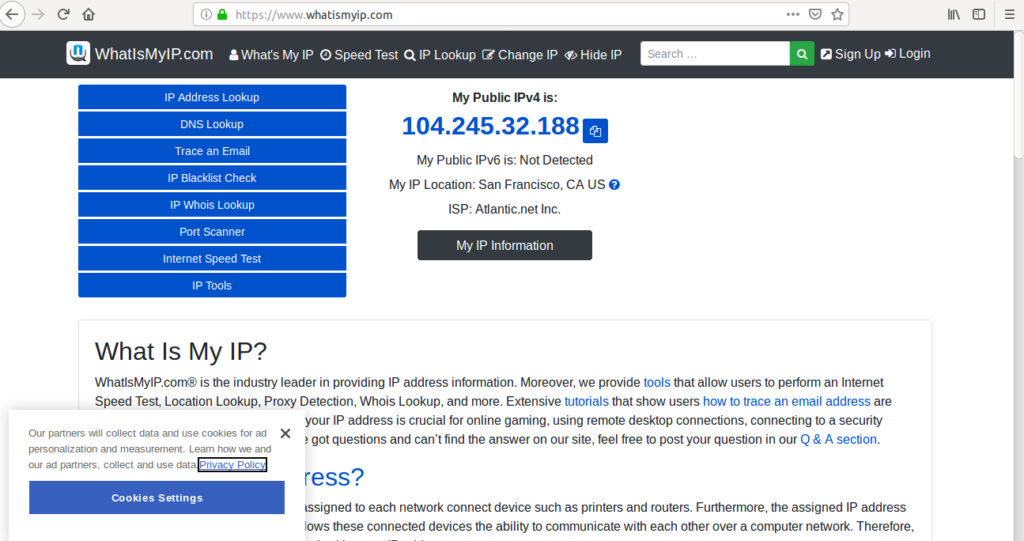
Now, open your web browser and access the URL https://www.whatismyip.com to check your public IP address. If everything is fine, you should see your Privoxy server IP on the following page:
By default, the Privoxy server is configured to block any advertising site. To check it, open a new tab in your web browser and access any advertising site http://advertise.com/.
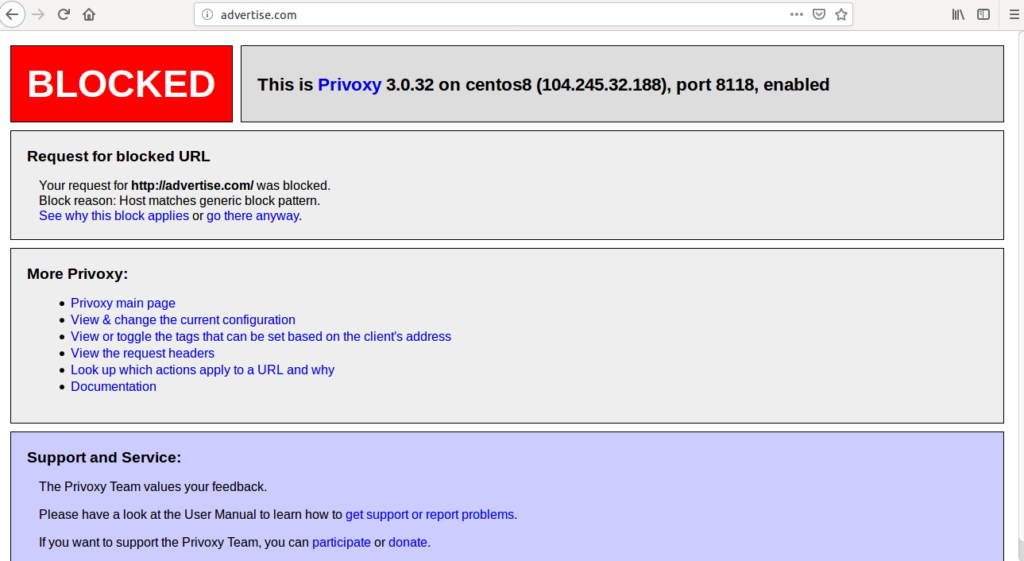
As you can see, your request for http://advertise.com/ was blocked.
Conclusion
Congratulations! You have successfully installed and configured the Privoxy server on your CentOS 8 virtual private server. You can now use some advanced filter in the Privoxy server and block your desired contents.
* This post is for informational purposes only and does not constitute professional, legal, financial, or technical advice. Each situation is unique and may require guidance from a qualified professional.
Readers should conduct their own due diligence before making any decisions.