Ansible is an automation tool set that works extremely well with Linux-based servers, but is also compatible with other cloud servers, such as Windows and VMware (to name a few). Ansible is an agentless application that only requires Python to function, which is a default application in nearly all Linux distributions.
Ansible its great at automating administrative tasks and creating a desired state infrastructure (ensuring all servers are the same).
Ansible works using the SSH protocol, so you don’t need any software or agent on remote servers. It is a great alternative to other automation tools, including Chef and Puppet.
In this article, we will show you how to install and configure Ansible on Ubuntu 18.04 server.
Prerequisites
- A fresh Ubuntu 18.04 VPS
- Preferably, you will have a few Linux test servers (Ubuntu or Debian)
- A root password configured on your server
Step 1 – Configure SSH Key-based Authentication
Ansible uses SSH to retrieve information from the remote hosts. You will need to set up key-based authentication for the remote hosts so the Ansible server can communicate with remote hosts without entering SSH password.
First, generate an SSH key on Ansible server with the following command:
ssh-keygen -t rsa
You should get the following output:
Generating public/private rsa key pair.
Enter file in which to save the key (/root/.ssh/id_rsa):
Created directory '/root/.ssh'.
Enter passphrase (empty for no passphrase):
Enter same passphrase again:
Your identification has been saved in /root/.ssh/id_rsa.
Your public key has been saved in /root/.ssh/id_rsa.pub.
The key fingerprint is:
SHA256:HzUXrR+ltn9w0mwz5+hKeFzEOPcJrLTKi9C72Y7elAE root@ubuntu1804
The key's randomart image is:
+---[RSA 2048]----+
|              .. |
|            .o .o|
|       E   .=o=o.|
|        . ..o*=o.|
|        S..o ..*o|
|      . ..++ .+oB|
|     . . =o +  O+|
|      . O .o  . +|
|      .Bo=  .o. .|
+----[SHA256]-----+
Next, copy the generated key to the remote hosts with the following command:
ssh-copy-id -i ~/.ssh/id_rsa.pub root@your-remote-host-ip
Next, check the SSH password-less login with the following command:
ssh root@your-remote-host-ip
Step 2 – Install Ansible
By default, Ansible is not available in the Ubuntu 18.04 default repository, so you will need to add Ansible PPA to your system.
You can add Ansible PPA with the following command:
apt-add-repository ppa:ansible/ansible
After adding Ansible PPA, update the repository and install Ansible with the following command:
apt-get update -y
apt-get install ansible -y
Once the installation has been completed, you can proceed to the next step.
Step 3 – Configure Ansible Hosts
Next, you will need to configure your Ansible hosts file to define the remote servers. You can edit the /etc/ansible/hosts with the following command:
nano /etc/ansible/hosts
You can add single hosts or group of hosts, as shown below:
[webservers]
webserver1 ansible_ssh_host=192.168.1.2 ansible_ssh_port=22 ansible_ssh_user=root
webserver2 ansible_ssh_host=192.168.1.3 ansible_ssh_port=22 ansible_ssh_user=root

[databaseservers]
dbserver1 ansible_ssh_host=192.168.1.4 ansible_ssh_port=22 ansible_ssh_user=root
Save and close the file when you are finished.
In the above file, webserver1 and webserver2 are used to define a webserver IP address, SSH port and username, while dbserver1 is used to define a database server IP Address, SSH port and username.
Next, disable the Python warning by editing the file /etc/ansible/ansible.cfg:
nano /etc/ansible/ansible.cfg
Add the following line below [defaults]:
deprecation_warnings=False
Save and close the file when you are finished.
At this point, your Ansible server is ready to manage your web server and database server.
Step 4 – Test Ansible
After setting up the Ansible server, it’s time to test the connectivity of all Ansible hosts.
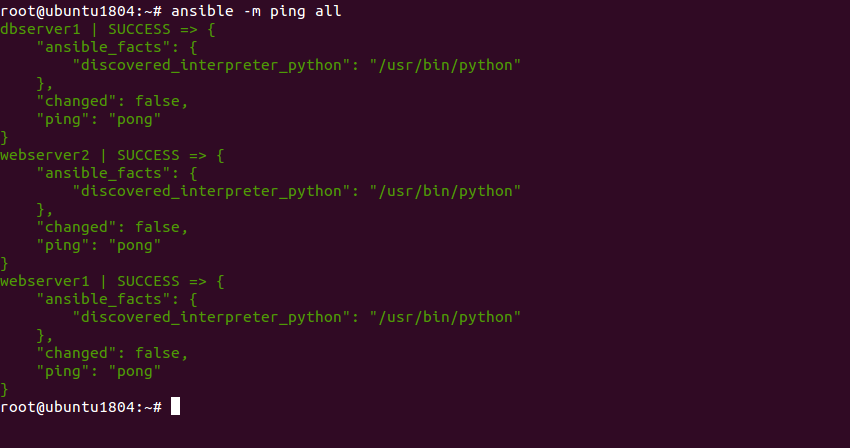
On the Ansible server, run the following command to test the connectivity of all hosts:
ansible -m ping all
If everything is fine, you should get the following output:
To test the connectivity of specific hosts like dbserver1, run the following command:
ansible -m ping dbserver1
You should see the following output:

To test the connectivity of a group of hosts like [webservers], run the following command:
ansible -m ping webservers
You should see the following output:

Step 5 – Ansible Advanced Commands
You can execute any command on a remote server over SSH from the Ansible server.
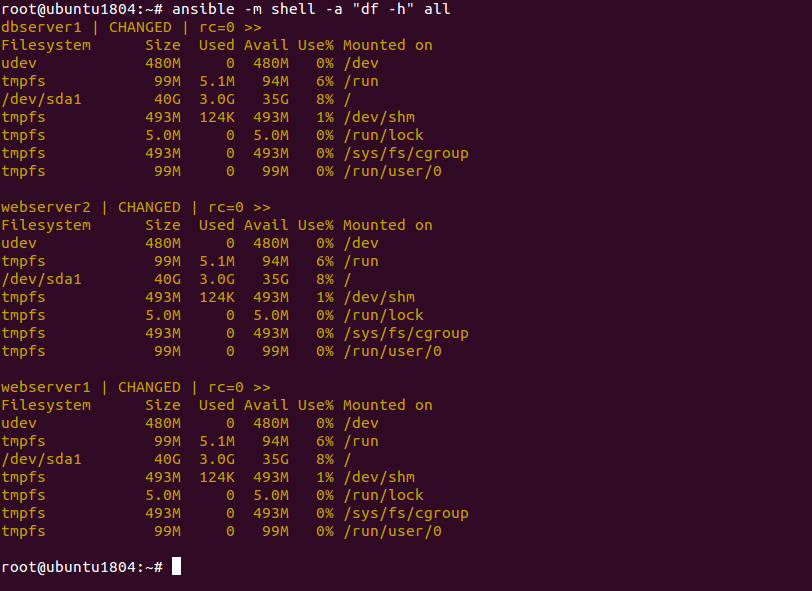
For example, to check disk usage of all Ansible hosts, run the following command:
ansible -m shell -a "df -h" all
This command will execute “df -h” command on all remote hosts and give the following output:
You can list all databases on dbserver1 hosts with the following command:
ansible -m shell -a "mysql -u root -padmin@123 -e 'show databases;'" dbserver1
You should see the following output:

Conclusion
In the above tutorial, we learned how to install Ansible on Ubuntu 18.04 server. We also learned how to manage multiple servers with Ansible. You can now easily manage your entire infrastructure with Ansible – try it out with VPS Hosting from Atlantic.Net!
* This post is for informational purposes only and does not constitute professional, legal, financial, or technical advice. Each situation is unique and may require guidance from a qualified professional.
Readers should conduct their own due diligence before making any decisions.