Apache Spark is a data processing framework that performs processing tasks over large data sets quickly. Apache Spark can also distribute data processing tasks across several computers. It does so either on its own or in tandem with other distributed computing tools. These two qualities make it particularly useful in the world of machine learning and big data. Spark also features an easy-to-use API, reducing the programming burden associated with data crunching. It undertakes most of the work associated with big data processing and distributed computing.
Step 1 – Install Java
Spark is a Java-based application, so you will need to install Java in your system. You can install the Java using the following command:
dnf install java-11-openjdk-devel -y
Once Java is installed, you can verify the Java version with the following command:
java --version
You should get the Java version in the following output:
openjdk 11.0.8 2020-07-14 LTSOpenJDK Runtime Environment 18.9 (build 11.0.8+10-LTS)
OpenJDK 64-Bit Server VM 18.9 (build 11.0.8+10-LTS, mixed mode, sharing)
Step 2 – Install Spark
First, you will need to download the latest version of Spark from its official website. You can download it with the following command:
wget https://mirrors.estointernet.in/apache/spark/spark-3.0.1/spark-3.0.1-bin-hadoop2.7.tgz
Once the download is completed, extract the downloaded file with the following command:
tar -xvf spark-3.0.1-bin-hadoop2.7.tgz
Next, move the extracted directory to /opt with the following command:
mv spark-3.0.1-bin-hadoop2.7 /opt/spark
Next, create a separate user to run Spark with the following command:
useradd spark
Next, change the ownership of the /opt/spark directory to the spark user with the following command:
chown -R spark:spark /opt/spark
Step 3 – Create a Systemd Service File for Spark
Next, you will need to create a systemd service file for the Spark master and slave.
First, create a master service file with the following command:
nano /etc/systemd/system/spark-master.service
Add the following lines:
[Unit]
Description=Apache Spark Master
After=network.target

[Service]
Type=forking
User=spark
Group=spark
ExecStart=/opt/spark/sbin/start-master.sh
ExecStop=/opt/spark/sbin/stop-master.sh

[Install]
WantedBy=multi-user.target
Save and close the file when you are finished, then create a Spark slave service with the following command:
nano /etc/systemd/system/spark-slave.service.service
Add the following lines:
[Unit]

Description=Apache Spark Slave

After=network.target

[Service]
Type=forking
User=spark
Group=spark
ExecStart=/opt/spark/sbin/start-slave.sh spark://your-server-ip:7077
ExecStop=/opt/spark/sbin/stop-slave.sh

[Install]
WantedBy=multi-user.target
Save and close the file, then reload the systemd daemon with the following command:
systemctl daemon-reload
Step 4 – Start the Master Service
Now, you can start the Spark master service and enable it to start at boot with the following command:
systemctl start spark-master
systemctl enable spark-master
You can verify the status of the Master service with the following command:
systemctl status spark-master
You should get the following output:
-
spark-master.service - Apache Spark Master
Loaded: loaded (/etc/systemd/system/spark-master.service; disabled; vendor preset: disabled)
Active: active (running) since Fri 2020-10-02 10:40:40 EDT; 18s ago
Process: 2554 ExecStart=/opt/spark/sbin/start-master.sh (code=exited, status=0/SUCCESS)
Main PID: 2572 (java)
Tasks: 32 (limit: 12523)
Memory: 174.5M
CGroup: /system.slice/spark-master.service
└─2572 /usr/lib/jvm/java-11-openjdk-11.0.8.10-0.el8_2.x86_64/bin/java -cp
/opt/spark/conf/:/opt/spark/jars/* -Xmx1g org.apache.spar>

Oct 02 10:40:37 centos8 systemd[1]: Starting Apache Spark Master...
Oct 02 10:40:37 centos8 start-master.sh[2554]: starting org.apache.spark.deploy.master.Master,
logging to /opt/spark/logs/spark-spark-org.apac>
Oct 02 10:40:40 centos8 systemd[1]: Started Apache Spark Master.
You can also check the Spark log file to check the Master server.
tail -f /opt/spark/logs/spark-spark-org.apache.spark.deploy.master.Master-1-centos8.out
You should get the following output:
20/10/02 10:40:40 INFO Utils: Successfully started service 'MasterUI' on port 8080.
20/10/02 10:40:40 INFO MasterWebUI: Bound MasterWebUI to 0.0.0.0, and started at
http://centos8:8080
20/10/02 10:40:40 INFO Master: I have been elected leader! New state: ALIVE
At this point, the Spark master server is started and listening on port 8080.
Step 5 – Access Spark Dashboard
Now, open your web browser and access the Spark dashboard using the URL http://your-server-ip:8080. You should see the Spark dashboard in the following page:
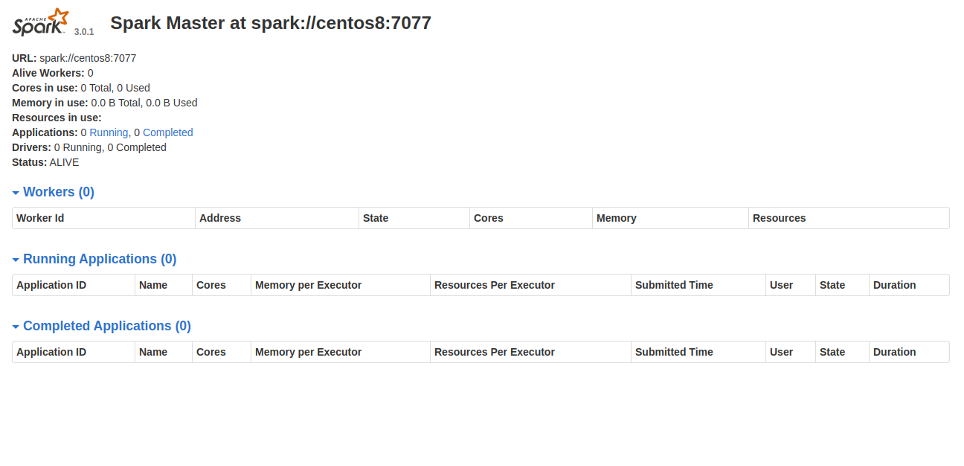
In the above page, there are no workers attached to the master.
Step 6 – Start Slave Service
Now, start the Slave service and enable it to start at boot with the following command:
systemctl start spark-slave
systemctl enable spark-slave
Next, check the status of the Slave with the following command:
systemctl status spark-slave
You should get the following output:
-
spark-slave.service - Apache Spark Slave
Loaded: loaded (/etc/systemd/system/spark-slave.service; disabled; vendor preset: disabled)
Active: active (running) since Fri 2020-10-02 10:45:12 EDT; 10s ago
Process: 2671 ExecStart=/opt/spark/sbin/start-slave.sh spark://45.58.32.165:7077 (code=exited,
status=0/SUCCESS)
Main PID: 2680 (java)
Tasks: 35 (limit: 12523)
Memory: 197.9M
CGroup: /system.slice/spark-slave.service
└─2680 /usr/lib/jvm/java-11-openjdk-11.0.8.10-0.el8_2.x86_64/bin/java -cp
/opt/spark/conf/:/opt/spark/jars/* -Xmx1g org.apache.spar>

Oct 02 10:45:09 centos8 systemd[1]: Starting Apache Spark Slave...
Oct 02 10:45:09 centos8 start-slave.sh[2671]: starting org.apache.spark.deploy.worker.Worker,
logging to /opt/spark/logs/spark-spark-org.apach>
Oct 02 10:45:12 centos8 systemd[1]: Started Apache Spark Slave.
You can also check the Spark slave log file for confirmation:
tail -f /opt/spark/logs/spark-spark-org.apache.spark.deploy.worker.Worker-1-centos8.out
You should get the following output:
20/10/02 10:45:12 INFO Worker: Spark home: /opt/spark
20/10/02 10:45:12 INFO ResourceUtils: ==============================================================
20/10/02 10:45:12 INFO ResourceUtils: Resources for spark.worker:
20/10/02 10:45:12 INFO ResourceUtils: ==============================================================
20/10/02 10:45:12 INFO Utils: Successfully started service ‘WorkerUI’ on port 8081.
20/10/02 10:45:12 INFO WorkerWebUI: Bound WorkerWebUI to 0.0.0.0, and started at http://centos8:8081
20/10/02 10:45:12 INFO Worker: Connecting to master 45.58.32.165:7077…
20/10/02 10:45:12 INFO TransportClientFactory: Successfully created connection to /45.58.32.165:7077 after 66 ms (0 ms spent in bootstraps)
20/10/02 10:45:13 INFO Worker: Successfully registered with master spark://centos8:7077
Now, go to the Spark dashboard and reload the page. You should see the worker in the following page.
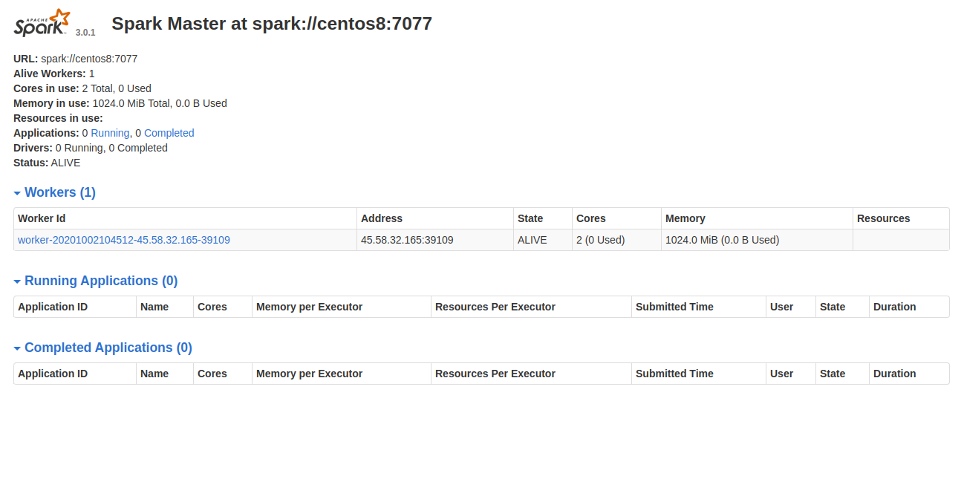
You can also access the worker directly using the URL http://your-server-ip:8081.
Conclusion
In this guide, you learned how to set up a single-node Spark cluster on CentOS 8. You can now configure Spark multinode cluster easily and use it for big data and machine learning processing. Set up Apache Spark on your VPS hosting account with Atlantic.Net!
* This post is for informational purposes only and does not constitute professional, legal, financial, or technical advice. Each situation is unique and may require guidance from a qualified professional.
Readers should conduct their own due diligence before making any decisions.