A MEAN Stack is a free, open-source, popular JavaScript software stack used for developing dynamic websites and web applications. It is made from four components: MongoDB, Express, Angular, and Node.js. Angular is used for frontend development, while Node.js, Express, and MongoDB are used for backend development. A MEAN stack is based on JavaScript language so it can handle all aspects of an application.
In this tutorial, we will show you how to install a MEAN Stack on Ubuntu 20.04.
Prerequisites
- A fresh Ubuntu 20.04 VPS on the Atlantic.Net Cloud Platform
- A valid domain name pointed to your server IP
- A root password configured on your server
Step 1 – Install MongoDB
First, you will need to install a MongoDB database in your server. By default, the latest version of MongoDB is available in the Ubuntu 20.04 default repository, so you can install it easily with the following command:
apt-get install mongodb -y
Once MongoDB is installed, start the MongoDB service and enable it to start at system reboot with the following command:
systemctl start mongodb
systemctl enable mongodb
Step 2 – Install Node.js
First, install the necessary dependencies using the following command.
apt-get install -y ca-certificates curl gnupg
Next, download the Node.js GPG key.
mkdir -p /etc/apt/keyrings
curl -fsSL https://deb.nodesource.com/gpgkey/nodesource-repo.gpg.key | gpg --dearmor -o /etc/apt/keyrings/nodesource.gpg
Next, add the NodeSource repo to the APT source list.
echo "deb [signed-by=/etc/apt/keyrings/nodesource.gpg] https://deb.nodesource.com/node_18.x nodistro main" | tee /etc/apt/sources.list.d/nodesource.list
Then, update the repository index and install the Ndoe.js with the following command.
apt update
apt-get install -y nodejs
Next, verify the Node.js version using the following command.
node -v
Output.
v18.19.0
Next, install other required packages including yarn, gulp, and pm2 with the following command:
npm install -g yarn
npm install -g gulp
npm install pm2 -g
Once all the packages are installed, you can proceed to the next step.
Step 3 – Install and Configure MEAN Stack
First, download the latest version of MEAN with the following command:
git clone https://github.com/meanjs/mean
Once the download is completed, change the directory to mean and install all required dependencies with the following command:
cd mean
yarn install
Next, edit the server.js file with the following command:
nano server.js
Replace all the lines with the following:
const express = require('express');
const MongoClient = require('mongodb').MongoClient;
const app = express();

app.use('/', (req, res) => {
MongoClient.connect("mongodb://localhost:27017/test", function(err, db){
db.collection('Example', function(err, collection){
collection.insert({ pageHits: 'pageHits' });
db.collection('Example').count(function(err, count){
if(err) throw err;
res.status(200).send('Page Hits: ' + Math.floor(count/2));
});
});
});
});

app.listen(3000);
console.log('Server running at http://localhost:3000/');

module.exports = app;
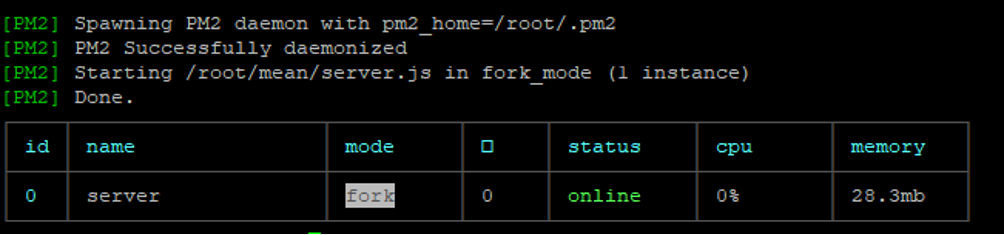
Save and close the file when you are finished, then start the server with the following command:
pm2 start server.js
You should get the following output:
Next, enable server.js to start at system reboot with the following command:
pm2 startup
At this point, the MEAN Stack is installed and listening on port 3000. You can check it with the following command:
ss -antpl | grep 3000
You should get the following output:
LISTEN 0 511 *:3000 *:* users:(("node",pid=26014,fd=20))
Step 4 – Configure Nginx as a Reverse Proxy For MEAN
Next, you will need to install and configure Nginx as a reverse proxy to access the MEAN application.
First, install the Nginx web server with the following command:
apt-get install nginx -y
Once installed, create a new Nginx virtual host configuration file with the following command:
nano /etc/nginx/sites-available/mean
Add the following lines:
server {
listen 80;

server_name mean.example.com;
access_log /var/log/nginx/mean-access.log;
error_log /var/log/nginx/mean-error.log;

location / {
proxy_set_header X-Forwarded-Host $host;
proxy_set_header X-Forwarded-Server $host;
proxy_set_header X-Forwarded-For $proxy_add_x_forwarded_for;
proxy_pass http://localhost:3000/;
}
}
Save and close the file when you are finished, then enable the virtual host with the following command:
ln -s /etc/nginx/sites-available/mean /etc/nginx/sites-enabled/
Next, edit the Nginx main configuration file and set the hash_bucket_size:
nano /etc/nginx/nginx.conf
Add the following line below http {
server_names_hash_bucket_size 64;
Save and close the file, then verify the Nginx for syntax errors with the following command:
nginx -t
You should get the following output:
nginx: the configuration file /etc/nginx/nginx.conf syntax is ok
nginx: configuration file /etc/nginx/nginx.conf test is successful
Finally, restart the Nginx service to apply the configuration changes:
systemctl restart nginx
Step 5 – Access MEAN Application
Now, open your web browser and access the MEAN application using the URL http://mean.example.com. You should see your MEAN application in the following screen:

In the above screen, the number will be increased automatically when you refresh the page.
Conclusion
Congratulations! You have successfully installed MEAN Stack with Nginx as a reverse proxy on Ubuntu 20.04 server. You can now easily deploy your own dynamic application with a MEAN Stack on your VPS hosting account with Atlantic.Net.
* This post is for informational purposes only and does not constitute professional, legal, financial, or technical advice. Each situation is unique and may require guidance from a qualified professional.
Readers should conduct their own due diligence before making any decisions.