Foreman is a free and open-source tool used for provisioning, configuring, and monitoring servers. It uses configuration management tools including Salt, Chef and Puppet to automate repetitive tasks and deploy applications. Foreman comes with a CLI tool and web-based interface to manage servers in public and private clouds. It supports all major operating systems including, CentOS, Ubuntu, Fedora, CoreOS, Debian, RHEL and many more.
In this tutorial, we will show you how to install Foreman on CentOS 8.
Step 1 – Setup Hostname
First, you will need to set up a hostname to resolve an IP address. You can set up it with the following command:
hostnamectl set-hostname foreman.example.com
Next, you will need to edit the file /etc/hosts and define your IP address.
nano /etc/hosts
Add the following lines:
your-server-ip foreman.example.com
Save and close the file when you are finished.
Step 2 – Install Foreman Installer
By default, Foreman installer is not available in the CentOS default repository, so you will need to add the Puppet and Foreman repositories to your system. You can install them with the following command:
dnf install https://yum.puppet.com/puppet6-release-el-8.noarch.rpm -y
dnf install https://yum.theforeman.org/releases/2.1/el8/x86_64/foreman-release.rpm -y
Once both repositories are installed, install the Foreman installer with the following command:
dnf install foreman-installer -y
After installing the Foreman installer, you can proceed to the next step.
Step 3 – Run Foreman Installer
Foreman installer installs everything including Apache, Puppet, Smart Proxy and TFTP. You can run the Foreman installer using the following command:
foreman-installer
Once the installation has been completed successfully, you should get the following output:
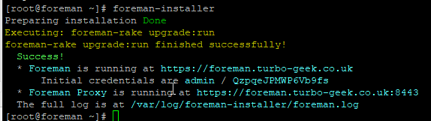
Note: Please note down the admin credentials as shown in the above output.
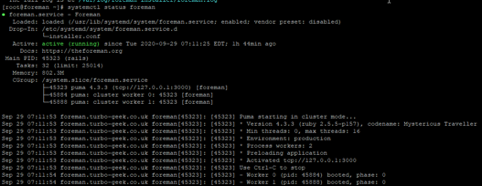
You can also check the status of the Foreman service with the following command:
systemctl status foreman
You should get the following output:
Step 4 – Configure Firewall
If FirewallD is installed in your server, then you will also need to allow all required ports for external access. You can allow them with the following command:
firewall-cmd --add-port={22,53,80,443,3000,8140,3306,5432,8443,5910-5930}/tcp --permanent
firewall-cmd --add-port=67-69/udp --permanent
Next, reload the FirewallD to apply the configuration changes.
firewall-cmd --reload
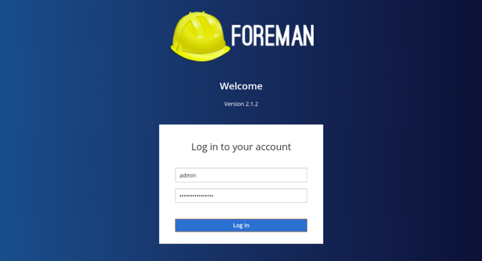
Step 5 – Access Foreman Web UI
Now, open your web browser and access the Foreman web interface using the URL https://foreman.example.com. You should see the Foreman login page as shown below:
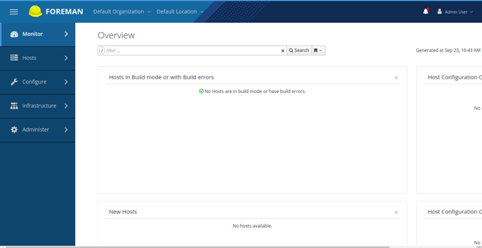
Provide your admin username and password and click on the Log In button. You should see the Foreman dashboard in the following page:
Conclusion
Congratulations! You have successfully installed and configured Foreman on CentOS 8. You can now add any remote hosts and start managing through the Foreman dashboard on your VPS from Atlantic.Net.
* This post is for informational purposes only and does not constitute professional, legal, financial, or technical advice. Each situation is unique and may require guidance from a qualified professional.
Readers should conduct their own due diligence before making any decisions.