Table of Contents
- Step 1 - Install Apache, PHP and MariaDB
- Step 2 - Create a MariaDB Database
- Step 3 - Install and Configure MongoDB
- Step 4 - Install Node.js
- Step 5 - Install Socioboard
- Step 6 - Create a Systemd Service File for Socioboard
- Step 7 - Configure Socioboard-web-php
- Step 8 - Configure Apache for Socioboard
- Step 9 - Access Socioboard
- Conclusion
Socioboard is a free, open-source social media management tool used for managing multiple social media channels from a central dashboard. It is used by small and medium-sized businesses for lead generation, marketing, customer support, and automated engagement. It comes with a rich set of features including advanced scheduling & publishing tools, social CRM tools, customizability, scalability, customer support, Helpdesk integration, and more.
In this post, we will show you how to install Socioboard with Apache on Ubuntu 20.04.
Step 1 – Install Apache, PHP and MariaDB
First, Apache, PHP, MariaDB, and other required packages by running the following command:
apt-get update -y
apt-get install apache2 mariadb-server php libapache2-mod-php7.4 php7.4-cli php7.4-mysql php7.4-common php7.4-json php7.4-opcache php7.4-readline php7.4-curl php7.4-gd php7.4-xml git curl gnupg2  -y
After installing all the packages, you can proceed to the next step.
Step 2 – Create a MariaDB Database
Next, you will need to create a database and user for Socioboard. First, connect to MariaDB with the following command:
mysql
Once connected, create a database and user with the following command:
create database socioboarddb;
create user socioboarduser@localhost identified by 'password';
Next, grant all the privileges with the following command:
grant all privileges on socioboarddb.* to socioboarduser@localhost;
Next, flush the privileges and exit from MariaDB with the following command:
flush privileges;
exit;
Step 3 – Install and Configure MongoDB
Next, you will need to install MongoDB and create a database for Socioboard.
First, add the MongoDB repository with the following command:
wget -qO - https://www.mongodb.org/static/pgp/server-4.4.asc | apt-key add -
echo "deb [ arch=amd64,arm64 ] https://repo.mongodb.org/apt/ubuntu focal/mongodb-org/4.4 multiverse" | tee /etc/apt/sources.list.d/mongodb-org-4.4.list
Next, update the repository and install MongoDB with the following command:
apt-get update -y
apt-get install mongodb-org -y
Next, start the MongoDB service with the following command:
systemctl start mongod
Next, connect MongoDB and create a database and user with the following command:
mongo
use socioboarddb
db.new_collection.insert({ some_key: "some_value" })
db.createUser(
  {
    user: "socioboarduser",
    pwd: "password",
    roles: [ { role: "readWrite", db: "socioboarddb" } ]
  }
)
Next, exit from the Mongo shell with the following command:
exit
Step 4 – Install Node.js
First, install the necessary dependencies using the following command.
apt-get install -y ca-certificates curl gnupg
Next, download the Node.js GPG key.
mkdir -p /etc/apt/keyrings
curl -fsSL https://deb.nodesource.com/gpgkey/nodesource-repo.gpg.key | gpg --dearmor -o /etc/apt/keyrings/nodesource.gpg
Next, add the NodeSource repo to the APT source list.
echo "deb [signed-by=/etc/apt/keyrings/nodesource.gpg] https://deb.nodesource.com/node_18.x nodistro main" | tee /etc/apt/sources.list.d/nodesource.list
Then, update the repository index and install the Ndoe.js with the following command.
apt update
apt-get install -y nodejs
Next, verify the Node.js version using the following command.
node -v
Output.
v18.19.0
Step 5 – Install Socioboard
First, download the latest version of Socioboard and copy it to the Apache web root directory:
git clone https://github.com/socioboard/Socioboard-4.0.git
mv Socioboard-4.0 /var/www/html/socioboard
Next, change the ownership of the socioboard directory to www-data:
chown -R www-data:www-data /var/www/html/socioboard
Next, edit the config.json file and define your MariaDB database settings:
nano /var/www/html/socioboard/socioboard-api/library/sequelize-cli/config/config.json
Change the following lines:
{
  "development": {
    "username": "socioboarduser",
    "password": "password",
    "database": "socioboarddb",
    "host": "127.0.0.1",
    "dialect": "mysql",
    "operatorsAliases": false,
    "pool": {
      "max": 100,
      "min": 0,
      "acquire": 1000000,
      "idle": 200000
    },
Save and close the file, then change the directory to feeds, library, notification, and publish directory and install all the dependencies for each:
cd /var/www/html/socioboard/socioboard-api/feeds
npm install
npm audit fix
cd /var/www/html/socioboard/socioboard-api/library
npm install
cd /var/www/html/socioboard/socioboard-api/notification
npm install
cd /var/www/html/socioboard/socioboard-api/publish
npm install
cd /var/www/html/socioboard/socioboard-api/user
npm install
Next, initialize the database with the following command:
cd /var/www/html/socioboard/socioboard-api/library/sequelize-cli/
NODE_ENV=development sequelize db:migrate
Next, list all files inside seeders directory:
ls /var/www/html/socioboard/socioboard-api/library/sequelize-cli/seeders/
Output:
20190213051930-initialize_application_info.js
20190507065043-initialize_dummy_users.js
20190507122417-initialize_socialaccounts.js
20190509121650-unauthorized_unittest_accounts.js
Next, pick the file that ends with initialize_application_info.js and run the following command:
NODE_ENV=development sequelize db:seed --seed 20190213051930-initialize_application_info.js
Next, edit the development.json and define your MongoDB database:
nano /var/www/html/socioboard/socioboard-api/user/config/development.json
Change the following lines:
    "mongo": {
        "username": "socioboarduser",
        "password": "password",
        "host": "localhost",
        "db_name": "socioboarddb"
    },
Save and close the file then edit each of the following files and define your MongoDB database settings:
nano /var/www/html/socioboard/socioboard-api/feeds/config/development.json
nano /var/www/html/socioboard/socioboard-api/notification/config/development.json
nano /var/www/html/socioboard/socioboard-api/publish/config/development.json
Step 6 – Create a Systemd Service File for Socioboard
First, create a systemd service file for Socioboard user with the following command:
nano /etc/systemd/system/socioboard-user.service
Add the following lines:
[Unit]
Description=SocioBoard User Microservice
After=multi-user.target

[Service]
Type=simple
User=www-data
WorkingDirectory=/var/www/html/socioboard/socioboard-api/user/
Environment=NODE_ENV=development
ExecStart=/usr/bin/nodemon app.js
Restart=on-failure
RestartSec=5

[Install]
WantedBy=multi-user.target
Save and close the file, then create a systemd service file for Socioboard publish with the following command:
nano /etc/systemd/system/socioboard-publish.service
Add the following lines:
[Unit]
Description=SocioBoard Publish Microservice
After=multi-user.target

[Service]
Type=simple
User=www-data
WorkingDirectory=/var/www/html/socioboard/socioboard-api/publish/
Environment=NODE_ENV=development
ExecStart=/usr/bin/nodemon app.js
Restart=on-failure
RestartSec=5

[Install]
WantedBy=multi-user.target
Save and close the file, then create a systemd service file for Socioboard feeds with the following command:
nano /etc/systemd/system/socioboard-feeds.service
Add the following lines:
[Unit]
Description=SocioBoard Feeds Microservice
After=multi-user.target

[Service]
Type=simple
User=www-data
WorkingDirectory=/var/www/html/socioboard/socioboard-api/feeds/
Environment=NODE_ENV=development
ExecStart=/usr/bin/nodemon app.js
Restart=on-failure
RestartSec=5

[Install]
WantedBy=multi-user.target
Save and close the file, then create a systemd service file for Socioboard notification:
nano /etc/systemd/system/socioboard-notification.service
Add the following lines:
[Unit]
Description=SocioBoard Notification Microservice
After=multi-user.target

[Service]
Type=simple
User=www-data
WorkingDirectory=/var/www/html/socioboard/socioboard-api/notification/
Environment=NODE_ENV=development
ExecStart=/usr/bin/nodemon app.js
Restart=on-failure
RestartSec=5

[Install]
WantedBy=multi-user.target
Save and close the file, then reload the systemd daemon with the following command:
systemctl daemon-reload
Next, start all the services and enable them to start at system reboot:
systemctl start socioboard-user socioboard-publish socioboard-feeds socioboard-notification
systemctl enable socioboard-user socioboard-publish socioboard-feeds socioboard-notification
Next, verify the status of all services with the following command:
systemctl status socioboard-user socioboard-publish socioboard-feeds socioboard-notification
Step 7 – Configure Socioboard-web-php
Next, change the directory to socioboard-web-php with the following command:
cd /var/www/html/socioboard/socioboard-web-php/
Note: If you encounter any issues with the following, retry after disabling IPV6
sysctl -w net.ipv6.conf.all.disable_ipv6=1
Next, install the Composer with the following command:
apt-get install composer -y
Next, install the Laravel components with the following command:
composer global require laravel/installer
Next, rename the environment variable file with the following command:
mv environmentfile.env .env
Next, edit the .env file:
nano .env
Change the following lines:
APP_URL=http://socioboard.linuxbuz.com/
API_URL=http://localhost:3000/
API_URL_PUBLISH=http://localhost:3001/
API_URL_FEEDs=http://localhost:3002/
API_URL_NOTIFY=http://localhost:3003/
Save and close the file, then update the composer with the following command:
composer update
Next, generate the Laravel app key with the following command:
php artisan key:generate
Step 8 – Configure Apache for Socioboard
Next, create an Apache virtual host configuration file for Socioboard:
nano /etc/apache2/sites-available/socioboard.conf
Add the following lines:
<VirtualHost *:80>
    ServerName socioboard.linuxbuz.com
    DocumentRoot /var/www/html/socioboard/socioboard-web-php/public/

     <Directory /var/www/html/socioboard/socioboard-web-php/public/>
       DirectoryIndex index.php
       Options +FollowSymLinks
       AllowOverride All
       Require all granted
     </Directory>

    ErrorLog ${APACHE_LOG_DIR}/socioboard.error.log
    CustomLog ${APACHE_LOG_DIR}/socioboard.access.log combined
</VirtualHost>
Save and close the file, then enable the Apache virtual host and rewrite module with the following command:
a2ensite socioboard.conf
a2enmod rewrite
Next, restart the Apache and Socioboard services with the following command:
systemctl restart apache2
systemctl restart socioboard-user socioboard-publish socioboard-feeds socioboard-notification
Step 9 – Access Socioboard
Now, open your web browser and access the Socioboar using the URL http://socioboard.linuxbuz.com. You should see the following page:
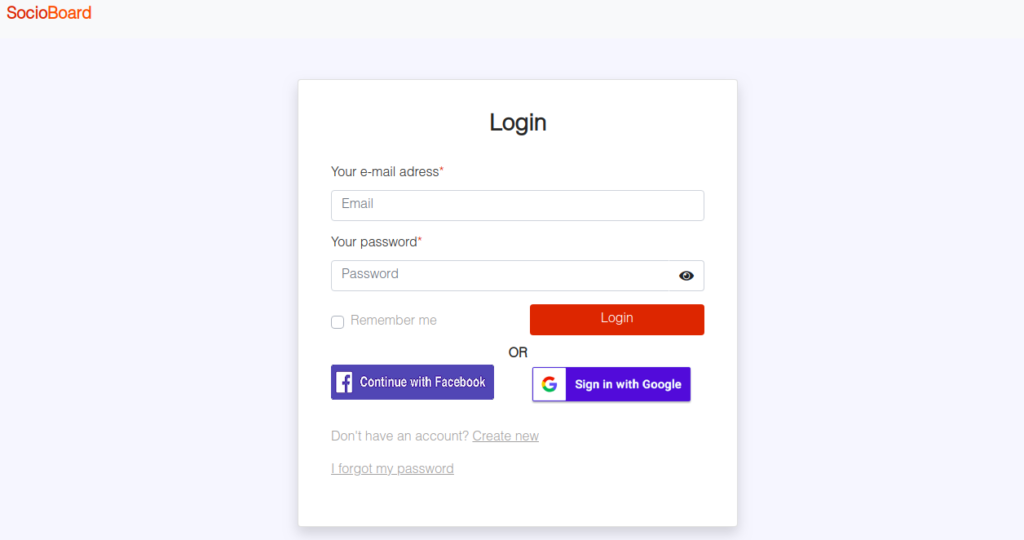
Click on the Create New button to create a new account. You should see the following page:
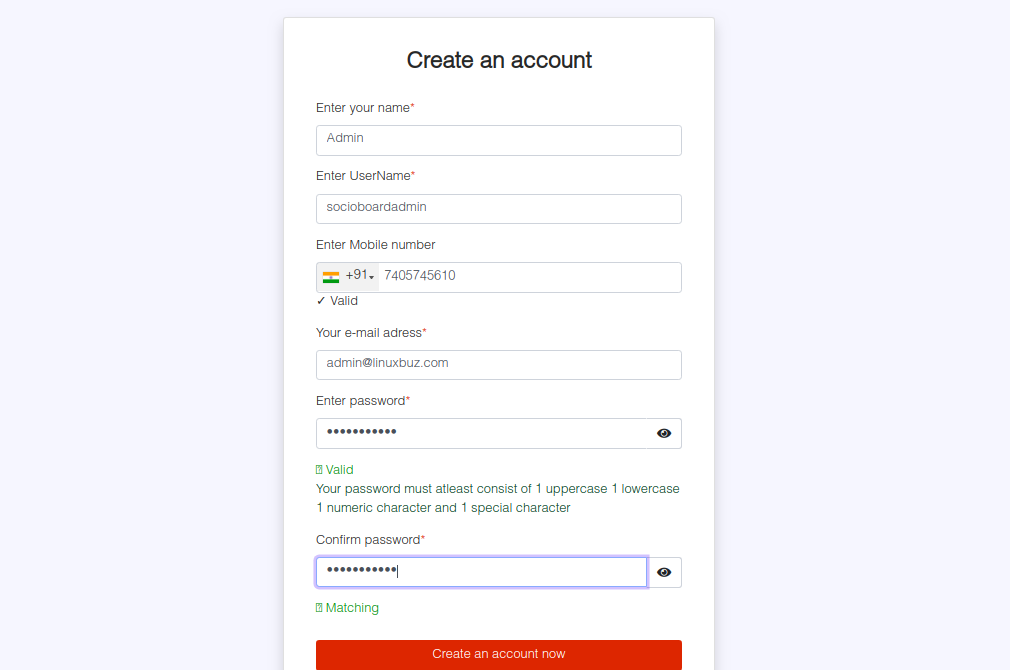
Provide all the details and click on the Create an account now button.
Socioboard tries to send a verification email, but it can not send an email. You will need to activate the account from the MariaDB console.
Connect to the MariaDB with the following command:
mysql
Once connected, change the database to socioboarddb and activate the account with the following command:
use socioboarddb;
update user_activations set activation_status = 1;
Next, change the account to Platinum plan with the following command:
update user_activations set user_plan = 7;
Next, exit from the MariaDB with the following command:
exit;
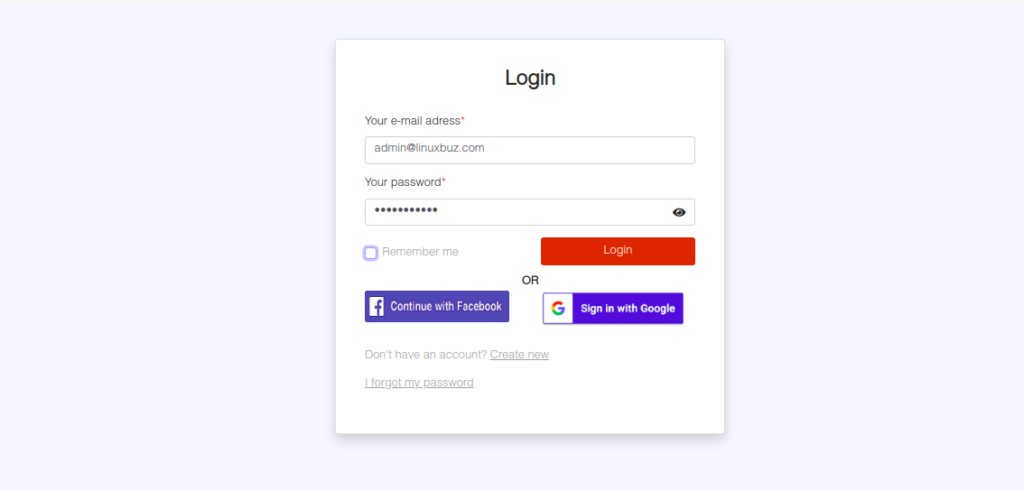
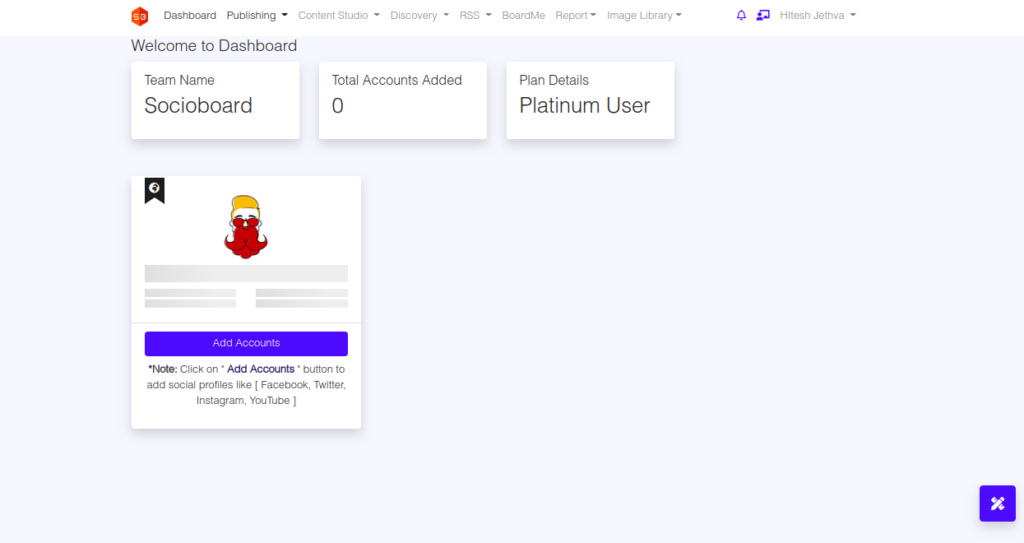
Now go back to your web interface, enter your email and password which you have provided during the registration process, and click on the Login button. You should see the Socioboard dashboard on the following page:
Conclusion
In the above guide, you learned how to install Socioboard on Ubuntu 20.04. You can implement it in your organizations and manage all social media channels from the central dashboard on your VPS hosting account from Atlantic.Net!
* This post is for informational purposes only and does not constitute professional, legal, financial, or technical advice. Each situation is unique and may require guidance from a qualified professional.
Readers should conduct their own due diligence before making any decisions.