Verified and Tested 02/16/2015
Introduction
A basic guide to securing access to your server with iptables.
Prerequisites
Server running CentOS 6.5 or earlier (these instructions could also work under other distributions of Linux, though with slight changes based on the distribution;
this article will work from CentOS 6.5) If you do not have a server already, consider firing up a virtual private server from Atlantic.Net
iptables installed
Starting with basic IPTables via Command Line
First, let’s verify that iptables is installed and active (all of these commands will require root privileges, so ensure that your user has access to these privileges–or,
if you’d prefer, elevate to root and obviate the need to preface all of your commands with ‘sudo’)
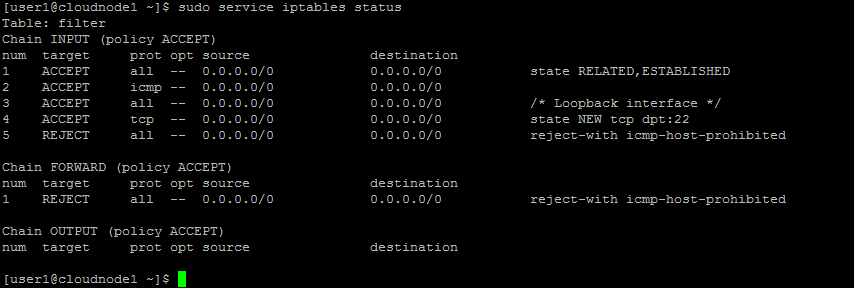
sudo service iptables status
 service iptables status
For this new server, iptables is not running, so it’s currently allowing all traffic in. Not good. Let’s fix that.
To cover some basics, we’ll be setting the default behavior to drop all traffic and allow only certain traffic in (this is a security practice often called “whitelisting”).
We’ll first do it all on the command line, and then we’ll set it up so those rules are persistent across reboots.
First, let’s start the service and then check to see what’s running.
sudo service iptables start
sudo service iptables status
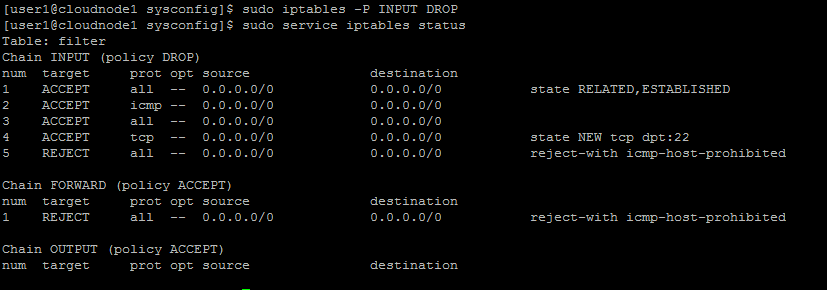
Note that the default policy in each of these chains is to accept traffic. Let’s change the default for INPUT to drop traffic.
(WARNING: be sure you have at least one ACCEPT rule in the INPUT chain to allow either your workstation IP address or port 22
if you are accessing this server remotely over ssh. In the above output of the iptables status, note that TCP traffic to port 22 (“tcp dpt:22”) is accepted.
If that rule weren’t there, we could lock ourselves out of this server!)
sudo iptables -P INPUT DROP
The ‘-P‘ indicates that we will be making a change to the overall policy, ‘INPUT‘ is the particular chain to edit, and ‘DROP‘ is the default policy target.
Now, let’s add some specific rules.
First, we’ll allow access for HTTP and HTTPS traffic, which we’ll want accessible from any IP address. When adding rules to iptables,
it’s important to pay attention to the order of those rules since iptables parses rules in order and will process traffic according
to the target indicated in the rule and then exit the chain (in most cases).
In the output above, note that the last rule will reject traffic. If we append an allow rule to the end of this chain, it will never be invoked,
since the reject rule above it will reject the traffic and stop processing any following rules in the INPUT chain.
So, let’s find out which at which line number we want to insert our new rule:
sudo iptables -nL INPUT --line-numbers

Iptables status
The ‘-nL‘ combines a couple of flags: ‘n‘ skips DNS resolution (so we can see which IPs each rule examines); ‘L‘ lists each rule in the indicated chain.
The final option, ‘–line-numbers‘, appropriately enough, adds line numbers to each rule entry. (This output is similar to what you could get with
‘sudo service iptables status‘, but that command provides the rules for all chains, whereas the ‘iptables‘ command above gives us the means to
narrow down the scope of the output by individual chain.)
In this case, we’ll insert our rules just above the reject rule:
sudo iptables -I INPUT 5 -m tcp -p tcp --dport 80 -j ACCEPT
sudo iptables -I INPUT 6 -m tcp -p tcp --dport 443 -j ACCEPT

Iptables list with line numbers
What does all this mean?
* ‘-I‘ indicates that we will be inserting this rule at the indicated line number (the number following the name of the chain within which we are inserting the rule).
* ‘-m tcp -p tcp –dport 80‘ specifies that this rule will match TCP packets arriving in with a destination port of 80 (or 443, in the case of the second rule).
* ‘-j ACCEPT‘ indicates that, if this rule is matched, then “jump” this packet to the ACCEPT target (which is the long way of saying it’s allowed through).
Note that once we enter the first command, the reject rule would be pushed down to line number 6, so that’s why the second rule inserts itself on line number 6.
Now, let’s add a rule to allow access from a particular IP, regardless of type of traffic or port.
sudo iptables -I INPUT 4 -s 192.168.0.1 -j ACCEPT
Here we’re inserting this rule just above the rule allowing all ssh traffic on line 4. The ‘-s‘ specifies source IP. We could just as easily have allowed a source IP range using CIDR notation as well, so to allow the entire 192.168.0.0/24 range:
sudo iptables -I INPUT 4 -s 192.168.0.0/24 -j ACCEPT
We could make this rule more specific–say we only want to be able to ssh into this server from that 192.168.0.1 address. Let’s also go ahead and throw in a comment!
sudo iptables -R INPUT 4 -s 192.168.0.1 -m tcp -p tcp --dport 22 -j ACCEPT -m comment --comment "Only home workstation can ssh in"
First, since this rule will replace our earlier on, note the ‘-R‘–this means ‘replace’ on the indicated line number instead of insert. This rule combines checking for source IP and destination port, so in order for it to allow traffic, we’ll have to match both. The final match option for the comment is optional, but it can be very helpful when listing iptables rules to indicate briefly why that rule is in place–which can be super helpful when your iptables rules get more involved, or when there are rules that aren’t immediately self-evident when listed (such as the one for the loopback interface, which I’d added the comment for earlier).
We could, at this point, remove the rule allowing any IP to access this server via ssh:
sudo iptables –D INPUT 5
(The ‘-D’ specifies that the indicated line number in this chain will be deleted.)
Once are done adding rules, be sure to save:
sudo service iptables save
This will save your currently running iptables rules in /etc/sysconfig/iptables so that, the next time you restart your server,
it will automatically load the rules you’ve spent the time entering here. If you want to edit your iptables file with more descriptive
comments (or manage a larger, more intricate set of firewall rules), see the article on Basic IPTables File Configuration.
* This post is for informational purposes only and does not constitute professional, legal, financial, or technical advice. Each situation is unique and may require guidance from a qualified professional.
Readers should conduct their own due diligence before making any decisions.