Previously
We have almost reached the end of our journey through this bonus round of our Introduction to Object-Oriented Programming! In our last article, we started our Petting Zoo example with a review of classes, objects, and methods. If you missed the beginning of this series, you can catch back up with us here. Otherwise, let’s dive back in!
Constructors
If you did the exercise with two Dog objects, it was a bit boring, right? After all, we have nothing to separate the dogs from each other and no way of knowing, without looking at the source code, which dog produced which bark.
In the previous article, I mentioned that when you create objects, you call a special method called a constructor. The constructor looks like the class name written as a method. For example, for a Dog class, the constructor would be called Dog().
The special thing about constructors is that they are the path to any new object, so they are a great place to call code that initializes an object with default values. Further, the return value from a constructor method is always an object of the class itself, which is why we can assign the return value of the constructor to a variable of the type of class we create.
However, so far, we have not actually created a constructor at all, so how come we can still call that method?
In many languages, C# included, the language gives you a free and empty constructor without you having to do anything. It is implied that you want a constructor; otherwise there would be no way of using the class for anything, so the languages just assume that you have written one.
This invisible and free constructor is called the default constructor, and, in our example, it will look like this:
public Dog(){ }
Notice that this syntax is very similar to the Speak() method we created earlier, except that we do not explicitly return a value nor do we even declare the return type of the method. As I mentioned earlier, a constructor always returns an instance of the class to which it belongs.
In this case, that is the class Dog, and that is why when we write Dog myDog = new Dog(), we can assign the new object to a variable named myDog which is of type Dog.
So let’s add the default constructor to our Dog class. You can either copy the line above or, in Visual Studio, you can use a shortcut: type ctor and hit Tab twice. It should generate the default constructor for you, as shown in Figure 9:
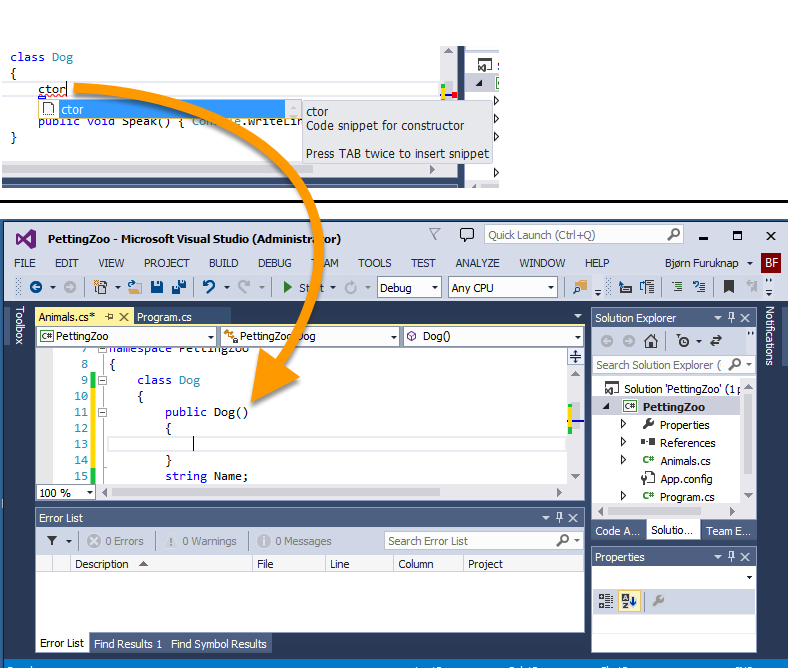
Figure 9: Adding a Constructor with ‘ctor’
The default constructor doesn’t actually give us anything new because it is now explicitly doing what was done implicitly before. However, it is a method, so we can now add content inside the brackets that will execute whenever we call this constructor. And because the constructor runs as the very first thing in an object’s construction, it is a perfect place to add initialization code.
For example, we could set the Name property of our objects to something by adding code such as this:
public Dog()
{
    this.Name = "Snoopy";
}
This example will set the Name property of any new objects to “Snoopy”.
Of course, that’s not very useful because not all dogs are called “Snoopy”, so instead, let us change the method signature of the constructor so that it accepts a parameter.
The parentheses of methods aren’t just there to look pretty; they serve to contain parameters that we can use to pass values to a method. This function applies to all methods, not just constructors, but let’s do it for a constructor first.
Change the default constructor signature to this:
public Dog(string dogName)
This addition allows us to send a string parameter into the constructor, and that when we do, we can refer to that parameter by the name dogName.
Then, add the following line to the method block:
this.Name = dogName;
This line sets this object’s property Name to the parameter we sent into the constructor.
Note that when you change the constructor’s signature, you get a case of the red squigglies in your Program.cs file, as shown in Figure 10.
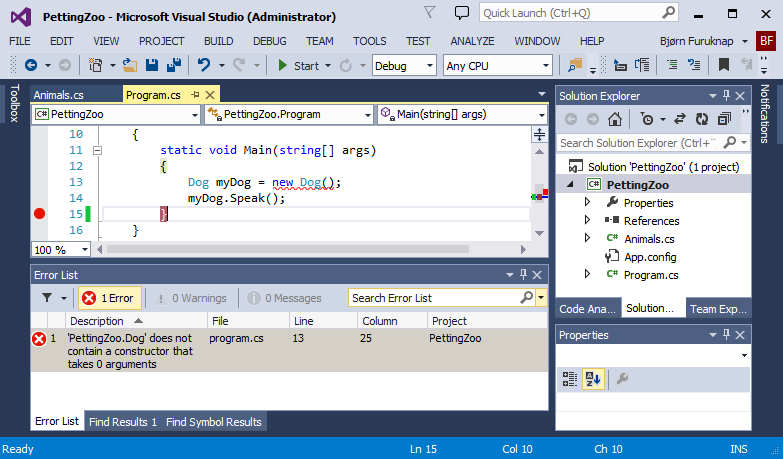
Figure 10: A Case of the Red Squigglies from Our New Constructor
When we add our own explicit constructors, C# and .NET will not implicitly create a default constructor for us. In our Program.cs file, we are still creating the Dog objects using the default parameter-less constructor, which now no longer exists.
To fix this problem, we need to add a parameter to our constructor call in Program.cs. We can, for example, update our object construction line as such:
Dog myDog = new Dog(“Snoopy”);
Doing so will remove the red squigglies and allow you to run the code again. If you leave or set your breakpoint after the last code line, you can look at the Locals panel and verify that your object’s Name property has indeed been set, as shown in Figure 11.
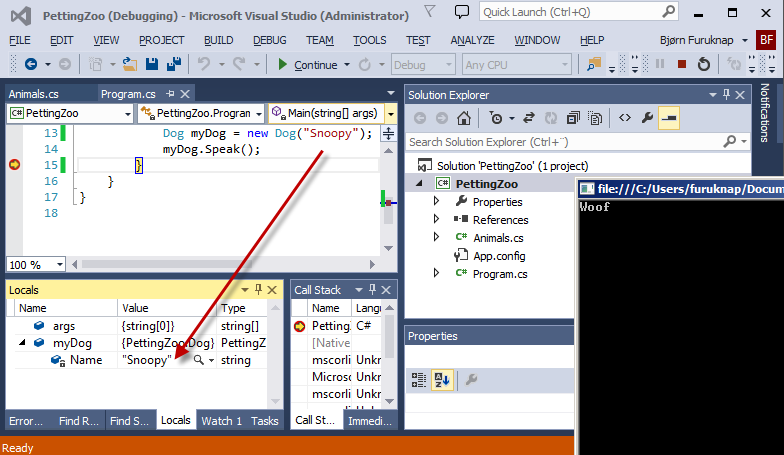
Figure 11: Seeing our Name Property Set Correctly
Got it? Good! We now have the ability to name our dog, but it isn’t really a useful program if people have to debug it to see what we’re doing. So let’s mix up the code a bit to make sure that we display the name of the dog that is barking.
Update your Dog objects and change the Speak() method as such:
public void Speak() { Console.WriteLine(this.Name + " says: Woof"); }
The change we have made now tells the WriteLine method to concatenate the name of this object with the literal string “ says: Woof” which should give us output that better displays our efforts. Try running the program now, and you should see something resembling Figure 12.
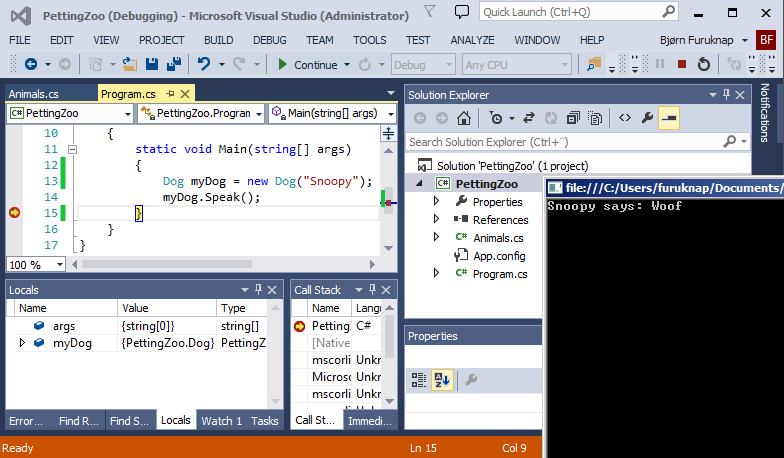
Figure 12: Snoopy Says: Woof
Nice work! You can now create many dogs with different names, and they will all bark at your command.
Of course, a petting zoo with only dogs is somewhat boring. I mean, I love dogs, but maybe we could add some additional animals to spice up the experience a bit?
.
Inheritance
Let’s start out by adding a new Cat class to our Animals.cs file. Add the following code next to the Dog class, but still inside the PettingZoo namespace brackets:
class Cat
{
    public Cat(string catName)
    {
        this.Name = catName;
    }
    string Name;
    public void Speak() { Console.WriteLine(this.Name + " says: Meow!"); }
}
Then, let’s create a Cat object in Program.cs and have it speak:
Cat myCat = new Cat("Garfield");
myCat.Speak();
Running this program now should give you output resembling Figure 13.
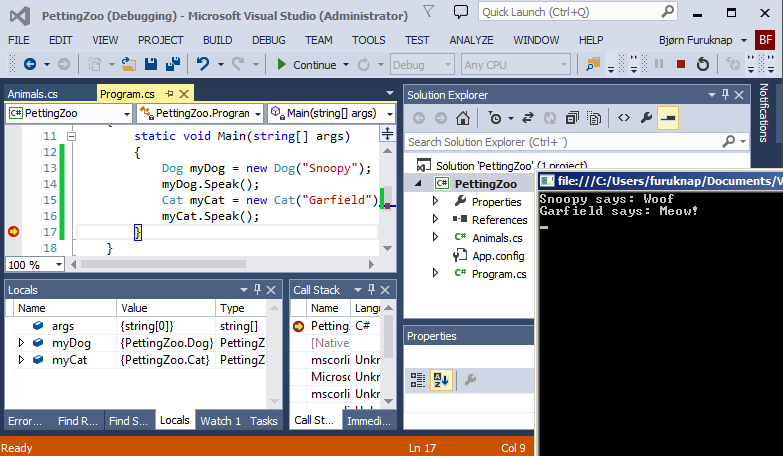
Figure 13: Garfield Says: Meow
Our program is predictable and works, but did you notice how similar the two classes really are? See how much code we’ve duplicated across the two classes? Wasn’t object orientation supposed to save us from writing code multiple times?
The answer is yes. We can–and should–simplify this code to reduce the amount of duplication. What we are about to go into will demonstrate a feature of OO called inheritance.
Inheritance in object orientation allows you to create a hierarchy of classes and have each class inherit the properties and methods of a parent class. For example, for our petting zoo, we can create a parent Animal class and have Dog and Cat inherit from that class. Then, we can move parts of our code into the Animal class so that both the Dog and Cat classes will inherit that code.
If, however, we move the duplicate parts of our code to this Animal class, then the Dog and Cat classes would each inherit the same properties and methods, making the children clones of the parent classes. This organization isn’t very useful because we want to have distinct types of animals. It would be terribly boring if cats, dogs, and all other animals were the same. In fact, for the purposes of our program, it wouldn’t make sense to call them different things at all.
Now, if inheritance meant that we could only create child classes that were identical to their parent classes, there wouldn’t be much point to going to all of this effort. So while we inherit all parts of a parent class, we can also override certain parts of a parent class in the child classes to make the child classes distinct.
Let’s go through this and see how it works, shall we?
.
Creating Parent and Child Classes
We’re going to take a few steps back and recreate the Dog and Cat classes in a better way. To start off, we need a parent class that will define the shared properties and methods of the child classes.
In your Animals.cs file, remove the Dog and Cat classes and add the following class definition:
class Animal
{
    public string Name;
    public string Sound;
    public void Speak() { Console.WriteLine(this.Name + " says " + this.Sound); }
}
This class looks unsurprisingly like the previous Dog and Cat classes, with the noted exceptions that we have made all properties and methods public and that we have introduced a new property called Sound of type string. Finally, we have updated the Speak method to use the Sound variable.
At this point, your Program.cs will not work and, if you click on that tab, you should see several error messages, which is only natural because we have removed the Cat and Dog classes. Let’s recreate them and do so using inheritance. In your Animals.cs file, right after the Animal class, add the following code:
class Dog : Animal { }
class Cat : Animal { }
These new classes are much shorter than before and do not replicate any code. The new syntax here is a colon followed by the class name Animal, which tells C# that we want both Dog and Cat to inherit from the Animal class. In effect, Dog and Cat become child classes of Animal as illustrated in the diagram shown in Figure 14.
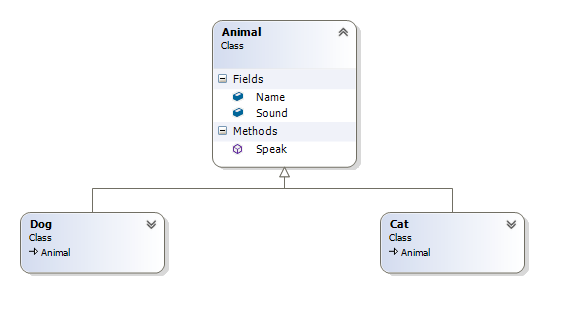
Figure 14: Diagram of Animal Class Inheritance
Note: I’ve been using the term Property so far, which is slightly inaccurate because the correct term is field as you can see in the diagram in Figure 14. Field is less clear outside the scope of programming, however, so I have used Property instead. Technically, a property is a wrapper around a field in C#.
.
We still have a problem with our Program.cs file, though, because of the custom constructor we created. If you try to run or debug our program, then you should see an error message saying that “‘PettingZoo.Cat’ does not contain a constructor that takes 1 arguments” and similar one for “PettingZoo.Dog”.
To fix this error., we need to add the constructors back in. This time, though, we’re going to utilize inheritance to inherit the constructor and show how you can extend the constructor to change the functionality of a parent class.
First, we need to create a base constructor for Animal, which will resemble the previous constructors we created earlier. Add the following code to your Animal class:
public Animal(string animalName)
{
    this.Name = animalName;
}
As before, our constructor sets the name of the animal to what we pass into it. However, this isn’t enough because we also need to add a constructor to both the Dog and Cat classes. We will use this to define which sound each animal makes too.
class Dog : Animal
{
    public Dog(string dogName) : base(dogName)
    {
        this.Sound = "Woof";
    }
}
class Cat : Animal
{
    public Cat(string catName) : base(catName)
    {
        this.Sound = "Meow";
    }
}
For both classes, we add a constructor that accepts a Name parameter. We also set this object’s Sound property to the sound we want the animal to make.
However, unlike before, we now call the parent class constructor and pass in the Name parameter from the parent constructor. This call comes through the : base() method and by adding the received dogName or catName parameters inside the parentheses.
Note: This
: base()syntax is unique to constructors. We will see other ways of changing or extending case functionality later.
.
With these updates to our code, we can now run our program again and see a result similar to Figure 15.
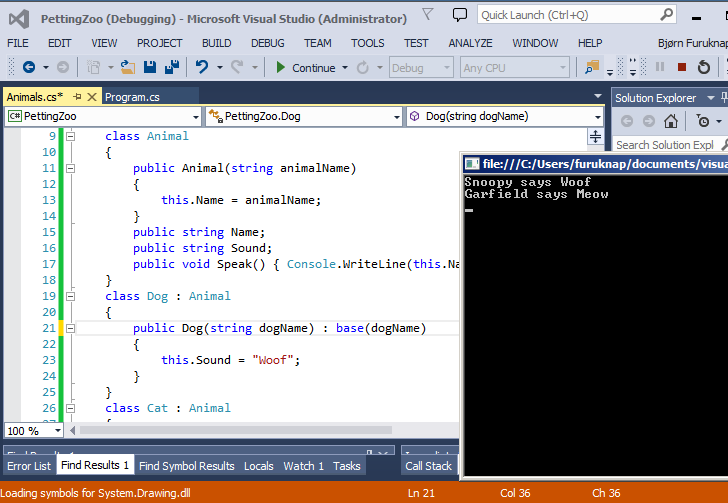
Figure 15: Animals Speak, Using Inheritance
Note that we have neither a Sound nor a Name property defined in either the Dog or Cat classes. We also do not we have a Speak() method. Instead, they reside in the parent Animal class, and the Dog and Cat classes inherit these properties and methods.
We can similarly create other classes now, for any type of animal and we will only need to replicate the pattern of the Dog and Cat classes. For example, we might create these classes:
class Parrot : Animal
{
    public Parrot(string parrotName)
        : base(parrotName)
    {
        this.Sound = "I want a cracker!";
    }
}
class Pig : Animal
{
    public Pig(string pigName)
        : base(pigName)
    {
        this.Sound = "Oink";
    }
}
Then, we can instantiate these classes in Program.cs:
Parrot myParrot = new Parrot("Polly");
myParrot.Speak();

Pig myPig = new Pig("Bacon");
myPig.Speak();
Now we will have a veritable zoo on our hands when we run the program, as shown in Figure 16.
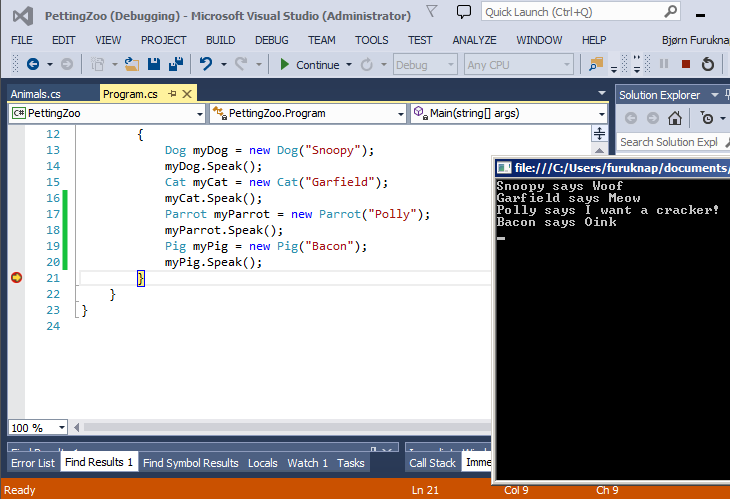
Figure 16: A Zoo of Four Animals Speaking
You could create further sub-child classes of existing child classes, too. For example, you might separate the Dog class into Beagle and Pointer or have the Parrot class inherit from a parent Bird class that, in turn, inherits from Animal. Creating this sort of hierarchy is beyond the scope of this article, however, so let’s move on and finally look at how we can override, change, or extend the functionality of parent classes in child classes.
.
Modifying Inheritance
We can change the method of a parent class by using a technique called overriding. The syntax for overriding may differ between languages, but the principle of changing the parent’s method in the child class remains the same.
In C#, we add the keyword override followed by the method signature you want to override. We also must declare in the parent class that we are allowing children to override the methods by adding the virtual keyword to the method signature in the parent class. (Other languages may not require this additional indication.)
In our program, we need to update the Speak() method in the Animal class.
public virtual void Speak() { Console.WriteLine(this.Name + " says " + this.Sound); }
Now we can insert our override of the Speak() method in the Dog class at the beginning of our code block for this class.
class Dog : Animal
{
    public override void Speak()
    {
        base.Speak();
        Console.WriteLine("...and then runs around, chasing his tail");
    }
[remaining code omitted]
This code tells us that we want to override what happens in the parent method Speak(). We will still execute the parent method using the base.Speak() call before we output an extra line right afterwards.
Why would you want to do so? Well, perhaps we want our dogs to be as enthusiastic as they can be in person. Run the program and see for yourself:
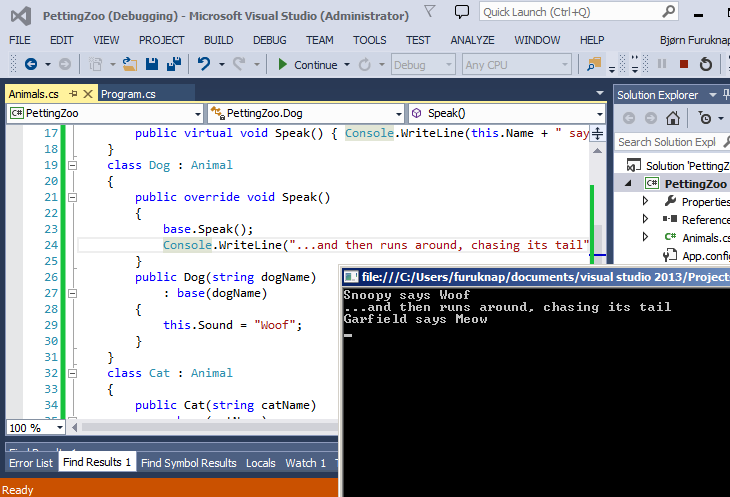
Figure 17: Our Dog Overrides His Class Method
First, Snoopy barks as normal: the base.Speak() method calls the Speak() method from the parent Animal class. Then the rest of the code outputs a second line to the console. Effectively, we extend the parent class by adding new functionality to the child class only. See how the Cat class is unaffected.
Of course, cats are notoriously difficult to get to do as you wish, so let’s reflect that in code. Update the Cat class and add the following method override, similar to the Dog class.
class Cat : Animal
{
    public override void Speak()
    {
        Console.WriteLine(Name + " doesn't speak but just sits there wondering when you will feed it.");
    }
[remaining code omitted]
Unlike what we did in the Dog override, we do not call the base.Speak() method this time. Without that call, we never execute the Animal Speak() method and completely change what happens in this method. See for yourself:
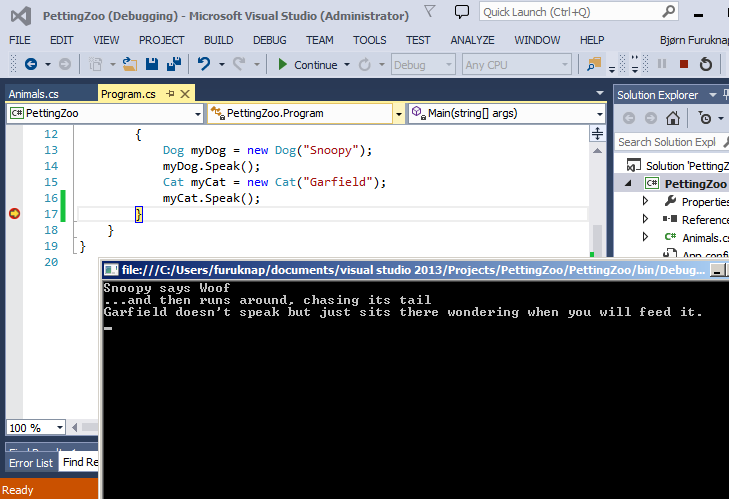
Figure 18: Our Cat Also Overrides His Class Method
Also notice that as we have rebuilt our classes, we have not changed the Program.cs code. These changes serve as a good example of why object orientation is a very powerful technique; we have completely changed the underlying code without touching the program that uses that code. [Object orientation has allowed us to isolate many of the implementation details and simply expose a small set of interface with which the program needs to interact.]
Where We Bent the Rules
Before we wrap up, I want to point out a few things, chiefly some “bad” things we have done.
First, in our classes, we call the Console.WriteLine() method directly. This usage is not a good design decision because classes should be independent of how we output the results of the classes.
A better approach would be to return data from the classes instead and then output that as part of the program. We would then allow the program to decide what to do with the output rather than the classes, allowing us to use the same classes across many different types of programs, whether they are web pages, Windows Forms, QT, or Console applications.
Second, in our later examples, all the properties were public. Making these properties public weakens the security aspect of object orientation, where we seek to protect the data in the classes from manipulation from the outside. However, protection of properties and methods quickly becomes complex when you are dealing with inheritance so I wanted to avoid that complication, at least at this introductory stage.
Finally, there’s really no point in having Sound set as part of the child constructor at all because we were duplicating that code, too. It would be a better design to create a constructor in the parent class that accepted both a name and a sound, and then just calling that as part of the child constructor. However, again, for the sake of simplicity, I didn’t want to introduce differing constructor signatures at this stage.
So, while we’ve learned a lot in this bonus tutorial, you can see there’s still more to learn. Don’t worry too much about it just yet, however. You can take a moment to congratulate yourself on having followed along all the way. If you have followed all the steps, you have learned:
- Why we use object orientation
- How to create classes
- How to create properties and methods
- How to create constructors and what they do
- How to take advantage of inheritance and why it’s a powerful feature of object orientation
I hope you enjoyed this extra lesson and are interested in exploring more. Be sure to check back with us for new content on the Atlantic.Net blog, and consider one our industry-leading virtual private hosting servers.
.
* This post is for informational purposes only and does not constitute professional, legal, financial, or technical advice. Each situation is unique and may require guidance from a qualified professional.
Readers should conduct their own due diligence before making any decisions.