 Programmer RPG by Walker Cahall
How-To Series
This is part 1 of a 5 part series for Introduction To Programming
- Introduction To Programming: Getting Started
- Introduction To Programming: Your First Program
- Introduction To Programming: Variables, Types, And Manipulating Data
- Introduction To Programming: Flow Control
- Introduction To Programming: Object Oriented Programming
Help! I Have To Become a Programmer!
Let me just quote the late Douglas Adams immediately, because if you are the target audience for this article series, you may just feel a bit nervous right now:
Don’t Panic!
.
You’re going to be fine! I’ll make sure you are well prepared for the tasks ahead. By the end of this series, I’ll have introduced you to programming from a very pragmatic point of view. You will be much better prepared to handle basic programming tasks and understand code when it is thrust in front of you. You’ll understand how programs work and how to build them. You will have seen, if not mastered, many of the concepts of programming so that if nothing else you will know the basics of how these concepts fit into the larger picture of building software.
And it won’t hurt a bit. I promise.
So how did you wind up in this situation? If you’ve read this far, you probably fit into one of several characteristics that make you the perfect audience for this series of beginner programming articles here on Atlantic.Net. For example, you may be sick and tired of doing repetitive tasks when there should be an easier way to do the same thing multiple times. You may want to show that programming dude or gal you know that what they do cannot be that hard, or maybe you really just want to understand how to improve the latest WordPress release. On the other hand, you may just want to learn a bit about how to make machines dance to your tune.
Whatever your background, in this series, I will introduce you to programming. I will do so with a chosen set of tools and languages, not because these tools and language are by any definition “best” or “right”, but because they are simple to use and because learning tools and languages isn’t important in programming at all. Besides, you’ll have plenty of time to develop nearly religious affection for whatever tools or languages you prefer later in life.
As such, I’ve chosen to go with a language called C# (pronounced “See Sharp”) and using Visual Studio for a development environment. To follow along, you’ll need to download a few things to get the same or a similar experience as I show you.
.
Getting Ready
First, you need Visual Studio. Any version will do, but note that they all run on Windows, so you’ll need that. If you don’t have Windows, you can fire up an Atlantic.NET Windows cloud server and use this.
Now, I’m using Visual Studio 2013, but you can use any variety back to Visual Studio 2003, and they’ll behave more or less the same for our purposes. Most likely, you will want to get one of the newer versions. Unless Microsoft radically changes Visual Studio’s look, any version you get will probably be the close enough to what I’m showing.
Go… Download. Install. Make sure you include at least C#. Other languages are completely optional. I’ll wait right here for you to finish.
Done? Great! Now, you’ve got all the prerequisites for this entire beginner series. Really. Visual Studio contains everything you need to have to start building software, and because it’s all very neatly integrated, it is also very easy with almost zero need for additional setup.
In fact, let’s build a program right now. Three simple steps and you can, technically, put “programming experience” on your resume. Just don’t hope to land any advanced development jobs.
Step 1: Fire up Visual Studio
There’s a splash screen. It takes a few seconds. It may ask you what development setup you want, in which case you can pick any, since it’s likely you don’t have a preference yet.
Step 2: Create a Console Application
When Visual Studio opens, you should see a start page that has a “Start” heading and a “New Project” link, as shown below.
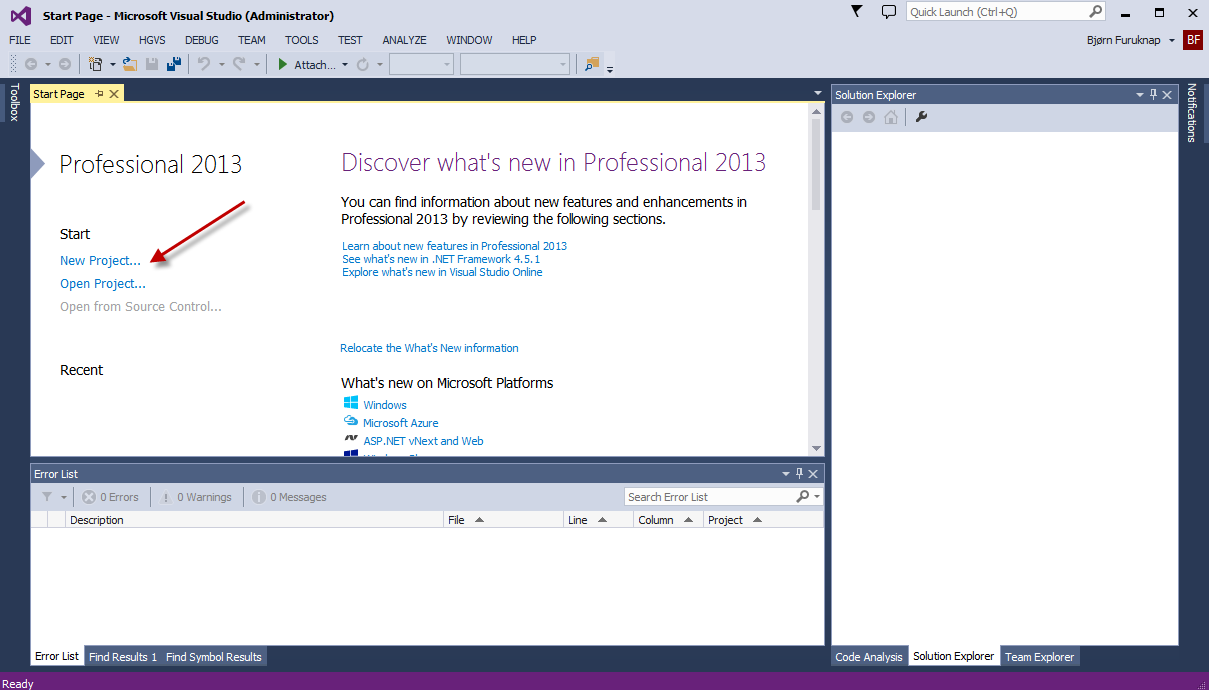 Figure 1: New Project Link in Visual Studio
Click that link and then browse, search, or find Console Application. Its location differs depending on the version of Visual Studio, but in my version, it’s under Windows Desktop. Select it, leave everything else default, and then click “OK”.
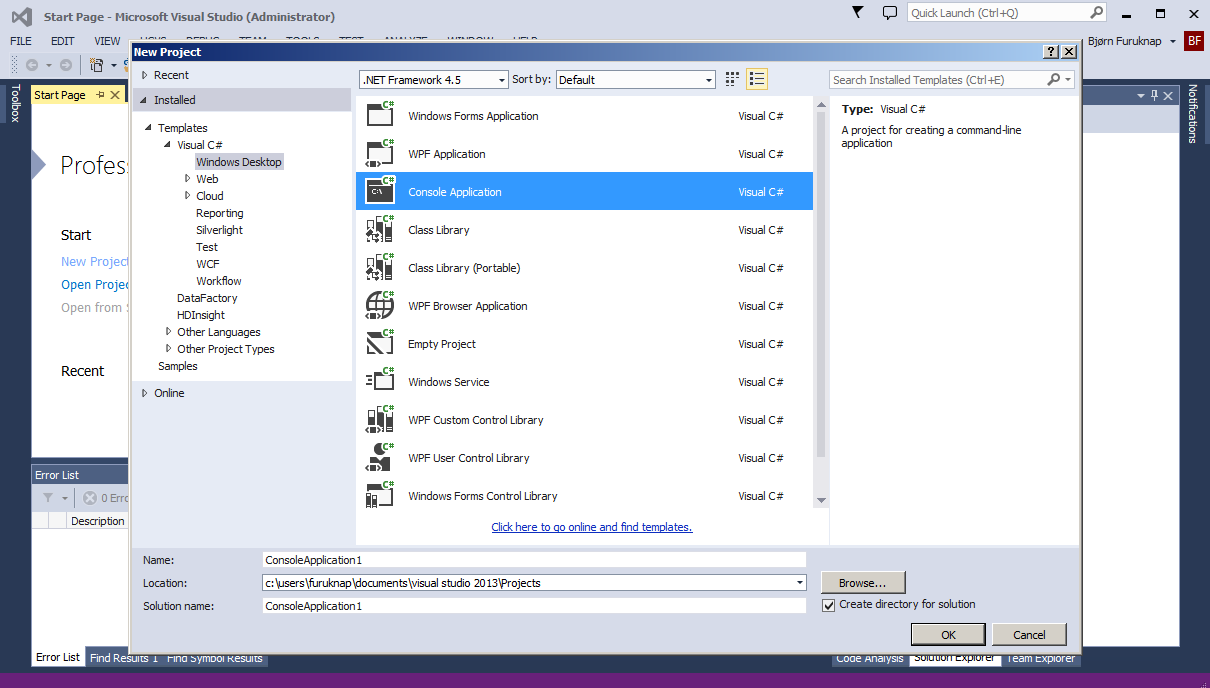 Figure 2: Console Application
Visual Studio will take a few seconds to create your project, after which you’ll see the code for your first program, ConsoleApplication1.
Don’t worry about any of the code for now, let’s just get this beast running.
Step 3: Start
Pay close attention to the screen because what happens next happens fast. Hit the Start button where indicated in the menu.
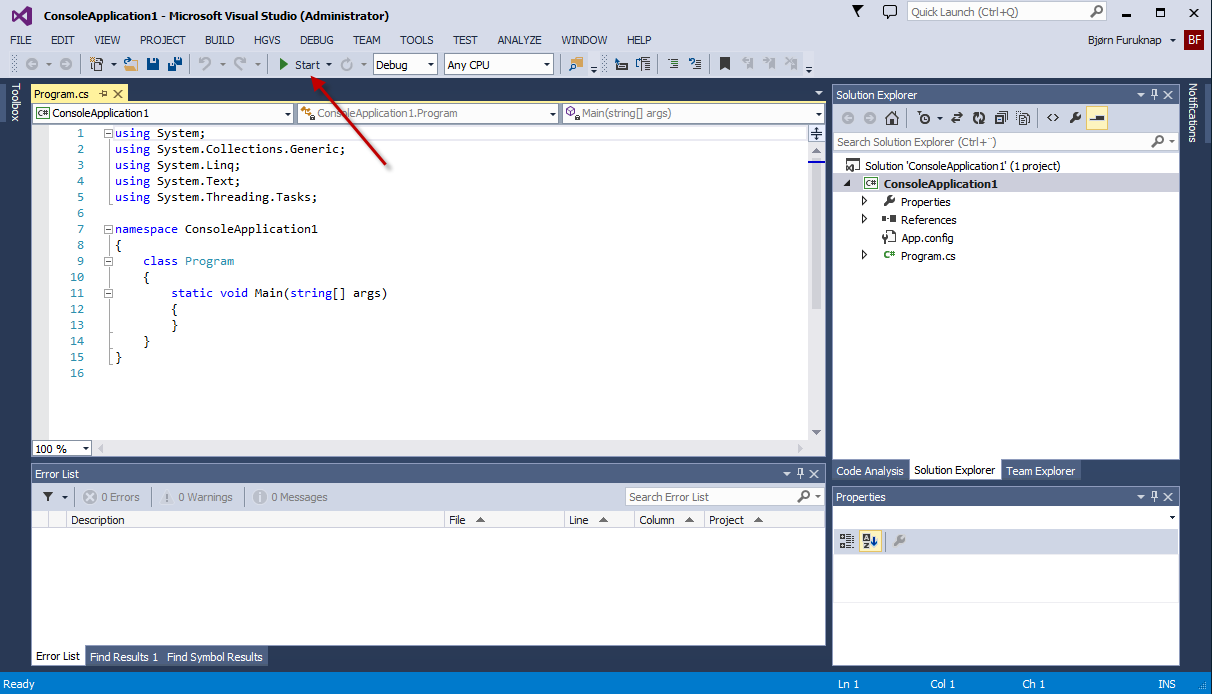 Figure 3: Starting the Program
What happens next is that a black screen appears briefly and then disappears. That’s fine; we’ll fix that in a moment, but for now, pat yourself on the back and update your resume because you have built your first computer program!
Before we move on and get our program to do something even mildly interesting, let’s examine what you have actually done already, because, despite the way it looked, a lot happened.
.
Under the Hood
Inside your computer is a CPU (Central Processing Unit), which you probably know is the main processing part of your computer. That CPU comprises billions of transistors, which in turn are controlled solely by the flow of electricity. It is a massively complex piece of engineering that has taken thousands of the brightest brains on the planet decades to develop.
The CPU, however, is rather useless on its own. It needs to have the right currents added at the right conductors to be able to do anything. Your job, as a programmer, is to provide it with that current, in the right spot, at the right time.
What you just did was exactly that. The code you see on screen, as simple as it is, is written in a language that is somewhat human-readable. Visual Studio takes care of converting that language into instructions for your CPU by sending your code over to a separate program called a compiler.
The compiler works as a translator between you and the CPU. It can take commands like “Show this on screen” and turn it into operations your CPU understands. This process generates a program, a portable and self-contained piece of software, that you can run at any time.
You have made such a program right now. It is an .exe program, and you can find it by right-clicking on ConsoleApplication1 in the Solution Explorer panel and choosing “Open Folder in File Explorer”.
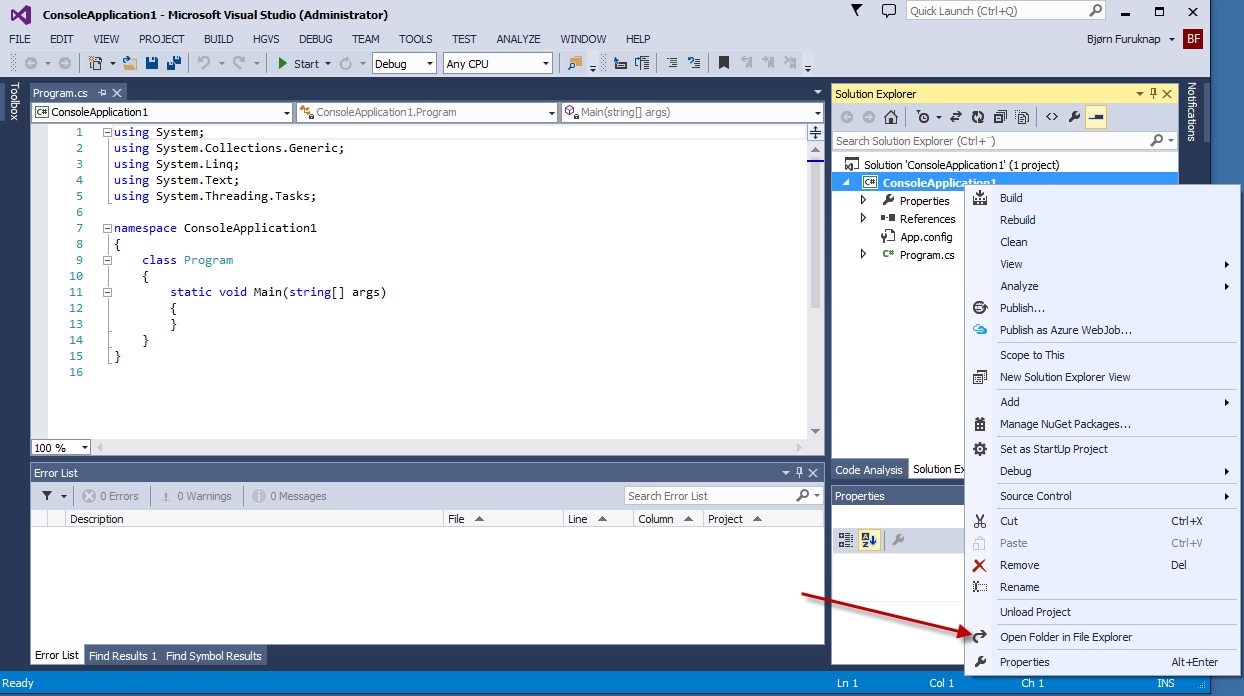 Figure 4: Locating Your .exe File
Then, browse into the “bin” (for binary) folder and then into the “debug” folder. You should see your ConsoleApplication1.exe there, proof that you have indeed created your very first computer program, capable of controlling a massively complex computer chip that is the result of millions of hours of work from hardware engineers across time and space.
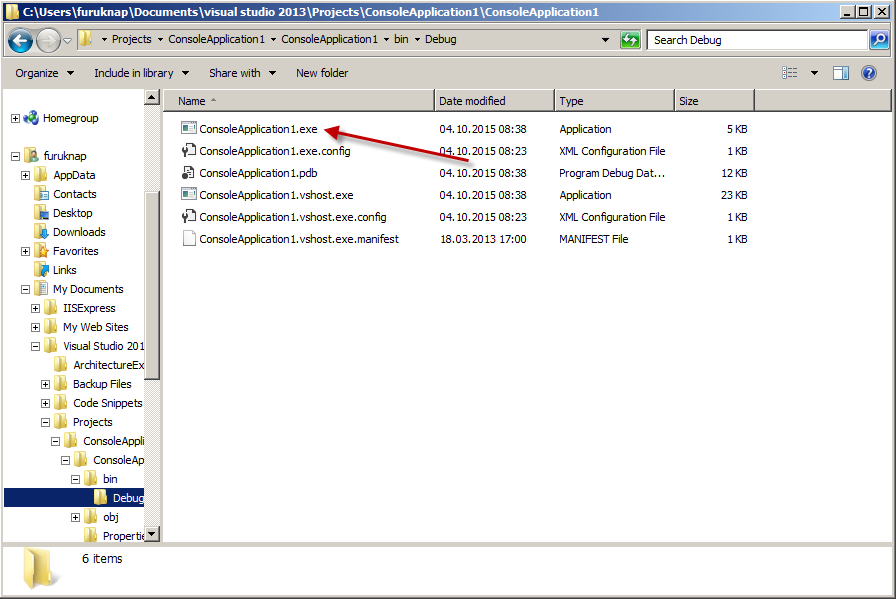 Figure 5: File Location
Go ahead, double-click it, and it will act the same way as when you ran it through Visual Studio: up will pop a black window for a brief moment and then disappear. You can take that program file, move it to a different computer, too, and run it–and if you have a compatible system, the program will behave the same.
Before we make any further changes, however, I’d like to point out a couple of important ideas here. What you have created is a binary executable file. A binary executable is usually built to run only on a single type of system. You cannot, for example, take that program file and run it on a Macintosh or a Linux machine without special preparation.
To accomplish platform independence when building software, you need to utilize different methods for turning your program code into instructions for the machine.
In our basic example, we’re relying on Visual Studio to send out program code into a compiler to generate a particular type of executable code. That’s fine for the purposes of learning to program because the concepts are similar across most platforms, and the code we build doesn’t really change that much if we want to build platform-independent code or code that runs in different types of programs.
For example, if you are building web pages, you may build ASP.NET applications instead. The approach to writing the code is very similar but what Visual Studio does behind the scenes produces a different type of executable code. In return, the executable code can run on multiple platforms as long as these support running ASP.NET code. So, for example, you can build code on Windows and run it on Linux using a runtime called Mono.
We won’t go into platform independence in this series, but I wanted to point this out because the way you write code remains very similar, and the concepts you will learn in this series apply to all approaches.
In fact, even if you go outside the Windows and .NET world, you’ll recognize the approaches to programming are very similar. This similarity is why I mentioned earlier that language and tools aren’t really important to programming. If you learn programming, the ideas span not just language, but platform, toolset, runtimes, and devices.
With this understanding in place, we can wrap up this initial article by adding some additional code to our program to make it do something more than just disappear.
.
Why, Hello World!
It is a tradition when learning new programming languages to build a first program called “Hello World!”. The program should do nothing more than print “Hello World!” in whatever way the program outputs text, optionally pausing to wait for the user to acknowledge that they have seen the text. So let’s build that now.
Go back into Visual Studio and take a look at the “Program.cs” file in the left-side pane. Don’t worry about what the code already in place does, but notice that there are curly brackets in lines 12 and 13.
Many languages use such brackets to enclose different parts of a program, and they must always match each left curly bracket (in line 12) to a right curly bracket (line 13). We’ll look more into this later, but for now, just know that the program code we’re about to write goes inside the brackets in lines 12 and 13.
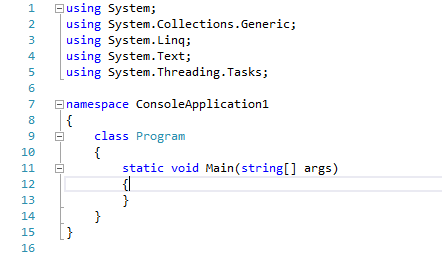 Figure 6: Where To Insert Code Within Program.cs
Place your cursor to the right of the left curly bracket (as I have done above) and add a couple of blank lines. You can add as many blank lines as you wish; the compiler will just remove any empty lines before building the machine code from it.
Where you added the blank lines, add the following two lines of code:
Console.WriteLine("Hello World!");
Console.ReadLine();
Computers are notoriously bad at inaccuracies so make sure you get it exactly as written above, with the double quotation marks, the parentheses, and the semicolon at the end of each line exactly the way it is. Luckily, if you make mistakes, Visual Studio will often warn you by placing red squiggly lines where you make mistakes and will even tell you what mistake you made.
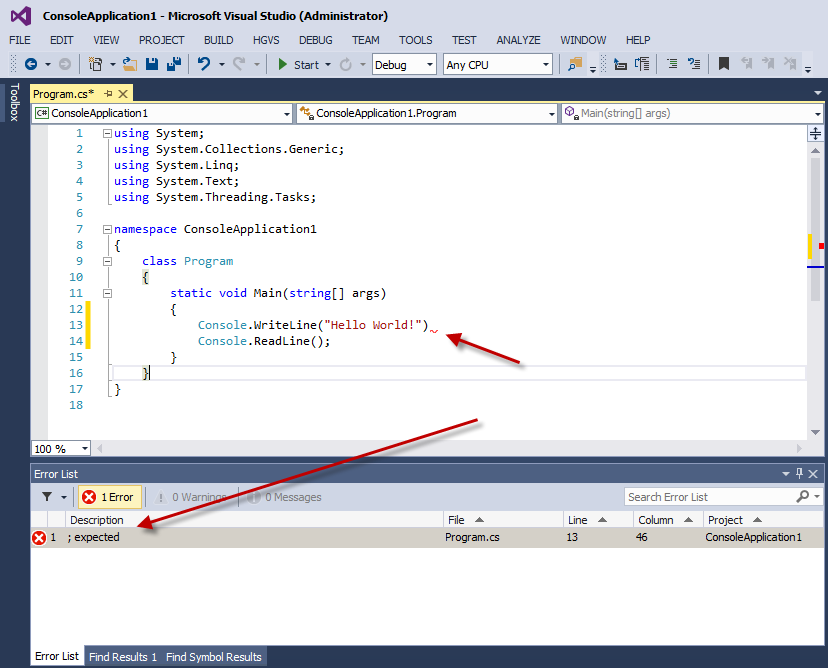 Figure 7: Example of an Error and the Red Squiggly
Once you have everything entered correctly, go ahead and click the Start button again. This time, you should see the text “Hello World!” inside the black window. The program should stop when you hit the Enter key.
 Figure 8: Your “Hello World!” Program
Congratulations! You have built your first interactive program! Go, you!
.
Introduction To Programming Wrap-Up
In this first article, you’ve already learned a lot about how programming works, not to mention having built your first program! In the next part of this series, we’ll explain more about what you just did and start understanding some of the concepts related to input and output from programs such as these.
Now, don’t forget to save the program before you go out to celebrate with your celebratory beverage of choice. You’ve earned it!
How-To Series
This is part 1 of a 5 part series for Introduction To Programming
* This post is for informational purposes only and does not constitute professional, legal, financial, or technical advice. Each situation is unique and may require guidance from a qualified professional.
Readers should conduct their own due diligence before making any decisions.