Table of Contents
- Prerequisites
- Step 1 - Setup Hostname on Each Node
- Step 2 - Prepare Storage Device on Each Node
- Step 3 - Install DRBD
- Step 4 - Configure DRBD Resource
- Step 5 - Initialize and Enable DRDB Resource
- Step 6 - Set Primary Resource of Initial Device Synchronization
- Step 7 - Create a Filesystem on DRBD Device
- Step 8 - Mount the DRBD Device on Second Node
- Conclusion
DRBD, also known as “Distributed Replicated Block Device,” is a distributed storage solution for Linux. It is used to mirror the data on block devices such as hard disks, partitions, and logical volumes from one server to another over a network connection. If one server crashed, then the data on the other could be used. DRBD also ensures high availability (HA) for Linux applications by networked mirroring.
In this tutorial, we will show you how to install DRBD and use it to replicate the partition between two servers.
Prerequisites
- Two fresh CentOS 8 VPS on the Atlantic.Net Cloud Platform with one block storage device attached to each VPS. The server must be created in USA-EAST1 (Orlando)
- A root password configured on both servers
Step 1 – Setup Hostname on Each Node
First, you will need to set up a hostname on each node.
On the first node, run the following command to setup hostname.
hostnamectl set-hostname node1.example.com
On the second node, run the following command to setup hostname.
hostnamectl set-hostname node2.example.com
Once you are finished, you can proceed to the next step.
Step 2 – Prepare Storage Device on Each Node
Next, you will need to set the same size storage device on each node for your DRBD resource. In this tutorial, we will use /dev/sdb block storage on each node.
On both nodes, create a GPT partition table and partition with the following command:
parted -s -a optimal -- /dev/sdb mklabel gpt
parted -s -a optimal -- /dev/sdb mkpart primary 0% 100%
parted -s -- /dev/sdb align-check optimal 1
Next, verify the partition with the following command:
fdisk -l
You should get the /dev/sdb1 partition in the following output:
Disk /dev/sda: 80 GiB, 85899345920 bytes, 167772160 sectors
Units: sectors of 1 * 512 = 512 bytes
Sector size (logical/physical): 512 bytes / 512 bytes
I/O size (minimum/optimal): 512 bytes / 512 bytes
Disklabel type: dos
Disk identifier: 0x7e9dbe13
Device     Boot Start       End   Sectors Size Id Type
/dev/sda1        2048 167770112 167768065  80G 83 Linux
Disk /dev/sdb: 50 GiB, 53687091200 bytes, 104857600 sectors
Units: sectors of 1 * 512 = 512 bytes
Sector size (logical/physical): 512 bytes / 512 bytes
I/O size (minimum/optimal): 512 bytes / 512 bytes
Disklabel type: gpt
Disk identifier: 4CBB1682-09B1-4785-B96C-2B9D2B3BEB53
Device     Start       End   Sectors Size Type
/dev/sdb1   2048 104855551 104853504  50G Linux filesystem
Step 3 – Install DRBD
Important: Repeat this process on both nodes.
By default, DRBD is not available in the CentOS standard repository, so you will need to install the EPEL repository in your system.
You can install it with the following command:
dnf -y install https://www.elrepo.org/elrepo-release-8.el8.elrepo.noarch.rpm
rpm --import https://www.elrepo.org/RPM-GPG-KEY-elrepo.org
Once the repository is installed, install the DRBD package with the following command:
dnf install drbd90-utils kmod-drbd90 -y
Once the installation is completed, you can proceed to the next step.
Step 4 – Configure DRBD Resource
Important: Repeat this process on both nodes.
The default DRBD configuration file is located at /etc/drbd.conf, and other files are located inside /etc/drbd.d/ directory.
To replicate storage device between two servers, you will need to create a new configuration file inside /etc/drbd.d/ directory:
nano /etc/drbd.d/resource0.res
Add the following lines:
resource resource0 {
  on node1.example.com {
    device    /dev/drbd1;
    disk      /dev/sdb1;
    address   node1-ip-address:7789;
    meta-disk internal;
  }
  on node2.example.com {
    device    /dev/drbd1;
    disk      /dev/sdb1;
    address  node2-ip-address:7789;
    meta-disk internal;
  }
}
Note: The resource0.res is the same on both nodes.
Where:
- node1.example.com and node2.example.com are the hostnames of each node.
- /dev/drbd1 is the name of the DRBD device.
- /dev/sdb1 is the name of the storage device on each node.
- Node1-ip-address is the IP address of the first node.
- Node2-ip-address is the IP address of the second node.
- 7789 is the DRBD port.
Save and close the file when you are finished.
Step 5 – Initialize and Enable DRDB Resource
Next, you will need to initialize DRBD’s metadata on both nodes.
Run the following command on both nodes to initialize the DRBD resource:
drbdadm create-md resource0
You should get the following output:
md_offset 53684989952
al_offset 53684957184
bm_offset 53683318784
Found ext3 filesystem
     2097152 kB data area apparently used
    52425116 kB left usable by current configuration
Even though it looks like this would place the new meta data into
unused space, you still need to confirm, as this is only a guess.
Do you want to proceed?
[need to type 'yes' to confirm] yes
initializing activity log
initializing bitmap (1600 KB) to all zero
Writing meta data...
New drbd meta data block successfully created.
success
After initializing the DRBD resource on both nodes, you will need to enable the resource.
Run the following command on both nodes to enable the resource.
drbdadm up resource0
This will attach the resource with its backing device; then, it sets replication parameters and connects the resource to its peer.
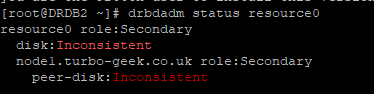
On the first node, check the status of the DRBD with the following command:
drbdadm status resource0
You should get the following output:
Step 6 – Set Primary Resource of Initial Device Synchronization
At this point, DRBD is ready for operation. Next, you will need to tell it which node should be used as the source of the initial device synchronization.
On the first node, start the initial full synchronization with the following command:
drbdadm primary --force resource0
Now, check the status on the first node with the following command:
drbdadm status resource0
You should get the following output:

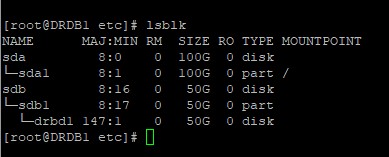
You can also get device mapping for a name with the following command:
lsblk
You should see the new DRBD device drbd1 in the following output:
Step 7 – Create a Filesystem on DRBD Device
Next, you will need to create a filesystem on the DRBD device, mount it, and check whether we can use it for replicated data storage.
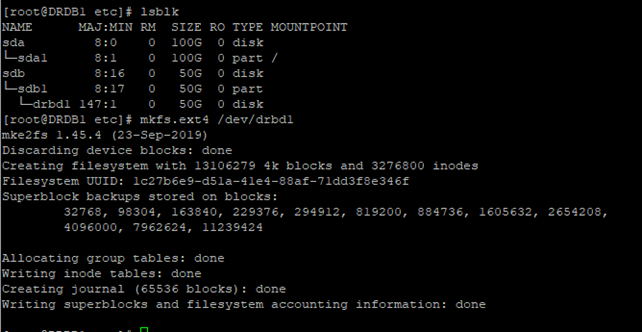
On the first node, create an ext4 filesystem on the DRBD device with the following command:
mkfs.ext4 /dev/drbd1
Note: This Process can take a while depending on the size of your block storage.
You should get the following output:
Next, mount the DRBD device on /opt directory using the following command:
mount /dev/drbd1 /opt/
Next, create some test files inside /opt directory.
cd /opt
touch file1 file2 file3 file4 file5 file6 file7 file8 file9
Next, verify the mounted device with the following command:
df -hT /opt
You should see the following output:
Filesystem     Type  Size  Used Avail Use% Mounted on
/dev/drbd1     ext4   49G   53M   47G   1% /opt
Step 8 – Mount the DRBD Device on Second Node
In this section, we will mount the DRBD device on the second node and check whether the replication is working or not.
On the first node, unmount the DRBD device and make it a secondary node with the following command:
cd
umount /opt
drbdadm secondary resource0
On the second node, make the second node primary with the following command:
drbdadm primary resource0
Next, mount the DRBD device on the /opt directory with the following command:
mount /dev/drbd1 /opt
Now, run the following command to print the list of files in the /opt directory:
ls /opt
If everything is fine, all the files stored in the DRBD device should be there:

You can also check the mounted partition of the DRBD device with the following command:
df -hT /opt
You should get the following output:
Filesystem     Type  Size  Used Avail Use% Mounted on
/dev/drbd1     ext4   49G   53M   47G   1% /opt
Conclusion
Congratulations! You have successfully installed and setup replication with DRBD on CentOS 8. DRBD is a great tool if you are looking to increase the availability of your data. For more information, you can visit the DRBD documentation. Try DRBD today on your VPS Hosting account from Atlantic.Net!
* This post is for informational purposes only and does not constitute professional, legal, financial, or technical advice. Each situation is unique and may require guidance from a qualified professional.
Readers should conduct their own due diligence before making any decisions.