Verified and Tested 02/17/2015
Introduction
Fail2ban is an excellent service primarily used to stop brute-forcers from accessing your system. Fail2ban works great at deterring your primary attackers away by blocking them when it determines an attack may be happening. We will be performing the steps below as the root user. You will need to sudo if you are using another user. For all editing of configuration files, we will be using vi; however, you can use any editor of your choice. This installation is performed on an Ubuntu 14.04 64bit Cloud server with IPTables installed per our IPTables guide. This guide is also applicable to our Ubuntu 12.04 OS and Debian.
Prerequisites
An Ubuntu 14.04 64bit server. If you do not have a server and would like one, consider SSD VPS Hosting from Alantic.Net.
Install and Use fail2ban in Ubuntu and Debian
Fail2ban is included in the default Ubuntu and Debian repository. To install, run:
apt-get install fail2ban
Once you have installed it, we need to make only a few changes to the configuration. When modifying configuration files like this, the best practice is always to copy out the original to a backup. In this case, you can leave the original alone as fail2ban does work with a duplicate .local file is also named jail. To do this, run:
cp /etc/fail2ban/jail.conf /etc/fail2ban/jail.local
Once you’ve made that .local file, it’s time to edit it with your editor.
vi /etc/fail2ban/jail.local
Now, as you’ll see when editing the file, there are A LOT of sections for you to “play” with and adjust. The main ones we’ll focus on are the ignoreip, bantime, findtime, maxretry, and specifically [ssh] sections.
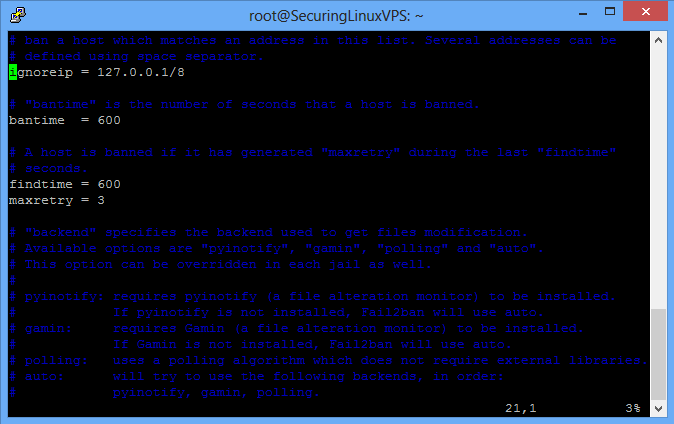
An example of what the /etc/fail2ban/jail.local file looks like
Note: In Ubuntu 12.04 and Debian, the configuration file looks slightly different from the above. You will only see ignoreip, bantime, and maxretry. As far as we are concerned here, the rest of the configuration is the same.
In the picture above, at the green indicator at the top, you will find the ignoreip. The ignoreip is essential as you can tell fail2ban to IGNORE your IP address. Setting ignoreip to the correct IP will prevent you from ever locking yourself out of your server by fail2ban. We highly recommend you add your IP address to this field. To add it, all you need to do is add a space after the 127.0.0.1/8 and put your IP.
Below the green indicator, you will find the bantime. As it states, this is how long a host is banned when triggered for banning. The bantime is the number of seconds that you want that IP address blocked from your system. We recommend that you set this to a high number if you are gunning for someone to be blocked. The default is 10 minutes. Adding a 0 will make it 6000 seconds or 100 minutes (just over an hour and a half.) That’s a good start.
In Ubuntu 14.04, the next section is the findtime. As it states, this is the period fail2ban will look at for failed attempts. The default setting here of 10 minutes (600) is acceptable.
Under the findtime (or bantime in Ubuntu 12.04), you will find the maxretry. As it sounds, this is how many times you’ll be allowed to fail the login within the findtime before the origin IP gets added to the ban for what you have set the bantime to be. 3 is a great number here to catch someone attempting to get in.
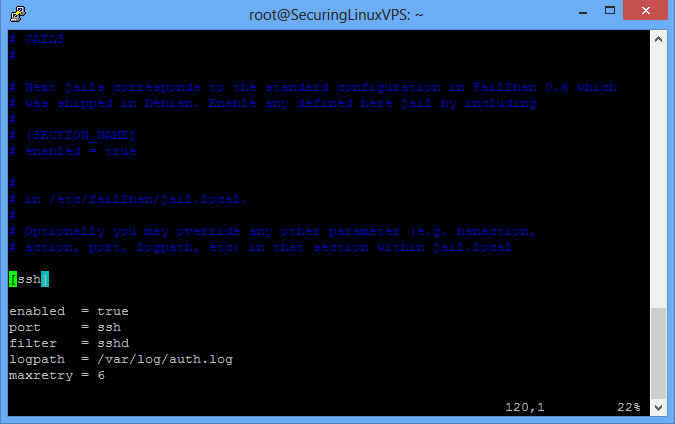
The last section we’ll look at is for [ssh]. You can see the section in the picture below. The biggest thing here to edit is the maxretry (each section can re-write your default maxretry to its own value) and the “port =” section. Maxretry means how many times a person can fail to attempt SSH to your server before being blocked. The lower this number, the better, but you also want to be safe to allow some retries, just in case.
In the “port =” section, you’ll see the port is set to “ssh.” If you have not changed your SSH port, this is fine. If you have configured a custom SSH port like described in Changing your SSH Port In Ubuntu, you will want to change the port= section. For example, using our custom SSH port:
port = 922
The location on where you can set the ssh port
Once you have changed this configuration to your liking, you need to save the changes you made and exit the file. Once out, restart the fail2ban service to activate it.
service fail2ban restart
If you have installed IPTables like in our guide referenced at the beginning, then there is one more step you will need to take. It would help if you wrote your IPTables out to the IPTables rules.v4 file to save the changes that fail2ban has implemented. To do this, you run a:
iptables-save > /etc/iptables/rules.v4
If you check your rules.v4 file, you will see that there is now a rule for fail2ban in place. This is the rule fail2ban put in place when installed and is needed to stop anyone who fail2ban blocks.
In the future, when adding new services on the server (like FTP, email, etc.), make sure you check your fail2ban configuration!
Learn more about our VPS hosting services and VPS hosting price.