Kamailio is a free and open-source SIP server written in C. It can handle over 5000 call setups per second and serve up to 300,000 active subscribers with just 4GB RAM. You can use Kamailio as a registrar server, location server, proxy server, SIP application server, and redirect server. It supports both IPv4 and IPv6 IP addresses and can be installed on all major Linux-based operating systems.
In this post, we will show you how to install a Kamailio SIP server on Oracle Linux 8.
Step 1 – Install and Configure MariaDB Server
Kamailio uses MariaDB as a database backend, so you will need to install a MariaDB server on your system. You can install it by running the following command:
dnf update -y
dnf install mariadb-server -y
Once the MariaDB server is installed, start and enable the MariaDB service using the following command:
systemctl start mariadb
systemctl enable mariadb
Next, you will need to secure the MariaDB installation and set the MariaDB root password:
mysql_secure_installation
Answer all questions as shown below:
Enter current password for root (enter for none):
OK, successfully used password, moving on...

Setting the root password ensures that nobody can log into the MariaDB
root user without the proper authorisation.

Set root password? [Y/n] Y
New password:
Re-enter new password:
Remove anonymous users? [Y/n] Y
Disallow root login remotely? [Y/n] Y
Remove test database and access to it? [Y/n] Y
Reload privilege tables now? [Y/n] Y
Step 2 – Add Kamailio Repo
By default, the Kamailio package is not included in the Oracle Linux 8 default repo, so you will need to add it to your system. You can add it with the following command:
yum install dnf-plugins-core -y
yum config-manager --add-repo https://rpm.kamailio.org/centos/kamailio.repo
Once the Kamailio repo is added, you can verify it using the following command:
dnf repolist
You should get the following output:
repo id                                    repo name
kamailio                                   Kamailio - latest - Packages for the Kamailio latest release
ol8_UEKR6                                  Latest Unbreakable Enterprise Kernel Release 6 for Oracle Linux 8 (x86_64)
ol8_appstream                              Oracle Linux 8 Application Stream (x86_64)
ol8_baseos_latest                          Oracle Linux 8 BaseOS Latest (x86_64)
Step 3 – Install Kamailio Server
Now, run the following command to install the Kamailio server with other required packages:
dnf install vim kamailio kamailio-mysql kamailio-presence kamailio-ldap kamailio-debuginfo kamailio-xmpp kamailio-unixodbc kamailio-utils kamailio-gzcompress kamailio-tls kamailio-outbound -y
After successful installation, you can verify the Kamailio version with the following command:
kamailio -version
You should get the following output:
version: kamailio 5.6.1 (x86_64/linux) b36a13
flags: USE_TCP, USE_TLS, USE_SCTP, TLS_HOOKS, USE_RAW_SOCKS, DISABLE_NAGLE, USE_MCAST, DNS_IP_HACK, SHM_MMAP, PKG_MALLOC, Q_MALLOC, F_MALLOC, TLSF_MALLOC, DBG_SR_MEMORY, USE_FUTEX, FAST_LOCK-ADAPTIVE_WAIT, USE_DNS_CACHE, USE_DNS_FAILOVER, USE_NAPTR, USE_DST_BLOCKLIST, HAVE_RESOLV_RES, TLS_PTHREAD_MUTEX_SHARED
ADAPTIVE_WAIT_LOOPS 1024, MAX_RECV_BUFFER_SIZE 262144, MAX_URI_SIZE 1024, BUF_SIZE 65535, DEFAULT PKG_SIZE 8MB
poll method support: poll, epoll_lt, epoll_et, sigio_rt, select.
id: b36a13
compiled on 12:16:45 Aug 16 2022 with gcc 8.5.0
Step 4 – Configure Kamailio Server
The Kamailio default configuration file is located at /etc/kamailio/kamctlrc. You will need to edit it and define your database and host.
nano /etc/kamailio/kamctlrc
Change the following lines:
DBENGINE=MYSQL
DBHOST=localhost
Save and close the file, then generate a database and tables for Kamailio using the following command:
kamdbctl create
Provide your MariaDB root password to create the database and tables as shown below:
MySQL password for root:
INFO: test server charset
INFO: creating database kamailio ...
INFO: granting privileges to database kamailio ...
INFO: creating standard tables into kamailio ...
INFO: Core Kamailio tables successfully created.
Create the presence related tables? (y/n): y
INFO: creating presence tables into kamailio ...
INFO: Presence tables successfully created.
Create the tables for imc cpl siptrace domainpolicy carrierroute
		drouting userblocklist htable purple uac pipelimit mtree sca mohqueue
		rtpproxy rtpengine secfilter? (y/n): y
INFO: creating extra tables into kamailio ...
INFO: Extra tables successfully created.
Create the tables for uid_auth_db uid_avp_db uid_domain uid_gflags
		uid_uri_db? (y/n): y
INFO: creating uid tables into kamailio ...
INFO: UID tables successfully created.
Next, open the /etc/kamailio/kamailio.cfg file and enable some features:
nano /etc/kamailio/kamailio.cfg
Add the following lines below #!KAMAILIO.
#!define WITH_MYSQL
#!define WITH_AUTH
#!define WITH_USRLOCDB
#!define WITH_NAT
#!define WITH_PRESENCE
#!define WITH_ACCDB
Save and close the file, then restart the Kamailio service to apply the changes:
systemctl restart kamailio
You can now check the status of Kamailio with the following command:
systemctl status kamailio
You will get the following output:
● kamailio.service - Kamailio - the Open Source SIP Server
   Loaded: loaded (/usr/lib/systemd/system/kamailio.service; enabled; vendor preset: disabled)
   Active: active (running) since Tue 2022-08-23 02:01:31 EDT; 4s ago
 Main PID: 6251 (kamailio)
    Tasks: 33 (limit: 11409)
   Memory: 30.0M
   CGroup: /system.slice/kamailio.service
           ├─6251 /usr/sbin/kamailio --atexit=no -DD -P /run/kamailio/kamailio.pid -f /etc/kamailio/kamailio.cfg -m 64 -M 8
           ├─6252 /usr/sbin/kamailio --atexit=no -DD -P /run/kamailio/kamailio.pid -f /etc/kamailio/kamailio.cfg -m 64 -M 8
           ├─6253 /usr/sbin/kamailio --atexit=no -DD -P /run/kamailio/kamailio.pid -f /etc/kamailio/kamailio.cfg -m 64 -M 8
           ├─6254 /usr/sbin/kamailio --atexit=no -DD -P /run/kamailio/kamailio.pid -f /etc/kamailio/kamailio.cfg -m 64 -M 8
           ├─6255 /usr/sbin/kamailio --atexit=no -DD -P /run/kamailio/kamailio.pid -f /etc/kamailio/kamailio.cfg -m 64 -M 8
           ├─6256 /usr/sbin/kamailio --atexit=no -DD -P /run/kamailio/kamailio.pid -f /etc/kamailio/kamailio.cfg -m 64 -M 8
           ├─6257 /usr/sbin/kamailio --atexit=no -DD -P /run/kamailio/kamailio.pid -f /etc/kamailio/kamailio.cfg -m 64 -M 8
           ├─6258 /usr/sbin/kamailio --atexit=no -DD -P /run/kamailio/kamailio.pid -f /etc/kamailio/kamailio.cfg -m 64 -M 8
           ├─6259 /usr/sbin/kamailio --atexit=no -DD -P /run/kamailio/kamailio.pid -f /etc/kamailio/kamailio.cfg -m 64 -M 8
           ├─6260 /usr/sbin/kamailio --atexit=no -DD -P /run/kamailio/kamailio.pid -f /etc/kamailio/kamailio.cfg -m 64 -M 8
           ├─6261 /usr/sbin/kamailio --atexit=no -DD -P /run/kamailio/kamailio.pid -f /etc/kamailio/kamailio.cfg -m 64 -M 8
           ├─6262 /usr/sbin/kamailio --atexit=no -DD -P /run/kamailio/kamailio.pid -f /etc/kamailio/kamailio.cfg -m 64 -M 8
           ├─6263 /usr/sbin/kamailio --atexit=no -DD -P /run/kamailio/kamailio.pid -f /etc/kamailio/kamailio.cfg -m 64 -M 8
           ├─6264 /usr/sbin/kamailio --atexit=no -DD -P /run/kamailio/kamailio.pid -f /etc/kamailio/kamailio.cfg -m 64 -M 8
           ├─6265 /usr/sbin/kamailio --atexit=no -DD -P /run/kamailio/kamailio.pid -f /etc/kamailio/kamailio.cfg -m 64 -M 8
           ├─6266 /usr/sbin/kamailio --atexit=no -DD -P /run/kamailio/kamailio.pid -f /etc/kamailio/kamailio.cfg -m 64 -M 8
           ├─6267 /usr/sbin/kamailio --atexit=no -DD -P /run/kamailio/kamailio.pid -f /etc/kamailio/kamailio.cfg -m 64 -M 8
           ├─6268 /usr/sbin/kamailio --atexit=no -DD -P /run/kamailio/kamailio.pid -f /etc/kamailio/kamailio.cfg -m 64 -M 8
           ├─6269 /usr/sbin/kamailio --atexit=no -DD -P /run/kamailio/kamailio.pid -f /etc/kamailio/kamailio.cfg -m 64 -M 8
           ├─6270 /usr/sbin/kamailio --atexit=no -DD -P /run/kamailio/kamailio.pid -f /etc/kamailio/kamailio.cfg -m 64 -M 8
           ├─6271 /usr/sbin/kamailio --atexit=no -DD -P /run/kamailio/kamailio.pid -f /etc/kamailio/kamailio.cfg -m 64 -M 8
           ├─6272 /usr/sbin/kamailio --atexit=no -DD -P /run/kamailio/kamailio.pid -f /etc/kamailio/kamailio.cfg -m 64 -M 8
           ├─6273 /usr/sbin/kamailio --atexit=no -DD -P /run/kamailio/kamailio.pid -f /etc/kamailio/kamailio.cfg -m 64 -M 8
           ├─6274 /usr/sbin/kamailio --atexit=no -DD -P /run/kamailio/kamailio.pid -f /etc/kamailio/kamailio.cfg -m 64 -M 8
           ├─6275 /usr/sbin/kamailio --atexit=no -DD -P /run/kamailio/kamailio.pid -f /etc/kamailio/kamailio.cfg -m 64 -M 8
           ├─6276 /usr/sbin/kamailio --atexit=no -DD -P /run/kamailio/kamailio.pid -f /etc/kamailio/kamailio.cfg -m 64 -M 8
Step 5 – Install Siremis Web UI
Siremis provides a web-based interface to manage the Kamailio SIP server. First, install the Apache and PHP package with the following command:
dnf install httpd php php-fpm php-mysqlnd php-gd php-curl php-xml php-pear git make gcc -y
Next, start and enable the Apache and PHP-FPM services:
systemctl start httpd php-fpm
systemctl enable httpd php-fpm
Next, install the XML_RPC2 package for XMLRPC command panel with the following command:
pear install XML_RPC2
Next, navigate to the Apache web root directory and download the latest version of Siremis:
cd /var/www
git clone https://github.com/asipto/siremis
Next, change the directory to the downloaded directory and generate Siremis configuration files:
cd siremis
make apache24-conf | tee /etc/httpd/conf.d/siremis.conf
make prepare24
Next, change the permissions and ownership of the Siremis directory:
chown -R apache:apache /var/www/siremis/
chmod -R 777 /var/www/siremis/
Next, restart the Apache service to apply the changes:
systemctl restart httpd
Step 7 – Access Siremis Web UI
Now, open your web browser and access the Siremis web interface using the URL http://your-server-ip/siremis/install/. You should see the following page:
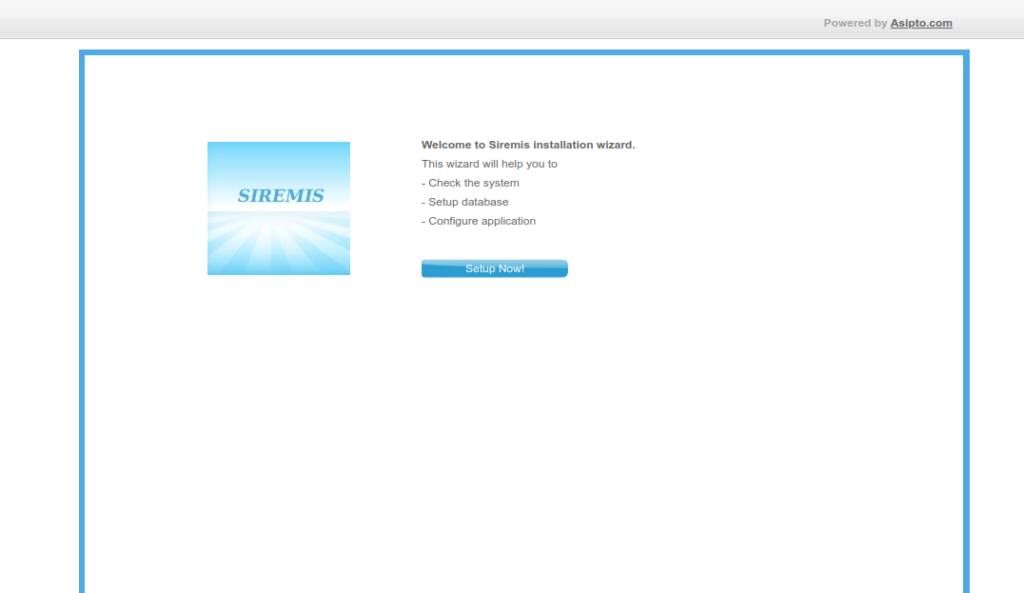
Now, click on the Setup Now! button. You should see the following page:
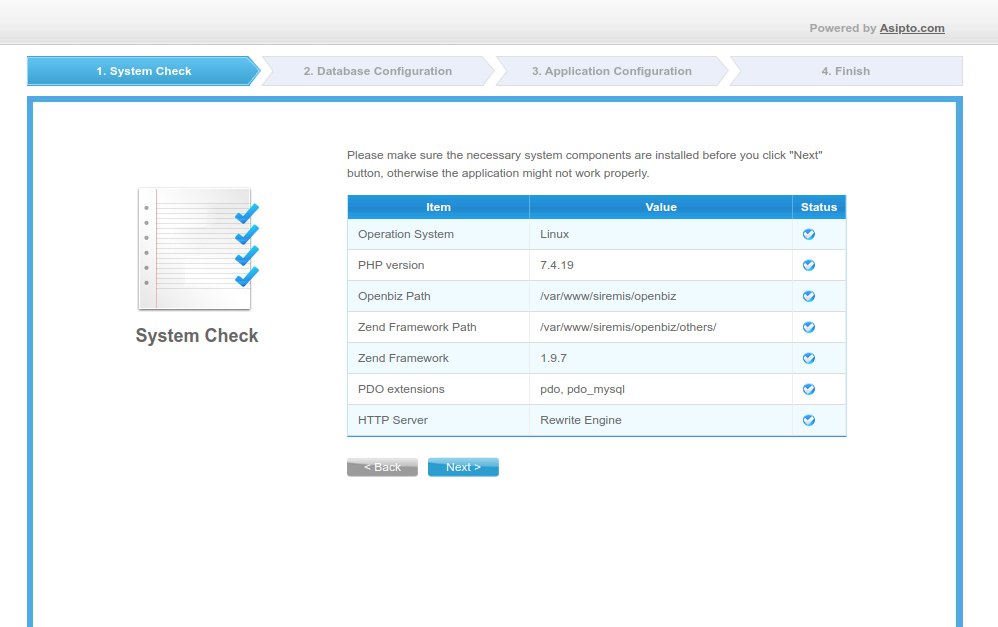
Make sure all the necessary components are installed. Then, click Next. You should see the following page:
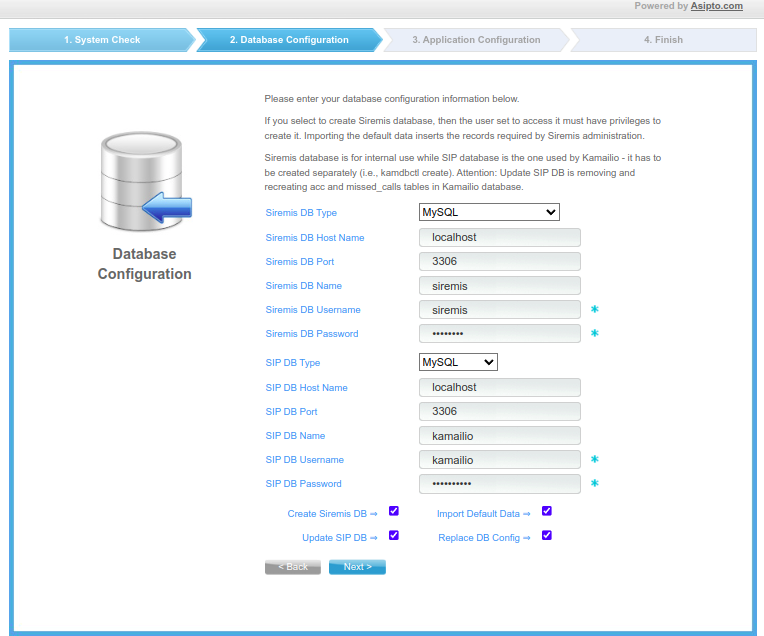
Leave all default settings and check all options, then click on the Next button. You should see the following page:
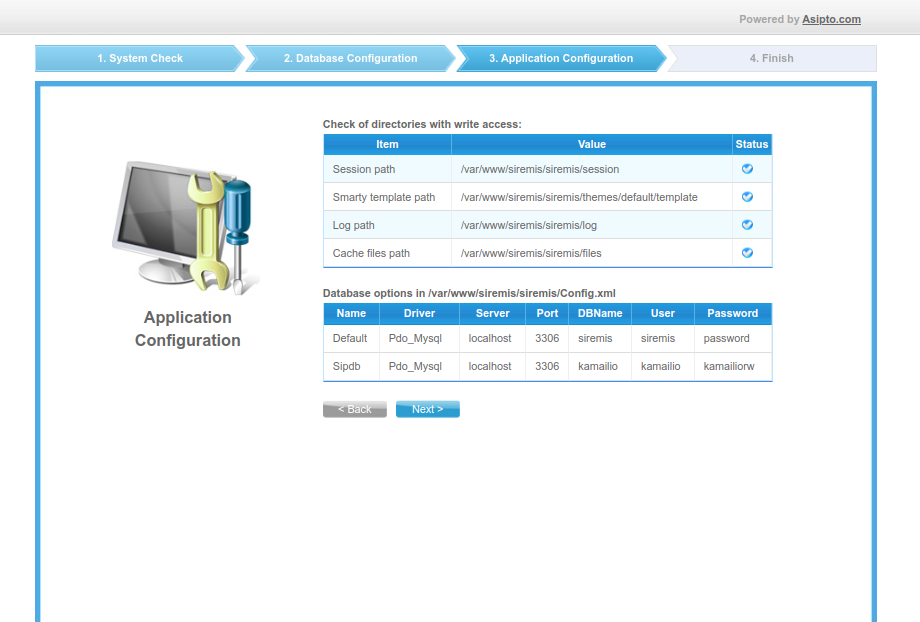
Click Next to start the installation. Once the installation has been completed successfully, you should see the following page:
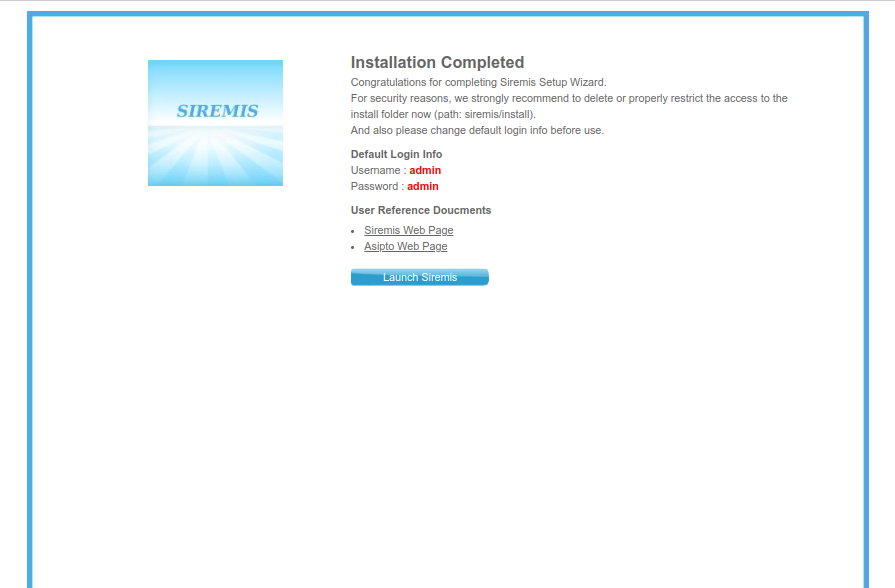
Click on the Launch Siremis button. You will be redirected to the Siremis login page as shown below:
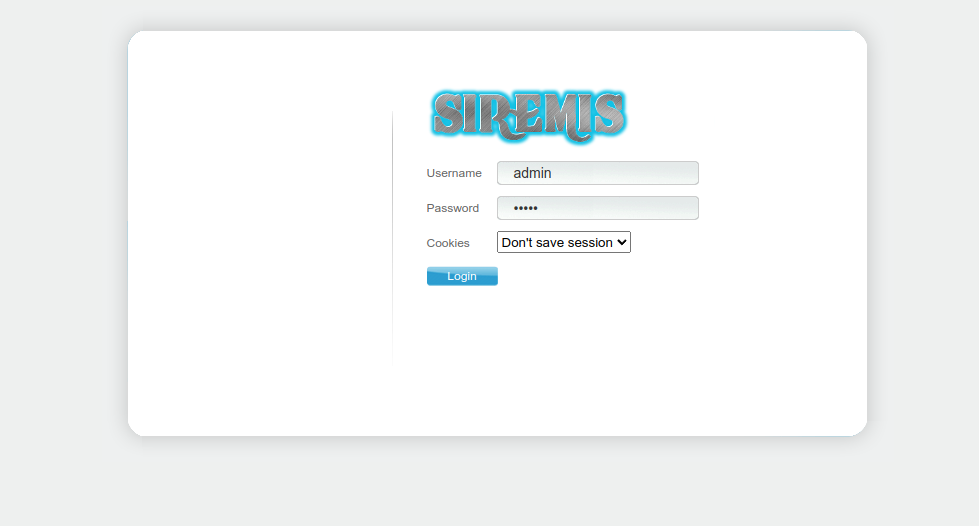
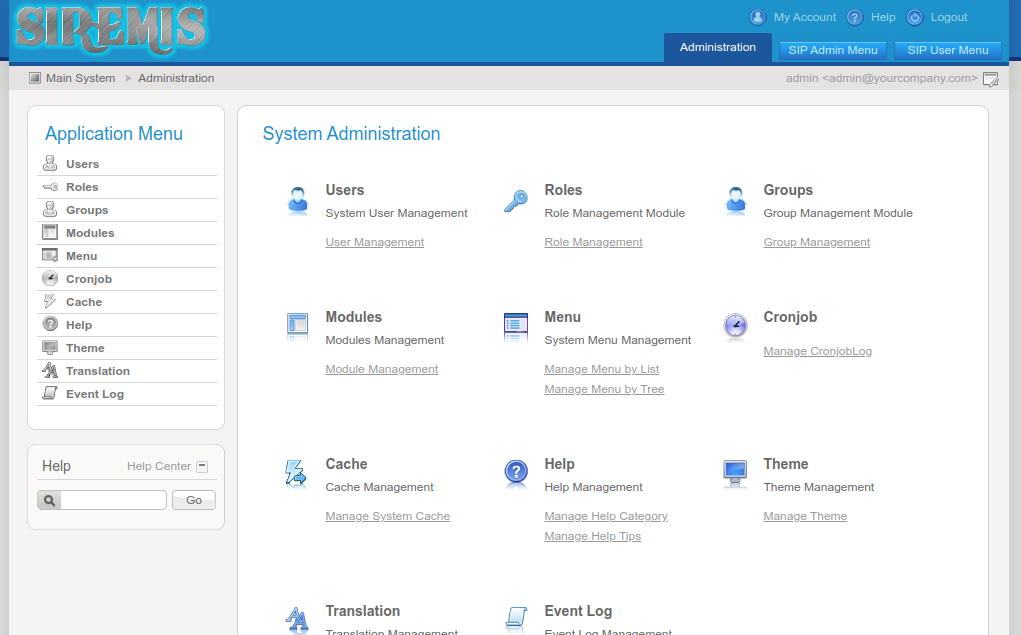
Now, provide Siremis admin username / password as admin / admin. Then, click on the Login button. You should see the Siremis default dashboard in the following page:
Conclusion
In this post, we explained how to install the Kamailio SIP server on Oracle Linux 8. We also explained how to install the Siremis web interface to manage the Kamailio SIP server. You can now start managing your SIP server via a web browser. Get started with Kamailio on VPS Hosting from Atlantic.Net!