Minikube is an open-source software written in Go and used for setting up a Kubernetes cluster on your local machine. Developers or administrators mainly use Minikube for testing purposes. This cross-platform software can be run on macOS, Linux, and Windows.
In this tutorial, we will learn how to install Kubernetes with Minikube on CentOS 8.
Step 1: Install Docker
By default, the Docker package is not available in the CentOS 8 default repo, so you will need to add the Docker repo in your system.
You can add it with the following command:
dnf config-manager --add-repo=https://download.docker.com/linux/centos/docker-ce.repo
After adding the Docker repo, install Docker by running the following command:
dnf install docker-ce --nobest -y
Once the installation is completed, start the Docker service and enable it to start at system reboot:
systemctl start docker
systemctl enable docker
You can also verify the installed version of Docker using the following command:
docker -v
You should see the following output:
Docker version 19.03.12, build 48a66213fe
Step 2: Install Kubectl
Before starting, you will need to install the required dependencies in your system. You can install them with the following command:
dnf install curl conntrack -y
Next, you will need to install Kubectl in your system. By default, kubectl is not included in CentOS 8, so you will need to install it using the curl command:
curl -LO https://storage.googleapis.com/kubernetes-release/release/`curl -s
https://storage.googleapis.com/kubernetes-release/release/stable.txt`/bin/linux/amd64/kubectl
Next, give the execution permission to the downloaded binary and move it to the /usr/local/bin directory:
chmod +x ./kubectl
mv ./kubectl /usr/local/bin/kubectl
You can now verify the Kubectl version with the following command:
kubectl version --client
You should see the following output:
Client Version: version.Info{Major:"1", Minor:"18", GitVersion:"v1.18.5",
GitCommit:"e6503f8d8f769ace2f338794c914a96fc335df0f", GitTreeState:"clean",
BuildDate:"2020-06-26T03:47:41Z", GoVersion:"go1.13.9", Compiler:"gc",
Platform:"linux/amd64"}
Step 3: Install Minikube
First, download the Minikube binary package using the curl command:
curl -Lo minikube https://storage.googleapis.com/minikube/releases/latest/minikube-linux-amd64
Next, give the execution permission to the downloaded binary with the following command:
chmod +x minikube
Next, install Minikube by running the following command:
install minikube /usr/local/bin/
You can now start Minikube using the following command:
minikube start --driver=none
Once Minikube is started successfully, you should get the following output:
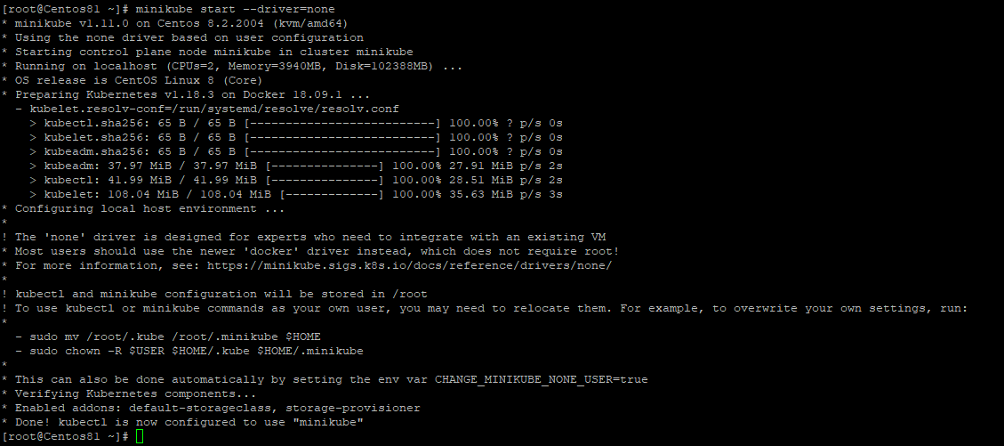
The above command will download and start the Docker containers for setting up a single node Kubernetes cluster.
You can also verify the status of the Kubernetes cluster with the following command:
minikube status
You should see the following output:
minikube
type: Control Plane
host: Running
kubelet: Running
apiserver: Running
kubeconfig: Configured
You can also view the cluster information using the following command:
kubectl cluster-info
You should see the following output:
Kubernetes master is running at https://your-server-ip:8443
KubeDNS is running at https://your-server-ip:8443/api/v1/namespaces/kube-system/services/kube-
dns:dns/proxy

To further debug and diagnose cluster problems, use 'kubectl cluster-info dump'.
You can also view the cluster nodes using the following command:
kubectl get nodes
You should get the following output:
NAME STATUS ROLES AGE VERSION
minicube Ready master 2m v1.18.3
Step 4: Verify Kubernetes Cluster
Now, deploy a k8s using echoserver image to test the Kubernetes cluster.
kubectl create deployment test-minikube --image=k8s.gcr.io/echoserver:1.10
You should see the following output:
deployment.apps/test-minikube created
Now, expose your deployment on port 8080 using the following command:
kubectl expose deployment test-minikube --type=NodePort --port=8080
You should see the following output:
service/test-minikube exposed
Next, get the information about your exposed deployment using the following command:
kubectl get pod
You should see the following output:
NAME READY STATUS RESTARTS AGE
test-minikube-f4df69575-7m2pl 1/1 Running 0 33s
Next, get the URL of your deployment using the following command:
minikube service test-minikube --url
You should see the following output:
http://your-server-ip:31186
Now, open your web browser and access the above URL http://your-server-ip:31186. You should see the following screen:

Step 5: Enable Kubernetes Dashboard
Kubernetes comes with a web dashboard that can be used to manage your cluster through a web browser. By default, the dashboard is disabled in Minikube.
You can list all Minikube addons using the following command:
minikube addons list
You should see the following output:
|-----------------------------|----------|--------------|
| ADDON NAME | PROFILE | STATUS |
|-----------------------------|----------|--------------|
| ambassador | minikube | disabled |
| dashboard | minikube | disabled |
| default-storageclass | minikube | enabled ✅ |
| efk | minikube | disabled |
| freshpod | minikube | disabled |
| gvisor | minikube | disabled |
| helm-tiller | minikube | disabled |
| ingress | minikube | disabled |
| ingress-dns | minikube | disabled |
| istio | minikube | disabled |
| istio-provisioner | minikube | disabled |
| logviewer | minikube | disabled |
| metallb | minikube | disabled |
| metrics-server | minikube | disabled |
| nvidia-driver-installer | minikube | disabled |
| nvidia-gpu-device-plugin | minikube | disabled |
| olm | minikube | disabled |
| registry | minikube | disabled |
| registry-aliases | minikube | disabled |
| registry-creds | minikube | disabled |
| storage-provisioner | minikube | enabled ✅ |
| storage-provisioner-gluster | minikube | disabled |
|-----------------------------|----------|--------------|
Now, enable the Minikube dashboard and get the URL of the dashboard with the following command:
minikube dashboard --url
This will enable the Minikube dashboard as shown below:
* Enabling dashboard ...
* Verifying dashboard health ...
* Launching proxy ...
* Verifying proxy health ...
http://127.0.0.1:42939/api/v1/namespaces/kubernetes-dashboard/services/http:kubernetes-
dashboard:/proxy/
Now, you can access the Minikube dashboard locally using the above URL.
Conclusion
Congratulations! You have successfully installed Kubernetes cluster with Minikube on CentOS 8. You can now start experimenting with Kubernetes locally. Get started with Kubernetes and Minikube on VPS Hosting from Atlantic.Net today!
* This post is for informational purposes only and does not constitute professional, legal, financial, or technical advice. Each situation is unique and may require guidance from a qualified professional.
Readers should conduct their own due diligence before making any decisions.