Laravel is a free and open-source PHP framework that can be used to build modern, fast, and scalable web applications. Laravel comes with expressive and elegant syntax that makes it a popular framework among PHP developers. Laravel uses a model view controller architecture pattern and comes with a lot of features including pagination, a complete authentication system, a powerful ORM, sessions, caching and many more. Laravel also provides a command-line interface called Artisan that can be used for building and managing Laravel-based apps.
In this tutorial, we will show you how to install Laravel Framework on Ubuntu 18.04.
Prerequisites
- A fresh Ubuntu 18.04 VPS.
- A valid domain name pointed to your server. In this tutorial, we will use example.com domain.
- A root password configured on your server.
Step 1 – Install LAMP Server
Laravel is based in PHP, runs on the webserver, and uses MySQL/MariaDB as a database backend, so you will need to install Apache, MariaDB, PHP and other required PHP extensions in your system. You can install all of them by just running the following command:
apt-get install apache2 libapache2-mod-php7.2 mariadb-server php7.2 php7.2-common php7.2-cli php7.2-gd php7.2-mysql php7.2-curl php7.2-intl php7.2-mbstring php7.2-bcmath php7.2-imap php7.2-xml php7.2-zip unzip git curl -y
Once all the packages are installed, you can proceed to the next step.
Step 2 – Configure Database
Before configuring the database, it is recommended to set a MySQL/MariaDB root password and secure the MariaDB installation. You can do it by running the following script:
mysql_secure_installation
Answer each question as shown below to set a root password and secure the MariaDB installation:
Enter current password for root (enter for none): Just Press Enter
Set root password? [Y/n] Y
New password:
Re-enter new password:
Remove anonymous users? [Y/n] Y
Disallow root login remotely? [Y/n] Y
Remove test database and access to it? [Y/n] Y
Reload privilege tables now? [Y/n] Y
Next, log in to the MariaDB shell with root user:
mysql -u root -p
Provide your MariaDB root password, then create a database and user for Laravel with the following command:
CREATE DATABASE laraveldb;
GRANT ALL ON laraveldb.* to 'laravel'@'localhost' IDENTIFIED BY 'password';
Next, flush the privileges and exit from MariaDB with the following command:
FLUSH PRIVILEGES;
EXIT;
Step 3 – Install Composer
Next, you will need to install Composer in your system. Composer is a PHP dependency manager used for installing PHP dependencies.
First, download the Composer setup file from Composer’s website with the following command:
curl -sS https://getcomposer.org/installer -o composer-setup.php
Next, check whether the installation script is corrupt with the following command:
HASH="$(wget -q -O - https://composer.github.io/installer.sig)"
php -r "if (hash_file('SHA384', 'composer-setup.php') === '$HASH') { echo 'Installer verified'; } else { echo 'Installer corrupt'; unlink('composer-setup.php'); } echo PHP_EOL;"
You should get the following output if everything is fine:
Installer Verified
Finally, run the following command to install Composer:
php composer-setup.php --install-dir=/usr/local/bin --filename=composer
You should get the following output:
All settings correct for using Composer
Downloading...

Composer (version 1.10.0) successfully installed to: /usr/local/bin/composer
Use it: php /usr/local/bin/composer
Step 4 – Install Laravel
Next, change the directory to the Apache web root directory and create a Laravel project named mylaravel using Composer command as shown below:
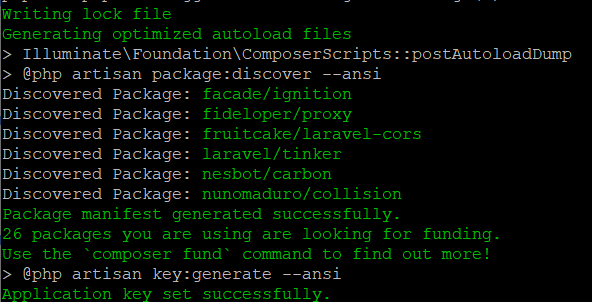
cd /var/www/html
composer create-project --prefer-dist laravel/laravel mylaravel
You should get the following output:
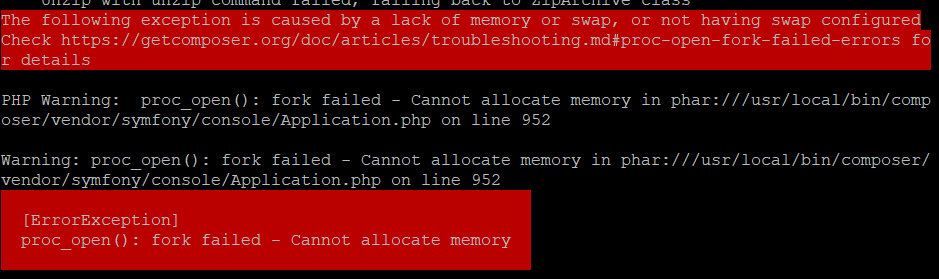
NOTE: If you get errors in during the installation about not enough swap file space available – follow this process. Make sure you run rm -fr /var/www/html/mylaravel if you get this error only.
After successful installation, change the directory to mylaravel and start the Laravel application:
cd mylaravel
php artisan serve --host=your-server-ip --port=8000
You should see the following output:
Laravel development server started: http://your-server-ip:8000
Laravel is now installed and listening on port 8000. You can check it by visiting the URL http://your-server-ip-8000 in your web browser. You should get the Laravel default dashboard in the following screen:
Next, press Ctrl + C to stop Laravel.
Step 5 – Configure Laravel
Next, you will need to configure Laravel to use MariaDB database. You can do it by editing the .env file:
nano /var/www/html/mylaravel/.env
Change the following lines that match with your database:
DB_CONNECTION=mysql
DB_HOST=127.0.0.1
DB_PORT=3306
DB_DATABASE=laraveldb
DB_USERNAME=laravel
DB_PASSWORD=password
Save and close the file when you are finished. Then, give proper permissions to the Laravel project directory:
chown -R www-data:www-data /var/www/html/mylaravel/
chmod -R 775 /var/www/html/mylaravel/
Once you are done, you can proceed to the next step.
Step 6 – Configure Apache for Laravel
Next, you will need to configure an Apache virtual host configuration file to serve the Laravel project. You can create it with the following command:
nano /etc/apache2/sites-available/laravel.conf
Add the following lines:
<VirtualHost *:80>

        ServerAdmin webmaster@example.com
        DocumentRoot /var/www/html/mylaravel/public
        ServerName www.example.com
        <Directory />
                Options FollowSymLinks
                AllowOverride None
        </Directory>
        <Directory /var/www/html/mylaravel>
                AllowOverride All
        </Directory>

        ErrorLog ${APACHE_LOG_DIR}/error.log
        CustomLog ${APACHE_LOG_DIR}/access.log combined

</VirtualHost>
Save and close the file when you are finished. Then, enable the Apache virtual host file with the following command:
a2ensite laravel.conf
Next, restart the Apache service to apply the changes:
systemctl restart apache2
Step 7 – Access Laravel Dashboard
Now, open your web browser and type the URL http://example.com. You will be redirected to the Laravel default dashboard in the following screen:
Conclusion
That’s it for now. You can now start creating your fast and scalable application with the Laravel framework. For more information visit the Laravel official documentation at Laravel Doc. If you’re ready to try out Laravel, get a VPS today from Atlantic.Net.
* This post is for informational purposes only and does not constitute professional, legal, financial, or technical advice. Each situation is unique and may require guidance from a qualified professional.
Readers should conduct their own due diligence before making any decisions.