Table of Contents
RTMP (Real-Time Messaging Protocol) is a streaming protocol originally developed by Macromedia to deliver audio, video, and data over the internet with low latency. It is still widely used today for live video streaming, especially when pushing streams from tools like OBS or FFmpeg to a media server.
The Nginx RTMP module extends Nginx into a lightweight yet powerful streaming server. It supports live RTMP streaming, HLS (HTTP Live Streaming) generation, video-on-demand playback, and even on-the-fly transcoding when combined with FFmpeg. Because Nginx is fast, stable, and resource-efficient, it is a popular choice for self-hosted streaming setups.
In this tutorial, you will compile Nginx 1.28.0 from source with the RTMP module enabled and set up a live RTMP + HLS streaming server on Ubuntu 24.04. This procedure has been tested on Ubuntu 20.04, 22.04, and 24.04.
Step 1: Install Required Dependencies
First, update your system.
apt update -y
To compile Nginx with the RTMP module, you need several build tools and libraries. These packages provide compiler support, compression, SSL, media processing, and additional Nginx features such as HTTP streaming and image handling. You can install all required tools using the below command.
apt install -y build-essential wget git ffmpeg unzip libpcre3 libpcre3-dev zlib1g zlib1g-dev libssl-dev libxml2 libxml2-dev libxslt1-dev libgd-dev geoip-database libgeoip-dev perl perl-modules
Next, create a dedicated system user for Nginx. Running Nginx as a non-login user improves security.
useradd -r -s /sbin/nologin nginx
Step 2: Download Required Components
In this step, you will download the Nginx source code, OpenSSL source, and the Nginx RTMP module. These components are required to compile Nginx with RTMP support enabled.
First, download the latest Nginx source.
wget http://nginx.org/download/nginx-1.28.0.tar.gz
After the download completes, extract the archive.
tar -xvzf nginx-1.28.0.tar.gz
This creates a new directory named nginx-1.28.0 containing the Nginx source files.
Nginx will link against OpenSSL during compilation. Download the required OpenSSL version.
wget https://www.openssl.org/source/openssl-1.1.0h.tar.gz
tar -xzvf openssl-1.1.0h.tar.gz
Next, clone the RTMP module repository from GitHub.
git clone https://github.com/sergey-dryabzhinsky/nginx-rtmp-module.git
This module adds RTMP, HLS, and VOD streaming capabilities to Nginx.
Step 3: Compile and Install Nginx with RTMP Support
Now that all required source components are available, you can compile Nginx with the RTMP module enabled. This step builds a custom Nginx binary with streaming, SSL, and HTTP features.
Change into the extracted Nginx source directory.
cd nginx-1.28.0
Run the following ./configure command to enable RTMP, SSL, HTTP streaming, and other commonly used modules.
./configure \
--prefix=/etc/nginx \
--sbin-path=/usr/sbin/nginx \
--conf-path=/etc/nginx/nginx.conf \
--error-log-path=/var/log/nginx/error.log \
--http-log-path=/var/log/nginx/access.log \
--pid-path=/var/run/nginx.pid \
--lock-path=/var/run/nginx.lock \
--user=nginx \
--group=nginx \
--with-threads \
--with-file-aio \
--with-http_ssl_module \
--with-http_v2_module \
--with-http_realip_module \
--with-http_addition_module \
--with-http_xslt_module \
--with-http_image_filter_module \
--with-http_geoip_module \
--with-http_sub_module \
--with-http_flv_module \
--with-http_mp4_module \
--with-http_gunzip_module \
--with-http_gzip_static_module \
--with-http_stub_status_module \
--with-stream \
--with-stream_ssl_module \
--with-openssl=../openssl-1.1.0h \
--add-module=../nginx-rtmp-module
After the configuration completes successfully, compile and install Nginx.
make
make install
The compilation process may take a few minutes depending on your server’s resources.
Check the installed Nginx version and build options.
nginx -V
You should see output similar to the following, confirming RTMP and OpenSSL support:
nginx version: nginx/1.28.0
built by gcc 13.3.0 (Ubuntu 13.3.0-6ubuntu2~24.04)
built with OpenSSL 1.1.0h  27 Mar 2018
TLS SNI support enabled
configure arguments: --prefix=/etc/nginx --sbin-path=/usr/sbin/nginx --conf-path=/etc/nginx/nginx.conf --error-log-path=/var/log/nginx/error.log --http-log-path=/var/log/nginx/access.log --pid-path=/var/run/nginx.pid --lock-path=/var/run/nginx.lock --user=nginx --group=nginx --with-threads --with-file-aio --with-http_ssl_module --with-http_v2_module --with-http_realip_module --with-http_addition_module --with-http_xslt_module --with-http_image_filter_module --with-http_geoip_module --with-http_sub_module --with-http_flv_module --with-http_mp4_module --with-http_gunzip_module --with-http_gzip_static_module --with-http_stub_status_module --with-stream --with-stream_ssl_module --with-openssl=../openssl-1.1.0h --add-module=../nginx-rtmp-module
Once verified, Nginx is successfully installed with RTMP support. In the next step, you will create a systemd service to manage the Nginx service.
Step 4: Create systemd Service for Nginx
Since you compiled Nginx from source, it does not include a systemd service file by default. You need to create one so you can start, stop, and manage Nginx using systemctl.
Create a service file.
nano /lib/systemd/system/nginx.service
Add the following content:
[Unit]
Description=nginx - high performance web server
After=network.target

[Service]
Type=forking
PIDFile=/var/run/nginx.pid
ExecStartPre=/usr/sbin/nginx -t
ExecStart=/usr/sbin/nginx
ExecReload=/bin/kill -s HUP $MAINPID
ExecStop=/bin/kill -s TERM $MAINPID

[Install]
WantedBy=multi-user.target
Reload systemd to apply the new service file.
systemctl daemon-reload
Start the Nginx service.
systemctl start nginx
Enable Nginx to start automatically at boot.
systemctl enable nginx
Step 5: Configure Nginx RTMP and HLS Streaming
With Nginx installed and running, the next step is to configure it for RTMP live streaming, HLS playback, and VOD support.
First, backup the Nginx main configuration file.
mv /etc/nginx/nginx.conf /etc/nginx/nginx.conf.bak
Next, create a new configuration file.
nano /etc/nginx/nginx.conf
Add the below configuration.
worker_processes auto;

events {
    worker_connections 1024;
}

rtmp {
    server {
        listen 1935;
        chunk_size 4000;

        application show {
            live on;

            hls on;
            hls_path /mnt/hls;
            hls_fragment 3;
            hls_playlist_length 60;

            deny play all;
        }

        application stream {
            live on;
        }

        application vod {
            play /mnt/mp4s;
        }
    }
}

http {
    sendfile off;
    tcp_nopush on;

    server {
        listen 8080;

        location / {
            root /mnt;
            add_header Cache-Control no-cache;

            types {
                application/vnd.apple.mpegurl m3u8;
                video/mp2t ts;
            }
        }
    }
}
Create directories for HLS and VOD content.
mkdir -p /mnt/hls /mnt/mp4s
chown -R nginx:nginx /mnt
Apply the new configuration by restarting Nginx.
systemctl restart nginx
Step 6: Start RTMP Streaming Using FFmpeg
Now that the RTMP and HLS server is configured, you can push a live stream to Nginx using FFmpeg. This step helps you verify that RTMP ingestion and playback are working correctly.
First, download the sample video file from the URL https://file-examples.com/index.php/sample-video-files/sample-mp4-files/.
wget https://file-examples.com/storage/febe13078a694784e9dcb0b/2017/04/file_example_MP4_1280_10MG.mp4 -O myfile.mp4
Use FFmpeg to send the video to the RTMP application configured earlier.
ffmpeg -re -i myfile.mp4 -vcodec libx264 -acodec aac -f flv rtmp://your-server-ip:1935/show/vod
Step 7: Test RTMP and HLS Playback
After pushing the stream to the RTMP server, the final step is to confirm that playback works correctly using both RTMP and HLS clients.
On the client system, open the VLS media player, go to VLC Media => Open Network Stream. You should see the following screen:
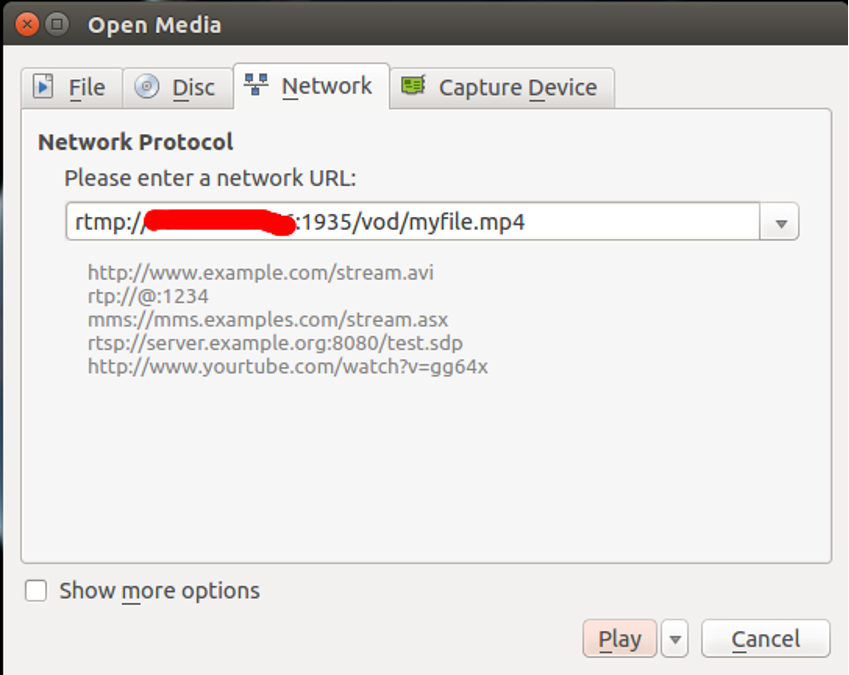
Provide your RTMP streaming server URL and click on the Play button.
Once you are connected successfully, you should see your MP4 video in the following screen:

Conclusion
You have successfully installed Nginx 1.28.0 with the RTMP module on Ubuntu 24.04 and built a working live streaming server from source. This setup allows you to accept incoming RTMP streams, generate HLS segments in real time, and serve them over HTTP for broad device compatibility.
* This post is for informational purposes only and does not constitute professional, legal, financial, or technical advice. Each situation is unique and may require guidance from a qualified professional.
Readers should conduct their own due diligence before making any decisions.