Memcache is a free, open-source, general-purpose memory caching system used to speed up dynamic database-driven websites. It is a high-performance and in-memory data store that offers an open-source solution for delivering faster response times. Memcached is distributed, meaning you can easily scale up compute capacity by adding new nodes.
In this post, we will explain how to install Memcached on Arch Linux.
Step 1 – Configure Repository
By default, the default repository is outdated in Arch Linux., so you will need to modify the default mirror list. You can do it by editing the mirrorlist configuration file:
nano /etc/pacman.d/mirrorlist
Remove all lines and add the following lines:
## Score: 0.7, United States
Server = http://mirror.us.leaseweb.net/archlinux/$repo/os/$arch
## Score: 0.8, United States
Server = http://lug.mtu.edu/archlinux/$repo/os/$arch
Server = http://mirror.nl.leaseweb.net/archlinux/$repo/os/$arch
## Score: 0.9, United Kingdom
Server = http://mirror.bytemark.co.uk/archlinux/$repo/os/$arch
## Score: 1.5, United Kingdom
Server = http://mirrors.manchester.m247.com/arch-linux/$repo/os/$arch
Server = http://archlinux.dcc.fc.up.pt/$repo/os/$arch
## Score: 6.6, United States
Server = http://mirror.cs.pitt.edu/archlinux/$repo/os/$arch
## Score: 6.7, United States
Server = http://mirrors.acm.wpi.edu/archlinux/$repo/os/$arch
## Score: 6.8, United States
Server = http://ftp.osuosl.org/pub/archlinux/$repo/os/$arch
## Score: 7.1, India
Server = http://mirror.cse.iitk.ac.in/archlinux/$repo/os/$arch
## Score: 10.1, United States
Server = http://mirrors.xmission.com/archlinux/$repo/os/$arch
Save and close the file, then update all the package indexes with the following command:
pacman -Syu
Step 2 – Install Memcached
By default, the Memcached package is available in the Arch Linux default repository. You can search the Memcached package using the following command.
pacman -Ss memcached
You will get the following list:
extra/memcached 1.6.17-1 [installed]
    Distributed memory object caching system
extra/prometheus-memcached-exporter 0.10.0-1
    Exports metrics from memcached servers for consumption by Prometheus
community/gambas3-gb-memcached 3.17.3-8 (gambas3)
    Memcached client component
community/libmemcached-awesome 1.1.3-1 [installed]
    C/C++ client library and tools for the memcached server
community/nginx-mod-memc 0.19-11
    Extended version of the standard memcached module for nginx
community/perl-cache-memcached 1.30-4
    client library for memcached (memory cache daemon)
community/php-legacy-memcached 3.2.0-2
    PHP Legacy extension for interfacing with memcached via libmemcached library
community/php-memcached 3.2.0-2
    PHP extension for interfacing with memcached via libmemcached library
community/python-binary-memcached 0.31.0-1
    A pure python module to access memcached via its binary protocol with SASL auth support
community/python-memcached 1.59-10
    Python interface to memcached
community/python-pylibmc 1.6.1-7
    Quick and small memcached client for Python
Now, install the Memcached package using the following command.
pacman -S memcached libmemcached
After the installation, verify the Memcached version with the following command.
memcached --version
You should see the following output.
memcached 1.6.17
Step 3 – Manage Memcached Service
By default, the Memcached service is managed by systemd. You can start and stop it using the systemctl utility.
To start the Memcached service, run the following command.
systemctl start memcached
To enable the Memcached service, run the following command.
systemctl enable memcached
You can check the status of the Memcached service using the following command.
systemctl status memcached
You will get the following output.
● memcached.service - memcached daemon
     Loaded: loaded (/usr/lib/systemd/system/memcached.service; disabled; preset: disabled)
     Active: active (running) since Mon 2023-01-30 14:36:32 UTC; 4s ago
   Main PID: 47816 (memcached)
      Tasks: 10 (limit: 2362)
     Memory: 1.4M
     CGroup: /system.slice/memcached.service
             └─47816 /usr/bin/memcached -m 64 -c 1024 -l 127.0.0.1,::1 -o modern,drop_privileges

Jan 30 14:36:32 archlinux systemd[1]: Started memcached daemon.
At this point, Memcached is installed and listens on port 11211. You can check it with the following command.
ss -antpl | grep memcache
You should see the following output.
LISTEN 0      0          127.0.0.1:11211      0.0.0.0:*    users:(("memcached",pid=47816,fd=22))
LISTEN 0      0              [::1]:11211            *:*    users:(("memcached",pid=47816,fd=23))
Step 4 – Install Memcached PHP Extension
If you want to use Memcached with your PHP-based application then you will need to install the Memcached PHP extensions. You can install it with other packages using the following command.
pacman -S php php-memcached php-fpm
Now, start and enable the PHP-FPM service using the following command.
systemctl start php-fpm
systemctl enable php-fpm
Step 5 – Install Nginx
To verify the PHP Memcached extension, you will need to install the Nginx to your system. You can install it with the following command.
pacman -S nginx-mainline
Next, start and enable the Nginx service with the following command.
systemctl start nginx
systemctl enable nginx
Step 6 – Verify Memcache PHP Extension
To verify the Memcached PHP extension, create a simple info.php file inside the Nginx web root directory.
nano /usr/share/nginx/html/info.php
Add the following code:
<?php
phpinfo();
?>
Next, edit the Nginx main configuration file and define your PHP location.
nano /etc/nginx/nginx.conf
Find the following lines:
location / {
root   /usr/share/nginx/html;
index  index.html index.htm;
}
Add the following lines after the above lines:
location ~ \.php$ {
fastcgi_pass   unix:/var/run/php-fpm/php-fpm.sock;
fastcgi_index  index.php;
root   /usr/share/nginx/html;
include        fastcgi.conf;
}
Save and close the file, then restart the Nginx service to apply the changes.
systemctl restart nginx
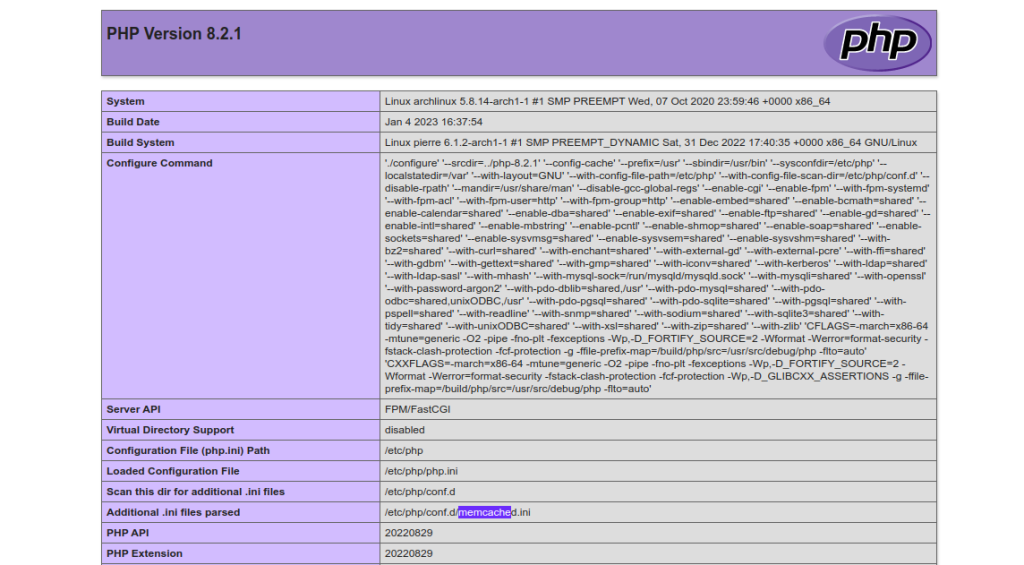
Now, open your web browser and access the info.php file using the URL http://your_server_ip/info.php. You should see the Memcached on the following screen.
Conclusion
Congratulations! You have successfully installed and tested Memcached on Arch Linux. You can now use Memcached with your PHP-based application to improve application performance. You can try the Memcached on dedicated server hosting from Atlantic.Net!
* This post is for informational purposes only and does not constitute professional, legal, financial, or technical advice. Each situation is unique and may require guidance from a qualified professional.
Readers should conduct their own due diligence before making any decisions.