Apache Solr is a popular open-source search platform built on Apache Lucene. It is written in Java and used to build search applications. Solr provides distributed indexing, replication, and load-balanced querying to achieve data querying in near real-time. It offers very useful features, including full-text search capability, easy monitoring, real-time indexing, optimized for high-volume traffic, and more.
This post will show you how to install Apache Solr on Arch Linux.
Step 1 – Configure Repository
By default, the default repository is outdated in Arch Linux, so you will need to modify the default mirror list. You can do it by editing the mirrorlist configuration file:
nano /etc/pacman.d/mirrorlist
Remove all lines and add the following lines:
## Score: 0.7, United States
Server = http://mirror.us.leaseweb.net/archlinux/$repo/os/$arch
## Score: 0.8, United States
Server = http://lug.mtu.edu/archlinux/$repo/os/$arch
Server = http://mirror.nl.leaseweb.net/archlinux/$repo/os/$arch
## Score: 0.9, United Kingdom
Server = http://mirror.bytemark.co.uk/archlinux/$repo/os/$arch
## Score: 1.5, United Kingdom
Server = http://mirrors.manchester.m247.com/arch-linux/$repo/os/$arch
Server = http://archlinux.dcc.fc.up.pt/$repo/os/$arch
## Score: 6.6, United States
Server = http://mirror.cs.pitt.edu/archlinux/$repo/os/$arch
## Score: 6.7, United States
Server = http://mirrors.acm.wpi.edu/archlinux/$repo/os/$arch
## Score: 6.8, United States
Server = http://ftp.osuosl.org/pub/archlinux/$repo/os/$arch
## Score: 7.1, India
Server = http://mirror.cse.iitk.ac.in/archlinux/$repo/os/$arch
## Score: 10.1, United States
Server = http://mirrors.xmission.com/archlinux/$repo/os/$arch
Save and close the file, then update all the package indexes with the following command:
pacman -Syu
Step 2 – Install Java JDK
First, you will need to install Java on your server. You can install it using the following command.
pacman -S jre17-openjdk
Once installed, you can verify the Java version with the following command.
java --version
You will get the following output.
openjdk 17.0.6 2023-01-17
OpenJDK Runtime Environment (build 17.0.6+10)
OpenJDK 64-Bit Server VM (build 17.0.6+10, mixed mode)
Step 3 – Install Apache Solr
Apache Solr is available in the Arch Linux default repository. You can install it using the following command.
pacman -S solr
After the installation, start and enable the Apache Solr service using the following command.
systemctl start solr
systemctl enable solr
You can also check the Apache Solr status with the following command.
systemctl status solr
You will see the following output.
● solr.service - Solr full text search engine
     Loaded: loaded (/usr/lib/systemd/system/solr.service; disabled; preset: disabled)
     Active: active (running) since Mon 2023-02-06 13:22:26 UTC; 2min 22s ago
   Main PID: 60050 (java)
      Tasks: 40 (limit: 2362)
     Memory: 637.6M
     CGroup: /system.slice/solr.service
             └─60050 java -server -Xms512m -Xmx512m -XX:+UseG1GC -XX:+PerfDisableSharedMem -XX:+ParallelRefProcEnabled -XX:MaxGCPauseMillis=2>

Feb 06 13:22:34 archlinux solr[60050]: 2023-02-06 13:22:34.532 WARN  (main) [] o.a.s.c.CoreContainer Not all security plugins configured!  au>
Feb 06 13:22:35 archlinux solr[60050]: 2023-02-06 13:22:35.040 INFO  (main) [] o.a.s.c.CorePropertiesLocator Found 0 core definitions underne>
Feb 06 13:22:35 archlinux solr[60050]: 2023-02-06 13:22:35.243 INFO  (main) [] o.e.j.s.h.ContextHandler Started o.e.j.w.WebAppContext@33a053d>
Feb 06 13:22:35 archlinux solr[60050]: 2023-02-06 13:22:35.274 INFO  (main) [] o.e.j.s.RequestLogWriter Opened /var/log/solr/2023_02_06.reque>
Feb 06 13:22:35 archlinux solr[60050]: 2023-02-06 13:22:35.289 INFO  (main) [] o.e.j.s.AbstractConnector Started ServerConnector@aa22f1c{HTTP>
Feb 06 13:22:35 archlinux solr[60050]: 2023-02-06 13:22:35.290 INFO  (main) [] o.e.j.s.Server Started @7940ms
Feb 06 13:24:14 archlinux solr[60050]: 2023-02-06 13:24:14.606 INFO  (qtp2085886997-19) [] o.a.s.c.TransientSolrCoreCacheDefault Allocating t>
Feb 06 13:24:14 archlinux solr[60050]: 2023-02-06 13:24:14.638 INFO  (qtp2085886997-19) [] o.a.s.s.HttpSolrCall [admin] webapp=null path=/adm>
Feb 06 13:24:14 archlinux solr[60050]: 2023-02-06 13:24:14.688 INFO  (qtp2085886997-18) [] o.a.s.s.HttpSolrCall [admin] webapp=null path=/adm>
Feb 06 13:24:15 archlinux solr[60050]: 2023-02-06 13:24:15.982 INFO  (qtp2085886997-19) [] o.a.s.s.HttpSolrCall [admin] webapp=null path=/adm>
lines 1-19/19 (END)
By default, Apache Solr listens on port 8993. You can verify it using the following command.
ss -altnp | grep 8983
You will get the following output.
LISTEN 0 0 [::ffff:127.0.0.1]:8983 *:* users:(("java",pid=60050,fd=138))
Step 4 – Configure Nginx as a Reverse Proxy for Apache Solr
First, install the Nginx web server package using the following command.
pacman -S nginx
Next, start and enable the Nginx service with the following command.
systemctl start nginx
systemctl enable nginx
Next, create a directory for the Nginx configuration with the following command.
mkdir /etc/nginx/sites-enabled
Next, edit the Nginx main configuration file and define your directory.
nano /etc/nginx/nginx.conf
Add the following lines below the line http{:
include sites-enabled/*;
server_names_hash_bucket_size 64;
Next, create an Nginx virtual host configuration file with the following command:
nano /etc/nginx/sites-enabled/solr.conf
Add the following lines.
Server {
    listen 80;

    server_name solr.example.com;

    location / {
        proxy_pass http://127.0.0.1:8983;
    }
}
Save and close the file, then verify Nginx for any syntax configuration errors:
nginx -t
You will get the following output:
nginx: the configuration file /etc/nginx/nginx.conf syntax is ok
nginx: configuration file /etc/nginx/nginx.conf test is successful
Finally, restart the Nginx service to apply the changes:
systemctl restart nginx
Step 5 – Access Apache Solr
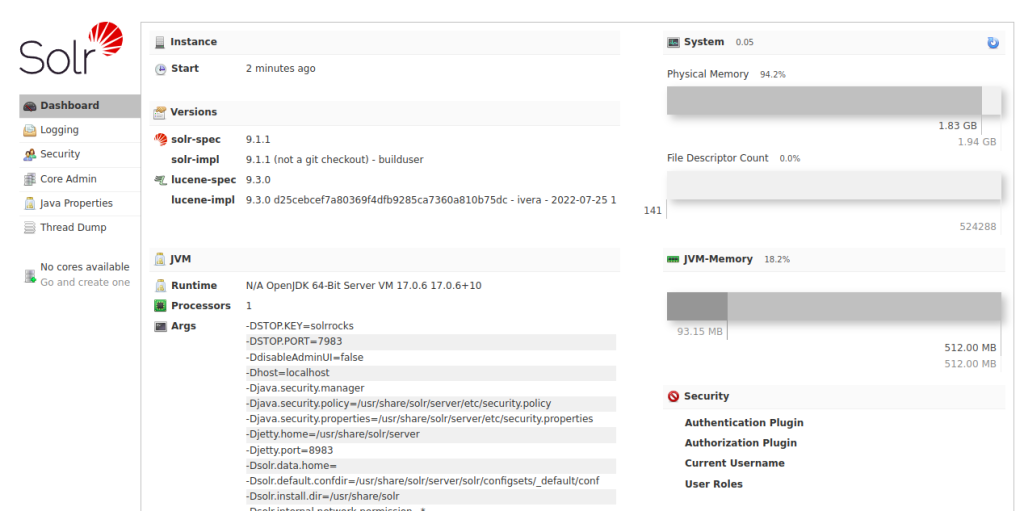
Now, open your web browser and access the Apache Solr web UI using the URL http://solr.example.com. You should see the Apache Solr web UI on the following screen.
Conclusion
In this tutorial, we showed you how to install Apache Solr on Arch Linux. You can now start building your search application using the Apache Solr platform. You can test Apache Solr on dedicated server hosting from Atlantic.Net!

