Protecting your web server against different kinds of attacks is a crucial responsibility for any system administrator. ModEvasive is an Apache web server module that helps you to protect your web server in the event of DoS, DDoS, and brute-force attacks. These types of attacks cause the server to run out of memory, crashing your website.
The mod_evasive module works by creating a hash table of IP Addresses and URIs and monitoring for suspicious incoming server requests, such as:
- Making more than 100 concurrent connections per second.
- Requesting the same page several times per second.
If such a suspicious request occurs, the mod_evasive module sends a 403 error and blocks the IP address.
In this tutorial, we will show you how to install and configure mod_evasive with Apache on an Ubuntu 24.04 server.
Step 1 – Install mod_evasive
Before starting, Apache webserver needs to be installed on your server. If not installed, you can install it with the following command:
apt-get install apache2 apache2-utils -y
Once Apache web server is installed, you can install mod_evasive with the following command:
apt-get install libapache2-mod-evasive -y
After installing mod_evasive, you can verify whether the mod_evasive module is enabled by running the following command:
apachectl -M | grep evasive
You should get the following output:
[Mon Jan 27 13:55:35.707317 2025] [so:warn] [pid 29031] AH01574: module dav_module is already loaded, skipping
 evasive20_module (shared)
At this point, the mod_evasive module is installed and enabled. You can now proceed to the next step.
Step 2 – Configure mod_evasive
The default configuration file of mod_evasive is located at /etc/apache2/mods-enabled/evasive.conf. You will need to configure this file per your requirements.
You can open this file using the nano editor as shown below:
nano /etc/apache2/mods-enabled/evasive.conf
Change the file as shown below. We recommend amending DOSEmailNotify to the address you want the email sent to (if configured) and DOSSystemCommand – for example “su – richard -c ‘/sbin… %s …’”
<IfModule mod_evasive20.c>
    DOSHashTableSize    3097
    DOSPageCount        2
    DOSSiteCount        50
    DOSPageInterval     1
    DOSSiteInterval     1
    DOSBlockingPeriod   100
    DOSEmailNotify      root@ubuntu1804
    DOSSystemCommand    "su - someuser -c '/sbin/... %s ...'"
    DOSLogDir           "/var/log/mod_evasive"
</IfModule>
Save and close the file when you are finished.
A brief explanation of each option is shown below:
- DOSHashTableSize: mod_evasive uses this option to control the hash table size. It is recommended to increase this if you have a busy web server.
- DOSPageCount: This option specifies the threshold limit for the number of requests allowed to the same URI per second. Once the threshold limit has been exceeded, the client’s IP address will be blacklisted.
- DOSSiteCount: This option specifies the limit on the total number of requests allowed to the same IP address.
- DOSPageInterval: This option specifies the page count interval.
- DOSSiteInterval: This option specifies the site count interval.
- DOSBlockingPeriod : This option defines the amount of time in seconds that a client will be blocked.
- DOSEmailNotify: This option sends an email to the specified address when an IP address has been blacklisted.
- DOSSystemCommand: Whenever an IP address has been blacklisted, the specified system command will be executed.
- DOSLogDir: This option defines the mod_evasive log directory.
Next, create a directory to store the mod_evasive log and change its ownership to www-data with the following command:
mkdir /var/log/mod_evasive
chown -R www-data:www-data /var/log/mod_evasive
Finally, restart the Apache service to implement the changes:
systemctl restart apache2
Step 3 – Test mod_evasive
At this point, the mod_evasive module is installed and configured. It’s time to test whether the module is working correctly.
Go to the remote system and send a bulk page request to the server using the ab command:
ab -n 1000 -c 20 http://your-server-ip/
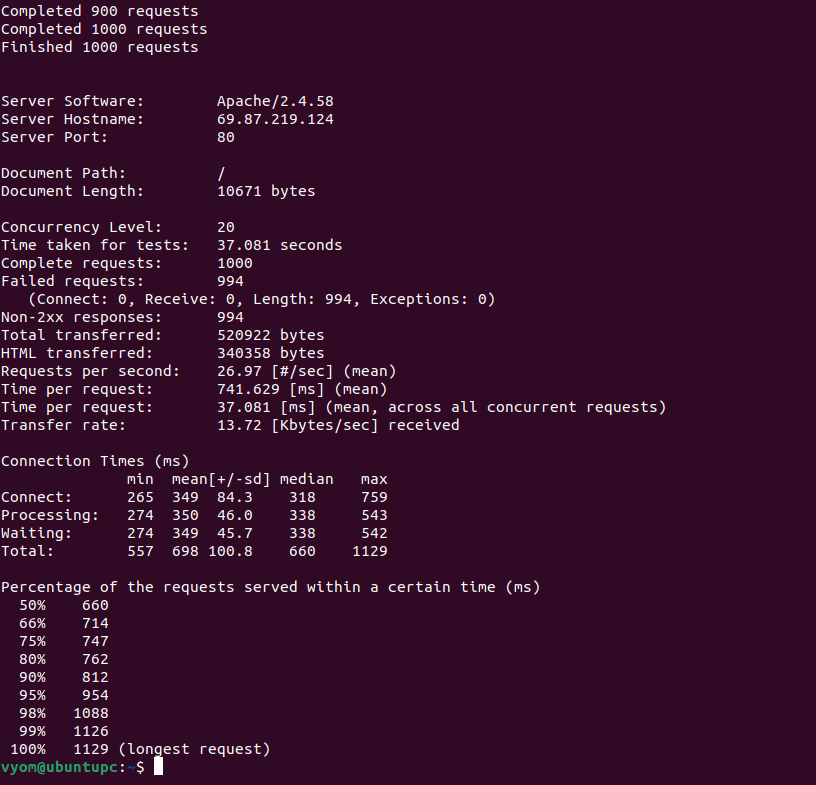
This command will cause the equivalent of a DoS attack by sending 1000 page requests in 10 concurrent connections.
On the server, check the mail log by running the following command:
tail -15 /var/mail/root
You should see that the client IP address has been blacklisted by mod_evasive:
To: root@ubuntu
MIME-Version: 1.0
Content-Type: text/plain; charset="ANSI_X3.4-1968"
Content-Transfer-Encoding: 8bit
Message-Id: <20250527064234.B1FA542ABE@ubuntu-master>
Date: Tue, 27 May 2025 06:42:34 +0000 (UTC)
From: www-data <www-data@ubuntu-master>

To: root@ubuntu
Subject: HTTP BLACKLIST 27.60.23.174

mod_evasive HTTP Blacklisted 27.60.23.174

--B1FA542ABE.1748328154/ubuntu-master--
You can also test mod_evasive using the test.pl built-in script. You will need to modify this script to make it works.
You can edit the script as shown below:
nano /usr/share/doc/libapache2-mod-evasive/examples/test.pl
Find the following line:
print $SOCKET "GET /?$_ HTTP/1.0\n\n";
Replace it with the following:
print $SOCKET "GET /?$_ HTTP/1.0\r\nHost: 127.0.0.1\r\n\r\n";
Save and close the file when you are finished. Then, run the script using the perl command:
perl /usr/share/doc/libapache2-mod-evasive/examples/test.pl
If everything works correctly, you should get the following output:
HTTP/1.1 403 Forbidden
HTTP/1.1 403 Forbidden
HTTP/1.1 403 Forbidden
HTTP/1.1 403 Forbidden
HTTP/1.1 403 Forbidden
HTTP/1.1 403 Forbidden
HTTP/1.1 403 Forbidden
HTTP/1.1 403 Forbidden
HTTP/1.1 403 Forbidden
HTTP/1.1 403 Forbidden
HTTP/1.1 403 Forbidden
HTTP/1.1 403 Forbidden
HTTP/1.1 403 Forbidden
HTTP/1.1 403 Forbidden
HTTP/1.1 403 Forbidden
HTTP/1.1 403 Forbidden
Conclusion
Congratulations! The mod_evasive module is now configured to protect your server against DDoS and Brute force attacks.
* This post is for informational purposes only and does not constitute professional, legal, financial, or technical advice. Each situation is unique and may require guidance from a qualified professional.
Readers should conduct their own due diligence before making any decisions.