AWStats, also called “Advanced Web Statistics,” is a powerful, free tool that generates advanced web server graphical statistics. It captures your Apache web server logs and can measure visits, unique visitors, authenticated users, pages, domains/countries, and more, displaying them in a graphical format. AWStats is capable of analyzing lots of web servers including IIS, Weblogic, Webstar, Squid, and mail or FTP servers. It is written in Perl.
In this post, we will show you how to install AWStats on Oracle Linux 8.
Step 1 – Install Apache Web Server
Before starting, an Apache web server must be installed on your server. If not installed, you can install it with the following command:
dnf install httpd -y
Once the Apache web server is installed, start and enable the Apache service:
systemctl start httpd
systemctl enable httpd
Step 2 – Create a Sample Website to Monitor via AWStats
Next, you will need to create a website that you want to monitor using AWStats. To do so, create an Apache virtual host configuration file:
nano /etc/httpd/conf.d/website.conf
Add the following lines:
<VirtualHost *:80>
   ServerName web.example.com
   ServerAdmin webmaster@example.com
   DocumentRoot /usr/share/httpd/noindex
   DirectoryIndex index.html
   ErrorLog /var/log/httpd/example_error.log
   CustomLog /var/log/httpd/example_access.log combined

</VirtualHost>
Step 3 – Install AWStats
By default, the AWStatspackage is not included in the Oracle Linux default repo, so you will need to install the EPEL repo and enable the ol8_codeready_builder repo.
dnf config-manager --set-enabled ol8_codeready_builder
dnf install epel-release -y
Next, install the required Perl modules with the following command:
dnf install perl perl-libwww-perl.noarch
Next, install the AWStats package using the following command:
dnf install awstats
Step 4 – Configure Awstats
By default, AWStats generates the Apache configuration file and save it at /etc/httpd/conf.d/awstats.conf, so, you will need to create a separate configuration file for your website web.example.com.
To do so, create a copy of the main configuration file to the file that matches your domain name:
cp /etc/awstats/awstats.oraclelinux8.conf /etc/awstats/awstats.web.example.com.conf
Next, edit the configuration file:
nano /etc/awstats/awstats.web.example.com.conf
Define your Apache server log file and domain name as shown below:
LogFile="/var/log/httpd/example_access.log"
SiteDomain="web.example.com"
HostAliases="REGEX[web.example.com]"
Save and close the file, then generate your initial statistics from the current Apache logs with the following command:
/usr/share/awstats/wwwroot/cgi-bin/awstats.pl -config=awstats.web.example.com.conf
You should see the following output:
Create/Update database for config "/etc/awstats/awstats.web.example.com.conf" by AWStats version 7.8 (build 20200416)
From data in log file "/var/log/httpd/example_access.log"...
Phase 1 : First bypass old records, searching new record...
Searching new records from beginning of log file...
Phase 2 : Now process new records (Flush history on disk after 20000 hosts)...
Jumped lines in file: 0
Parsed lines in file: 4
 Found 0 dropped records,
 Found 0 comments,
 Found 0 blank records,
 Found 0 corrupted records,
 Found 0 old records,
 Found 4 new qualified records
Step 5 – Allow AWStats from Remote Machine
By default, the Apache webserver is configured to access AWStats only from the localhost, so you will need to edit awstats.conf file to grant access to your IP address.
nano /etc/httpd/conf.d/awstats.conf
Find the following line:
Require local
Replace it with the following line:
Require ip your-system-ip
Save and close the file when you are finished.
Note: your-system-ip is the IP address of your desktop system from where you want to access AWStats. You can find the IP address of your desktop system using https://whatismyipaddress.com/.
Next, set proper ownership to the AWStats root directory with the following command:
chown -R apache: /usr/share/awstats/wwwroot/
Next, restart the Apache service to apply the configuration changes:
systemctl restart httpd
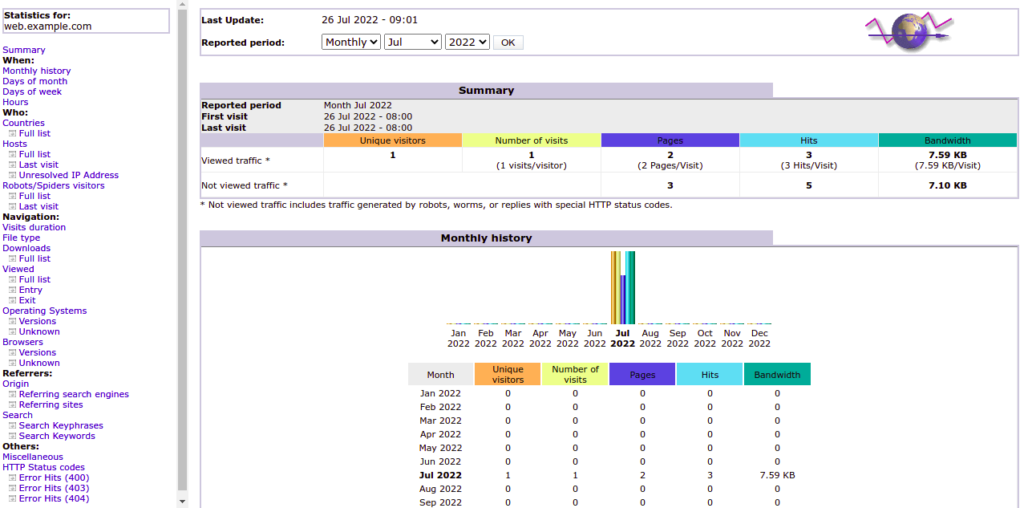
Step 6 – Access Awstats
Now, open your web browser and access your Apache website log statistics using the URL http://your-server-ip/awstats/awstats.pl?config=web.example.com. You should see the AWStats dashboard on the following screen:
Conclusion
In the above post, we explained how to install and configure AWStats to analyze your website log on Oracle Linux 8. You can now host AWStats in your organization to monitor your website. Try it on your VPS hosting account from Atlantic.Net.
* This post is for informational purposes only and does not constitute professional, legal, financial, or technical advice. Each situation is unique and may require guidance from a qualified professional.
Readers should conduct their own due diligence before making any decisions.