Rkhunter is a command-line utility that scans the local system for rootkits, backdoors, and possible local exploits. It also checks for hidden files, wrong permissions set on binaries, suspicious strings in the kernel, and many more potential security problems. Rkhunter works by comparing local files with hashes in an online database. It scans the Linux systems to determine if any rootkits infect the server.
This tutorial will show you how to install and use Rkhunter to scan and detect security holes in Ubuntu. This procedure is compatible with Ubuntu 22.04 and Ubuntu 24.04.
Step 1 – Install Rkhunter
By default, Rkhunter is available in the Ubuntu 20.04 default repository. You can install it with the following commands:
apt-get update -y
apt-get install rkhunter -y
Now, verify the installed version of Rkhunter with the following command:
rkhunter --version
You should get the following output:
Rootkit Hunter 1.4.6
Step 2 – Configure Rkhunter
Before starting, you will need to configure Rkhunter to scan your system. You can configure it by editing the file /etc/rkhunter.conf:
nano /etc/rkhunter.conf
Change the following lines:
UPDATE_MIRRORS=1

MIRRORS_MODE=0
WEB_CMD=""
Save and close the file when you are finished.
Next, you must create /etc/default/rkhunter.conf file to automatically set up regular scans and updates with a cron job.
nano /etc/default/rkhunter.conf
Change the following lines:
CRON_DAILY_RUN="true"
CRON_DB_UPDATE="true"
APT_AUTOGEN="true"
Save and close the file when you are finished.
Next, run the following command to verify any configuration errors:
rkhunter -C
Step 3 – Update the Database
Rkhunter uses text data files to find suspicious activities on the system, so you must first update the text data file. You can edit it with the following command:
rkhunter --update
You should get the following output:
[ Rootkit Hunter version 1.4.6 ]

Checking rkhunter data files...
Checking file mirrors.dat                                  [ Updated ]
Checking file programs_bad.dat                             [ No update ]
Checking file backdoorports.dat                            [ No update ]
Checking file suspscan.dat                                 [ No update ]
Checking file i18n/cn                                      [ Skipped ]
Checking file i18n/de                                      [ Skipped ]
Checking file i18n/en                                      [ No update ]
Checking file i18n/tr                                      [ Skipped ]
Checking file i18n/tr.utf8                                 [ Skipped ]
Checking file i18n/zh                                      [ Skipped ]
Checking file i18n/zh.utf8                                 [ Skipped ]
Checking file i18n/ja                                      [ Skipped ]
Next, update the Rkhunter data file with the current value by running the following command:
rkhunter --propupd
You should get the following output:
[ Rootkit Hunter version 1.4.6 ]
File updated: searched for 179 files, found 135
Step 4 – Start a System Check with Rkhunter
At this point, Rkhunter is installed and configured. Now, perform the test scan against your system with the following command:
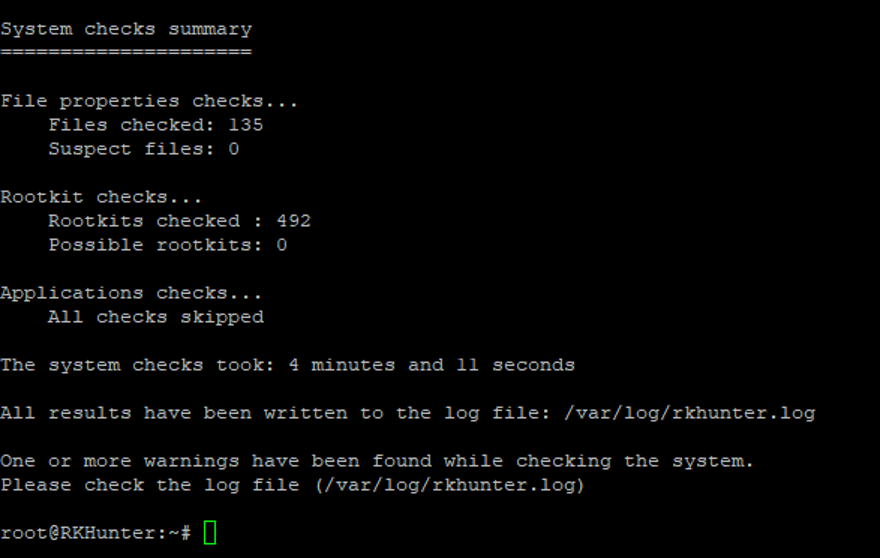
rkhunter --check
You should get the following output:
If you want to display only warning messages in the output, run the following command:
rkhunter --check --rwo
You should get the following output:
Warning: The SSH and rkhunter configuration options should be the same:
SSH configuration option 'PermitRootLogin': yes
Rkhunter configuration option 'ALLOW_SSH_ROOT_USER': no
Warning: Suspicious file types found in /dev:
/dev/shm/PostgreSQL.613016838: data
Step 5 – Setup Email Notifications
It is also recommended to enable email notifications so that Rkhunter sends an email if a threat is found on your system.
nano /etc/rkhunter.conf
Change the following line:
MAIL-ON-WARNING=root@localhost
Save and close the file when you are finished.
Conclusion
Congratulations! You have successfully installed and configured Rkhunter on the Ubuntu 24.04 server. I hope you can now easily find backdoors and malware with rkhunter. After making any changes in your system, we recommend running the rkhunter –propupd command to update rkhunter to the new file properties. Try out Rkhunter on dedicated server hosting from Atlantic.Net!
* This post is for informational purposes only and does not constitute professional, legal, financial, or technical advice. Each situation is unique and may require guidance from a qualified professional.
Readers should conduct their own due diligence before making any decisions.