Zammad is an open-source ticketing system written in Ruby specially designed for customer support teams. It allows you to deal with customer queries and complaints from various channels, including web forms, Twitter, Facebook, email, chat, and more. Zammad also provides an API to integrate your telephone system. It offers a rich set of features including auto-save, full-text search, two-factor-authentication, and external authentication via Twitter, Facebook, LinkedIn, or Google.
In this tutorial, we will learn how to install Zammad Ticketing System on Ubuntu. This procedure is compatible with Ubuntu 22.04 and Ubuntu 24.04.
Step 1 – Install Java
Zammad requires Java to be installed on your server. You can install Java JDK with the following command:
apt-get install default-jdk -y
Once installed, verify the installed version of Java using the following command:
java -version
You should get the following output:
openjdk 21.0.7 2025-04-15
OpenJDK Runtime Environment (build 21.0.7+6-Ubuntu-0ubuntu124.04)
OpenJDK 64-Bit Server VM (build 21.0.7+6-Ubuntu-0ubuntu124.04, mixed mode, sharing)
Step 2 – Install ElasticSearch
Zammad uses Elasticsearch to provide the search function. By default, ElasticSearch is not available in the Ubuntu 24.04 default repository, so you will need to add the ElasticSearch repository to your system. You can add it with the following commands:
apt-get install apt-transport-https gnupg -y

wget -qO - https://artifacts.elastic.co/GPG-KEY-elasticsearch | apt-key add -

curl -fsSL https://artifacts.elastic.co/GPG-KEY-elasticsearch | gpg --dearmor | tee /etc/apt/trusted.gpg.d/elasticsearch.gpg> /dev/null

echo "deb [signed-by=/etc/apt/trusted.gpg.d/elasticsearch.gpg] https://artifacts.elastic.co/packages/7.x/apt stable main"| tee -a /etc/apt/sources.list.d/elastic-7.x.list > /dev/null
Next, update the repository and install ElasticSearch with the following command:
apt-get update -y
apt-get install elasticsearch -y
Once installed, start the ElasticSearch service and enable it to start at boot:
systemctl start elasticsearch
systemctl enable elasticsearch
Next, you will need to allow Elasticsearch to index file attachments. You can do it with the following command:
/usr/share/elasticsearch/bin/elasticsearch-plugin install ingest-attachment
You should get the following output:
-> Installing ingest-attachment
-> Downloading ingest-attachment from elastic
[=================================================] 100%
@@@@@@@@@@@@@@@@@@@@@@@@@@@@@@@@@@@@@@@@@@@@@@@@@@@@@@@@@@@
@ WARNING: plugin requires additional permissions @
@@@@@@@@@@@@@@@@@@@@@@@@@@@@@@@@@@@@@@@@@@@@@@@@@@@@@@@@@@@
* java.lang.RuntimePermission accessClassInPackage.sun.java2d.cmm.kcms
* java.lang.RuntimePermission accessDeclaredMembers
* java.lang.RuntimePermission getClassLoader
* java.lang.reflect.ReflectPermission suppressAccessChecks
* java.security.SecurityPermission createAccessControlContext
* java.security.SecurityPermission insertProvider
* java.security.SecurityPermission putProviderProperty.BC
See http://docs.oracle.com/javase/8/docs/technotes/guides/security/permissions.html
for descriptions of what these permissions allow and the associated risks.

Continue with installation? [y/N]y
-> Installed ingest-attachment
Edit the Elasticsearch configuration file.
nano /etc/elasticsearch/elasticsearch.yml
Set max content length.
http.max_content_length: 400mb
Next, restart ElasticSearch to apply the changes:
systemctl restart elasticsearch
Step 3 – Install Zammad
By default, Zammad is not available in the Ubuntu 24.04 default repository, so you will need to add Zammad repository in your system.
First, download and add the GPG key with the following command:
curl -fsSL https://dl.packager.io/srv/zammad/zammad/key | gpg --dearmor | tee /etc/apt/keyrings/pkgr-zammad.gpg> /dev/null
Next, add the Zammad repository with the following command:
echo "deb [signed-by=/etc/apt/keyrings/pkgr-zammad.gpg] https://dl.packager.io/srv/deb/zammad/zammad/stable/ubuntu 24.04 main"| tee /etc/apt/sources.list.d/zammad.list > /dev/null
Next, update the repository and install Zammad with the following command:
apt-get update -y
apt-get install zammad -y
Next, you will need to configure Zammad to work with Elasticsearch, add extra Elasticsearch index name space, and set the max attachment size. You can do that with the following command:
zammad run rails r "Setting.set('es_url', 'http://localhost:9200')"
zammad run rails r "Setting.set('es_user', 'elastic')"
zammad run rake zammad:searchindex:rebuild
zammad run rails r "Setting.set('es_index', Socket.gethostname.downcase + '_zammad')"
zammad run rails r "Setting.set('es_attachment_ignore', [ '.png', '.jpg', '.jpeg', '.mpeg', '.mpg', '.mov', '.bin', '.exe', '.box', '.mbox' ] )"
zammad run rails r "Setting.set('es_attachment_max_size_in_mb', 50)"
Step 4 – Start Zammad
By default, Zammad service is managed by systemd.
First, start and enable the Zammad service.
systemctl start zammad
systemctl enable zammad
Verify the status of Zammad service.
systemctl status zammad
Output.
● zammad.service
     Loaded: loaded (/etc/systemd/system/zammad.service; enabled; preset: enabled)
     Active: active (running) since Sun 2025-05-25 04:57:50 UTC; 1s ago
   Main PID: 11744 (sleep)
      Tasks: 1 (limit: 4609)
     Memory: 360.0K (peak: 612.0K)
        CPU: 3ms
     CGroup: /system.slice/zammad.service
             └─11744 /bin/sleep infinity
Next, remove the Nginx default virtual host file.
rm -rf /etc/nginx/sites-enabled/default
Next, restart the Nginx service.
systemctl restart nginx
Step 5 – Access Zammad Web Interface
Now, open your web browser and access the Zammad web interface using the URL http://your-server-ip. You should see the following screen:

Click on the Setup new System. You should see the following screen:
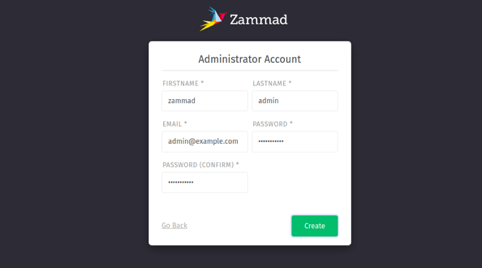
Provide your admin username, password, and email and click on the Create button. You should see the following screen:
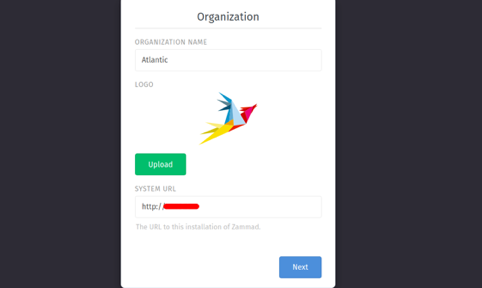
Provide your Organization name, upload a logo, provide system URL, and click on the Next button. You should see the following screen:
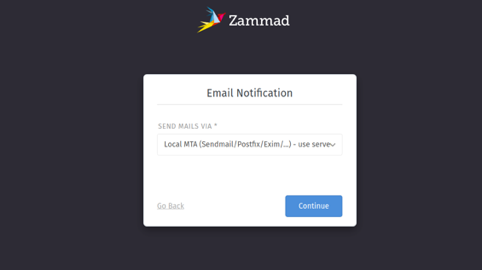
Select your MTA and click on the Continue button. You should see the following screen:
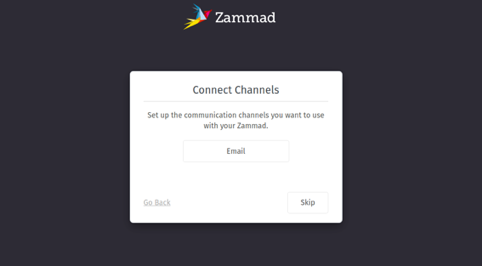
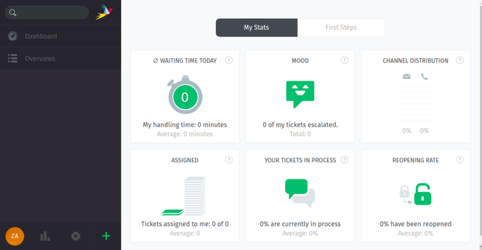
Click on the Skip button. You should see the Zammad dashboard in the following screen:
Conclusion
In this guide, you learned how to install and configure the Zammad ticketing system on Ubuntu 24.04. Try hosting your own online ticketing system with Zammad on VPS Hosting from Atlantic.Net.
* This post is for informational purposes only and does not constitute professional, legal, financial, or technical advice. Each situation is unique and may require guidance from a qualified professional.
Readers should conduct their own due diligence before making any decisions.