After installing or setting up a new Ubuntu 18.04 server, you will need to perform some basic steps to increase the server’s security, performance and reliability.
In this tutorial, we will show you some basic configuration steps you should perform after installing a new Ubuntu 18.04 server.
Step 1 – Create an Atlantic.Net Cloud Server
First, log in to your Atlantic.Net Cloud Server. Create a new server, choosing Ubuntu 18.04 as the operating system with at least 2GB RAM. Connect to your Cloud Server via SSH and log in using the credentials highlighted at the top of the page.
Once you are logged into your Ubuntu 18.04 server, you should update and upgrade all installed packages on your Ubuntu 18.04 server to benefit from the latest security patches.
You can update and upgrade your system by running the following commands:
apt-get update -y
apt-get upgrade -y
Once your system is updated, restart it to apply all the changes. Just type:
reboot
Step 2 – Create a New Superuser Account
By default, the root is an administrative user in Linux-based operating systems. Root user allows you to perform any task and can make very destructive changes within your system. Therefore, it is recommended to set up a separate user account with sudo (superuser) privileges. With sudo user, you can restrict users to run specific commands. You can also produce an audit of which user run what commands.
First, create a new user with the following command:
adduser user1
You will be prompted to provide a password and contact details as shown below:
Adding user `user1' ...
Adding new group `user1' (1001) ...
Adding new user `user1' (1001) with group `user1' ...
Creating home directory `/home/user1' ...
Copying files from `/etc/skel' ...
Enter new UNIX password:
Retype new UNIX password:
passwd: password updated successfully
Changing the user information for user1
Enter the new value, or press ENTER for the default
            Full Name []: New User
            Room Number []:
            Work Phone []:
            Home Phone []:
            Other []:
Is the information correct? [Y/n] Y
Once the new user is created, you will need to give superuser privileges to this user. You can do it by adding this user to sudo group as shown below:
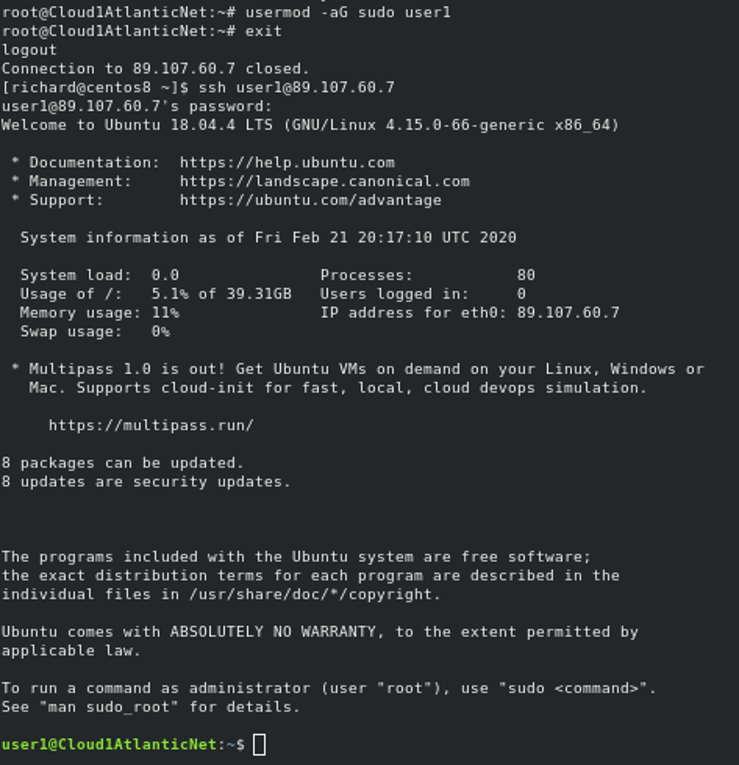
usermod -aG sudo user1
You should always log in to Ubuntu 18.04 with this user. Exit or close your SSH session and log in as your new user. Typically the command prompt changes when logged in as a user:
You can run any command by typing sudo before any commands you want to run. For example, if you want to install an Apache webserver run the following command:
sudo apt-get install apache2 -y
You will need to provide your user password in order to install Apache.
Step 3 – Secure SSH Server
By default, SSH is configured to listen on port 22. Therefore, it is recommended to change default ssh port and disable root login to secure your system from attackers.
You can change the default SSH port by editing /etc/ssh/sshd_config file:
sudo nano /etc/ssh/sshd_config
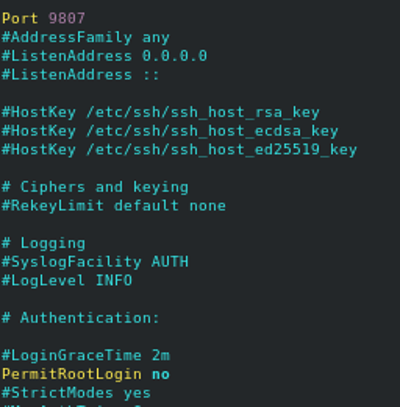
Find and change the following lines:
Port 9807
PermitRootLogin no
Save and close the file, then restart SSH service to apply the configuration:
sudo systemctl restart ssh
It is also a good idea to configure your server to disable password login and use key-based login instead.
You can disable password-based authentication by editing the file /etc/ssh/sshd_config:
sudo nano /etc/ssh/sshd_config
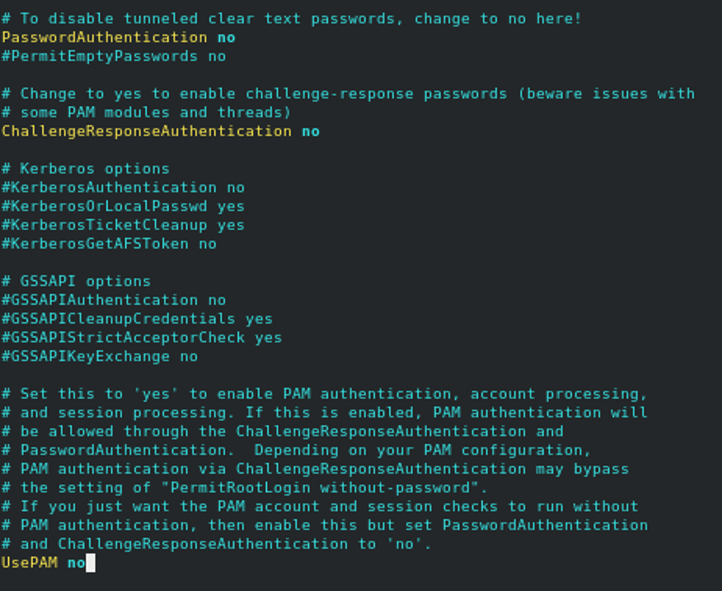
Find the following lines and change the value to “no”:
PasswordAuthentication no
ChallengeResponseAuthentication no
UsePAM no
Save and close the file, then restart SSH service to apply the configuration:
sudo systemctl restart ssh
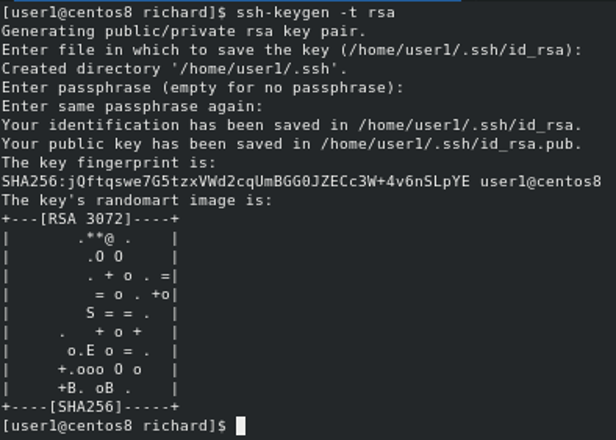
Next, generate an SSH key-pair on your trusted client system:
ssh-keygen -t rsa
You will need to press Enter to accept the default file location and provide a passphrase to add an extra layer of security.
Next, you will need to copy the key from your trusted client system to your Ubuntu 18.04 server. As we changed the default port in the previous section, we need to ensure we ssh-copy-id to the new port using the -p extension.
You can copy it with the following command:
ssh-copy-id user1@your-server-ip -p9807
You are now able to log in to your Ubuntu 18.04 server from your trusted client system with a public key.
Step 4 – Configure Firewall
By default, Ubuntu uses UFW firewall to manage iptables rules. If you are connected to your server via SSH, then it is good idea to allow SSH connections so you don’t get locked out.
You can allow SSH connections with the following command:
ufw allow OpenSSH
Next, enable the UFW firewall using the following command:
ufw enable
You can now allow other services like Apache, SMTP, FTP via UFW per your requirements.
Conclusion
That’s it! your server is now ready for production. You can now install and configure any additional applications per your needs. Ready to get started with an Ubuntu 18.04? Try VPS Hosting with Atlantic.Net!
* This post is for informational purposes only and does not constitute professional, legal, financial, or technical advice. Each situation is unique and may require guidance from a qualified professional.
Readers should conduct their own due diligence before making any decisions.