WonderCMS is a simple, lightweight CMS written in PHP, jQuery, and HTML/CSS. It is a flat-file CMS, meaning it does not require a database like MySQL or MariaDB. WonderCMS allows you to create a website with ease without any programming knowledge. It offers a wide range of features including SEO-friendliness, friendly URLs, themes, custom login URLs, and more.
In this post, we will explain how to install WonderCMS on Rocky Linux 10.
Step 1 – Install Apache and PHP
First, you will need to install Apache, PHP, and other necessary PHP extensions to your server. You can install all of them using the following command:
dnf install httpd php php-mysqlnd php-curl php-opcache php-xml php-gd php-mbstring php-zip php-json wget unzip git -y
Once all the packages are installed, edit the php.ini file and change some desired settings:
nano /etc/php.ini
Change the following settings:
file_uploads = On
allow_url_fopen = On
memory_limit = 256M
post_max_size 32M
upload_max_filesize = 64M
max_execution_time = 300
date.timezone = "America/Chicago"
Save and close the file, then start the Apache service and enable it to start at system reboot:
systemctl start httpd
systemctl enable httpd
Step 2 – Install WonderCMS
Next, you will need to download the latest version of WonderCMS from the GitHub repository. You can download it using the following command:
git clone https://github.com/robiso/wondercms.git /var/www/html/wondercms
Once the download is completed, set proper permissions and ownership on the WonderCMS directory:
chown -R apache:apache /var/www/html/wondercms
chmod -R 777 /var/www/html/wondercms
Once you are done, you can proceed to the next step.
Step 3 – Create an Apache Virtual Host for WonderCMS
Next, you will need to create an Apache virtual host configuration file for WonderCMS. You can create it using the following command:
nano /etc/httpd/conf.d/wondercms.conf
Add the following settings:
<VirtualHost *:80>
  ServerName wonder.example.com
  DirectoryIndex index.php
  DocumentRoot /var/www/html/wondercms
  Redirect /wondercms/loginURL /loginURL

  ErrorLog /var/log/httpd/error.log
  CustomLog /var/log/httpd/access.log combined

  <Directory /var/www/html/wondercms>
      Options FollowSymLinks
      AllowOverride All
      Require all granted
  </Directory>

</VirtualHost>
Save and close the file, then restart the Apache service to apply the changes:
systemctl restart httpd
You can check the status of Apache using the following command:
systemctl status httpd
You will get the following output:
● ● httpd.service - The Apache HTTP Server
Loaded: loaded (/usr/lib/systemd/system/httpd.service; enabled; preset: disabled)
Drop-In: /etc/systemd/system/httpd.service.d
└─php-fpm.conf
Active: active (running) since Mon 2025-10-20 00:21:51 EDT; 1s ago
Invocation: 5afc27fa181f43dc939bc380d0123177
Docs: man:httpd.service(8)
Main PID: 46420 (httpd)
Status: "Started, listening on: port 80"
Tasks: 177 (limit: 24809)
Memory: 13.4M (peak: 13.8M)
CPU: 103ms
CGroup: /system.slice/httpd.service
├─46420 /usr/sbin/httpd -DFOREGROUND
├─46422 /usr/sbin/httpd -DFOREGROUND
├─46423 /usr/sbin/httpd -DFOREGROUND
├─46424 /usr/sbin/httpd -DFOREGROUND
└─46445 /usr/sbin/httpd -DFOREGROUND
.
Step 4 – Access WonderCMS
Now, open your web browser and access the WonderCMS using the URL http://wonder.example.com. You should see the following screen containing your login password:

Click on the “Click to login” link. You should see the WonderCMS login screen:

Provide the WonderCMS password and click on the Login button. You should see the following screen:

Click on the Open security settings to change the default password and login URL as shown below:
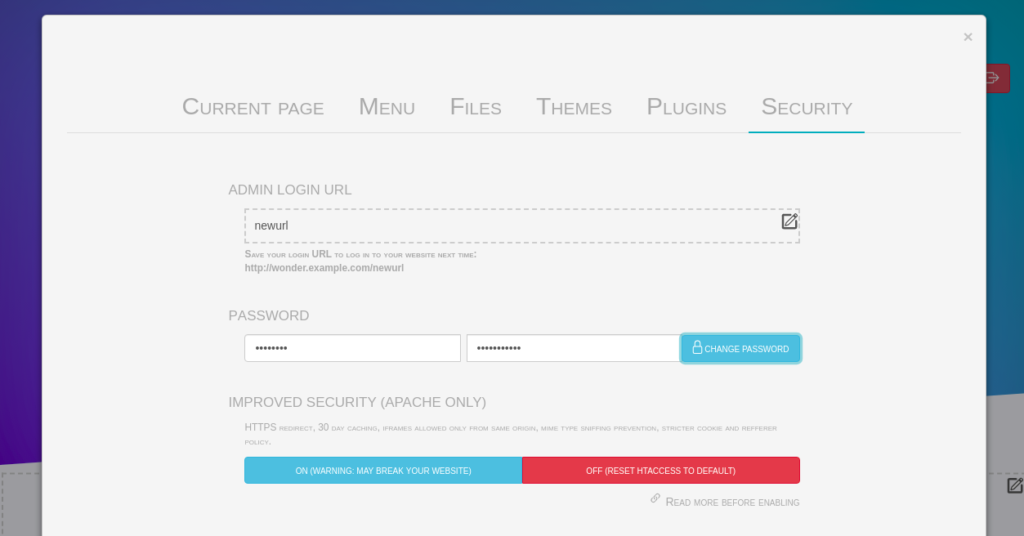
Define your new login URL and password and click on the CHANGE PASSWORD button to update the password.

Conclusion
Congratulations! You have successfully installed WonderCMS with Apache on Rocky Linux 10. You can now install themes and plugins and start creating your first website. Give it a try on your virtual private server from Atlantic.Net!
* This post is for informational purposes only and does not constitute professional, legal, financial, or technical advice. Each situation is unique and may require guidance from a qualified professional.
Readers should conduct their own due diligence before making any decisions.