Koel is a simple, free, open-source, web-based personal audio streaming server written in PHP and JavaScript. It uses Laravel on the server-side and Vue on the client-side. Koel allows you to stream your music and access it from anywhere through the Internet. It supports many media formats, including AAC, OGG, WMA, FLAC and APE, and it can stream music over HTTP / HTTPS.
In this tutorial, we will explain how to install Koel Audio Streaming server on Ubuntu 20.04.
Step 1 – Install Required Dependencies
First, you will need to install some dependencies required for Koel. You can install all of them with the following command:
apt-get update -y
apt-get install git unzip curl build-essential libpng-dev gcc make ffmpeg -y
Once all the dependencies are installed, you can proceed to the next step.
Step 2 – Install LEMP Server
Next, you will need to install Nginx, MariaDB, PHP, and other PHP extensions in your system. You can install all of them with the following command:
apt-get install nginx mariadb-server php php-cli php-fpm php-json php-common php-mysql php-zip
php-gd php-mbstring php-curl php-xml php-pear php-bcmath php-tokenizer openssl php-json -y
Note: If you get an error when Apache2 automatically starts – see this procedure.
After installing the above packages, Apache package will be installed automatically with PHP. Here, we will use Nginx web server so remove the Apache package with the following command:
systemctl stop apache2
apt-get purge apache2 -y
Next, edit the php.ini file and tweak some desired settings:
nano /etc/php/7.4/fpm/php.ini
Change the following lines:
memory_limit = 512M
date.timezone = Asia/Kolkata
Save and close the file when you are finished.
Step 3 – Install Composer
Composer is a dependency manager used for managing PHP dependencies. You can install it with the following command:
curl -sS https://getcomposer.org/installer -o composer-setup.php
php composer-setup.php --install-dir=/usr/local/bin --filename=composer
You should get the following output:
All settings correct for using Composer
Downloading...

Composer (version 1.10.10) successfully installed to: /usr/local/bin/composer
Use it: php /usr/local/bin/composer
Next, verify the installed version of Composer using the following command:
composer -V
You should get the following output:
Composer version 1.10.10 2020-08-03 11:35:19
Step 4 – Create a Database for Koel
Next, you will need to create a database and user for Koel.
First, log in to MariaDB with the following command:
mysql
Once logged in, create a database and user with the following command:
CREATE DATABASE koeldb;
CREATE USER 'koeluser'@'localhost' IDENTIFIED BY 'password';
Next, grant all the privileges to the Koel database with the following command:
GRANT ALL PRIVILEGES ON koeldb.* TO 'koeluser'@'localhost';
Next, flush the privileges and exit from the MariaDB shell with the following command:
FLUSH PRIVILEGES;
EXIT;
Step 5 – Install Node.js
First, install the necessary dependencies using the following command.
apt-get install -y ca-certificates curl gnupg
Next, download the Node.js GPG key.
mkdir -p /etc/apt/keyrings
curl -fsSL https://deb.nodesource.com/gpgkey/nodesource-repo.gpg.key | gpg --dearmor -o /etc/apt/keyrings/nodesource.gpg
Next, add the NodeSource repo to the APT source list.
echo "deb [signed-by=/etc/apt/keyrings/nodesource.gpg] https://deb.nodesource.com/node_18.x nodistro main" | tee /etc/apt/sources.list.d/nodesource.list
Then, update the repository index and install the Ndoe.js with the following command.
apt update
apt-get install -y nodejs
Additionally, you will also need to import the Yarn repository with the following command:
curl -sS https://dl.yarnpkg.com/debian/pubkey.gpg | gpg --dearmor -o /usr/share/keyrings/yarn-archive-keyring.gpg
Next, create a new file in the /etc/apt/sources.list.d/ directory to store the Yarn repository information:
echo "deb [signed-by=/usr/share/keyrings/yarn-archive-keyring.gpg] https://dl.yarnpkg.com/debian/ stable main" | sudo tee /etc/apt/sources.list.d/yarn.list
Finally, update the repository and install Yarn using the following command.
apt update -y
apt install yarn -y
Step 6 – Install Koel
First, change the directory to the Nginx root directory and install Laravel dependencies using the following command:
cd /var/www/html
composer global require laravel/installer
Next, download the latest version of Koel with the following command:
git clone https://github.com/koel/koel.git --recursive
Once downloaded, change the directory to Koel and install Node dependencies with the following command:
cd koel
npm install
npm audit fix
npm audit fix --force
Finally, install PHP dependencies using the following command:
composer install
Next, edit the .env file and define your database and other settings:
nano .env
Change the following lines:
DB_CONNECTION=mysql
DB_HOST=127.0.0.1
DB_PORT=3306
DB_DATABASE=koeldb
DB_USERNAME=koeluser
DB_PASSWORD=password

ADMIN_NAME="admin"
ADMIN_EMAIL=admin@example.com
ADMIN_PASSWORD=adminpassword

MEMORY_LIMIT=512
FFMPEG_PATH=/usr/bin/ffmpeg
Save and close the file, then initialize the database with the following command:
php artisan koel:init --no-interaction
You should get the following output:
Done in 156.20s.

🎆 Success! Koel can now be run from localhost with `php artisan serve`.
Again, visit 📙 https://docs.koel.dev for the official documentation.
Feeling generous and want to support Koel's development? Check out
https://github.com/users/phanan/sponsorship 🤗
Thanks for using Koel. You rock! 🤘
Next, initialize the database again with the following command:
php artisan koel:init
You should see the following output:
Attempting to install or upgrade Koel.
Remember, you can always install/upgrade manually following the guide here:
📙 https://docs.koel.dev

Generating app key
JWT secret exists -- skipping
Migrating database
Data seeded -- skipping
The absolute path to your media directory. If this is skipped (left blank) now, you can set it later via
the web interface.

Media path []:
>

Now to front-end stuff
├── Installing Node modules in resources/assets directory
Next, create a logs directory and provide necessary permissions and ownership with the following command:
mkdir /var/www/html/koel/storage/logs
chown -R www-data:www-data /var/www/html/koel
chmod -R 755 /var/www/html/koel
Step 7 – Configure Nginx for Koel
Now, create a Nginx virtual host configuration file to serve Koel.
nano /etc/nginx/sites-available/koel.conf
Add the following lines:
server {
listen 80 default_server;
server_name koel.example.com;
root /var/www/html/koel;
index index.html index.htm index.php;

location / {
try_files $uri /index.php$is_args$args;
}

location ~ \.php$ {
fastcgi_pass unix:/run/php/php7.4-fpm.sock;
fastcgi_index index.php;
fastcgi_read_timeout 240;
fastcgi_param SCRIPT_FILENAME $document_root$fastcgi_script_name;
include fastcgi_params;
fastcgi_split_path_info ^(.+.php)(/.+)$;
}
}
Save and close the file, then activate the Nginx virtual host file with the following command:
ln -s /etc/nginx/sites-available/koel.conf /etc/nginx/sites-enabled/
Next, restart the Nginx and PHP-FPM services to apply the changes:
systemctl restart nginx
systemctl restart php7.4-fpm
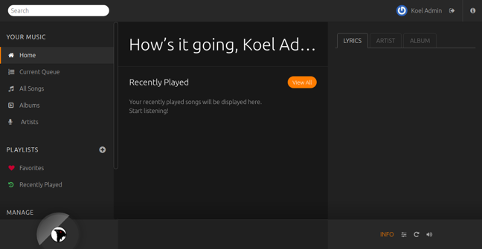
Step 8 – Access Koel Web UI
Now, open your web browser and access the Koel UI using the URL http://koel.example.com. You will be redirected to the Koel login page:

Provide your admin email and password which you have set in .env file, then click on the Log In button. You should see the Koel default dashboard in the following page:
Conclusion
Congratulations! You have successfully installed and configured a Koel audio streaming server on Ubuntu 20.04. Now, you can host your own music streaming server and access it over the Internet. Try Koel on VPS Hosting from Atlantic.Net using the tutorial above!
* This post is for informational purposes only and does not constitute professional, legal, financial, or technical advice. Each situation is unique and may require guidance from a qualified professional.
Readers should conduct their own due diligence before making any decisions.