Passbolt is an open-source, self-hosted password manager that can be used to store and share the login credentials for websites securely. If your business is organized into teams, then Passbolt will help you to store and share the password across those teams. Passbolt comes with a simple and user-friendly interface and uses GnuPG to authenticate users and verify secrets server side.
In this tutorial, we will show you how to install the Passbolt password manager on Ubuntu 18.04.
Step 1 – Download Passbolt Installation Script
The simplest way to install Passbolt using the Passbolt installation script. To download the installation script, run the following command:
wget -O passbolt-ce-installer-ubuntu-18.04.tar.gz
https://www.passbolt.com/ce/download/installers/ubuntu/latest
Next, check the installer checksum with the following command:
wget -O passbolt-installer-checksum
https://www.passbolt.com/ce/download/installers/ubuntu/latest-checksum

sha512sum -c passbolt-installer-checksum
You should see the following output:
passbolt-ce-installer-ubuntu-18.04.tar.gz: OK
Next, extract the downloaded installer with the following command:
tar -xzf passbolt-ce-installer-ubuntu-18.04.tar.gz
Once the installer is extracted, you can proceed with the installation.
Step 2 – Install Passbolt
Now, run the following command to install Passbolt in your system:
./passbolt_ce_ubuntu_installer.sh
You will be asked to install MariaDB on your system as shown below:
================================================================

____ __ ____
/ __ \____ _____ ____/ /_ ____ / / /_
/ /_/ / __ `/ ___/ ___/ __ \/ __ \/ / __/
/ ____/ /_/ (__ |__ ) /_/ / /_/ / / /_
/_/ \__,_/____/____/_,___/\____/_/\__/

The open source password manager for teams
(c) 2020 Passbolt SA
https://www.passbolt.com
================================================================
IMPORTANT NOTE: This installation scripts are for use only
on FRESH installed debian >= 9.0 | ubuntu 18.04 | CentOS >= 7.0
================================================================
==============================================================
Do you want to install a local mariadb server on this machine?
==============================================================
1) yes
2) no
#? 1
Type 1 and hit Enter to continue. You will be asked to set MariaDB root password as shown below:
=======================================================
Please enter a new password for the root database user:
=======================================================
MariaDB Root Password:
MariaDB Root Password (verify):
Next, you will be asked to provide a name for the Passbolt database, a database username, and a password as shown below:
======================================================

Please enter a name for the passbolt database username
======================================================
Passbolt database user name:passbolt
=======================================================
Please enter a new password for the mysql passbolt user
=======================================================
MariaDB passbolt user password:
MariaDB passbolt user password (verify):
==============================================
Please enter a name for the passbolt database:
==============================================
Passbolt database name:passboltdb
Next, you will be asked to create a GnuPG key as shown below:
================================================================================
On virtualized environments GnuPG happen to find not enough entropy
to generate a key. Therefore, Passbolt will not run properly.
Do you want to install Haveged to speed up the entropy generation on
your system? Please check https://help.passbolt.com/faq/hosting/why-haveged-
virtual-env
==================================================================
==============
1) yes
2) no
#? 1
=================================================================
===============
Type 1 and hit Enter to continue. You will be asked to provide a domain name or the IP address of your server as shown below:
Setting hostname...
Please enter the domain name under which passbolt will run.
Note this hostname will be used as server_name for nginx
and as the domain name to register a SSL certificate with
let's encrypt.
If you don't have a domain name and you do not plan to use
let's encrypt please enter the ip address to access this machine
===============================================================
=================
Hostname:your-server-ip
===============================================================
=================
Provide your server IP address or domain name and hit Enter. You will be asked to set up an SSL certificate as shown below:
Setting up SSL...
Do you want to set up a SSL certificate and enable HTTPS now?
- manual: Prompts for the path of user uploaded ssl certificates and set up
nginx
- auto: Will issue a free SSL certificate with https://www.letsencrypt.org
and set up nginx
- none: Do not setup HTTPS at all
================================================================================
1) manual
2) auto
3) none
#? 3
Type 3 and hit Enter to start the installation. Once the installation has been completed successfully, you should see the following output:
Installation is almost complete. Please point your browser to
http://your-server-ip to complete the process
==============================================================
==================
At this point, Passbolt is now installed on your server.
Step 3 – Access Passbolt Configuration Wizard
Next, you will need to configure Passbolt via a web browser.
Open your web browser and type the URL http://your-server-ip. You will be redirected to the following page:
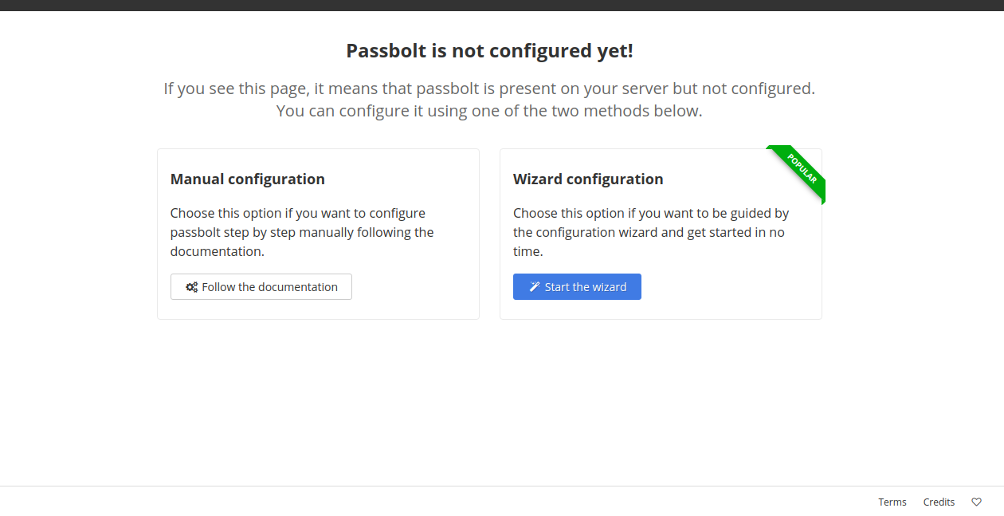
Click on the Start the wizard button. You should see the following page:
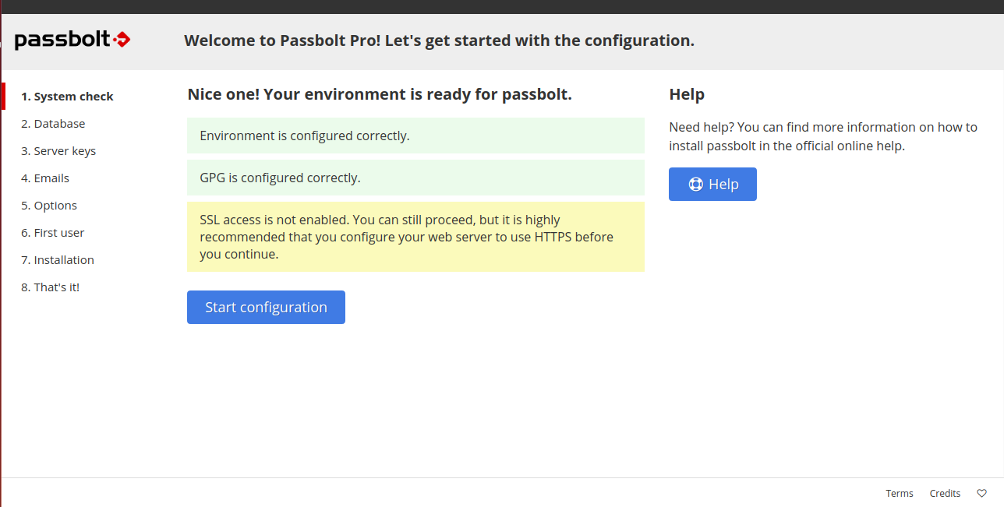
Click on the Start configuration to configure Passbolt as shown below:
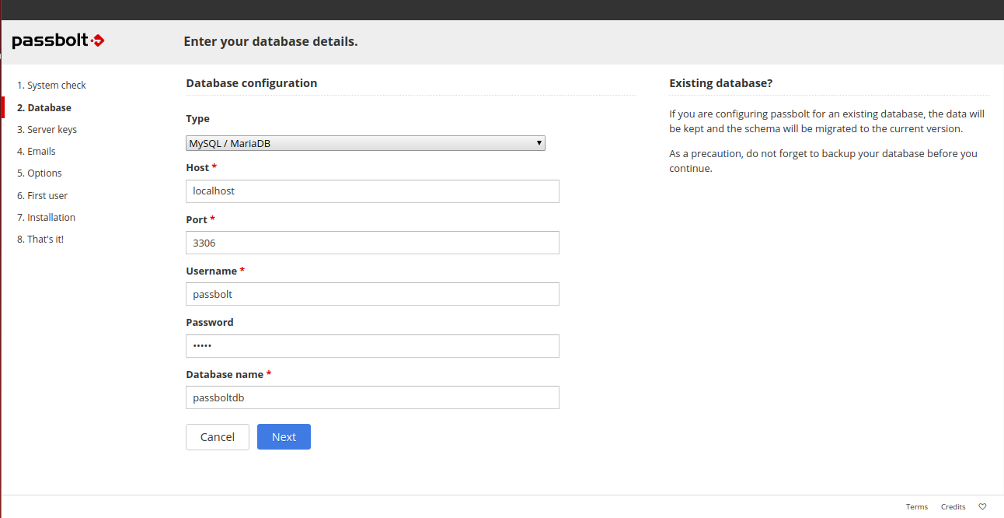
Under Database configuration, Set the host as localhost.
Leave port as 3306
Provide your database details created earlier and click on the Next button. You should see the following page:
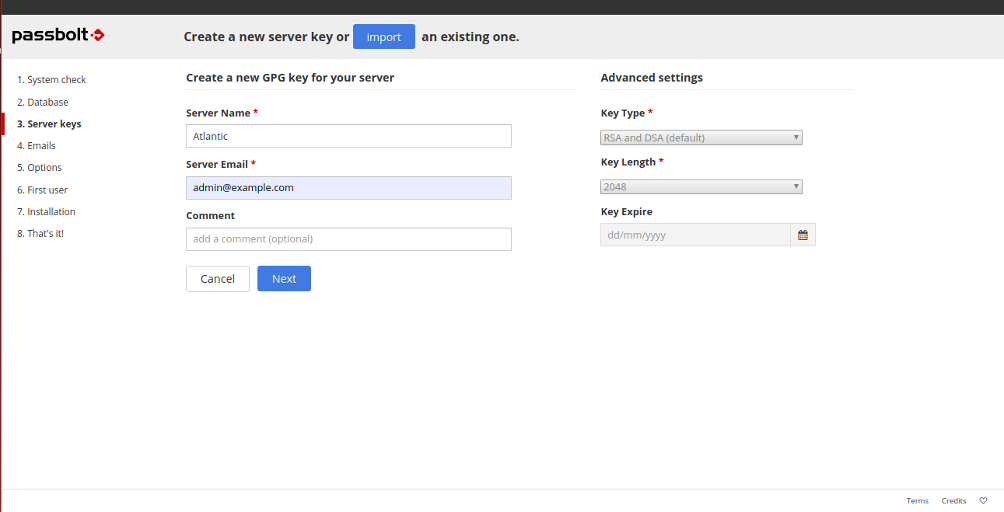
Give your server a name, email and click on the Next button to create a new server key. You should see the following page:

Provide your SMTP server settings and click on the Next button. You should see the following page:
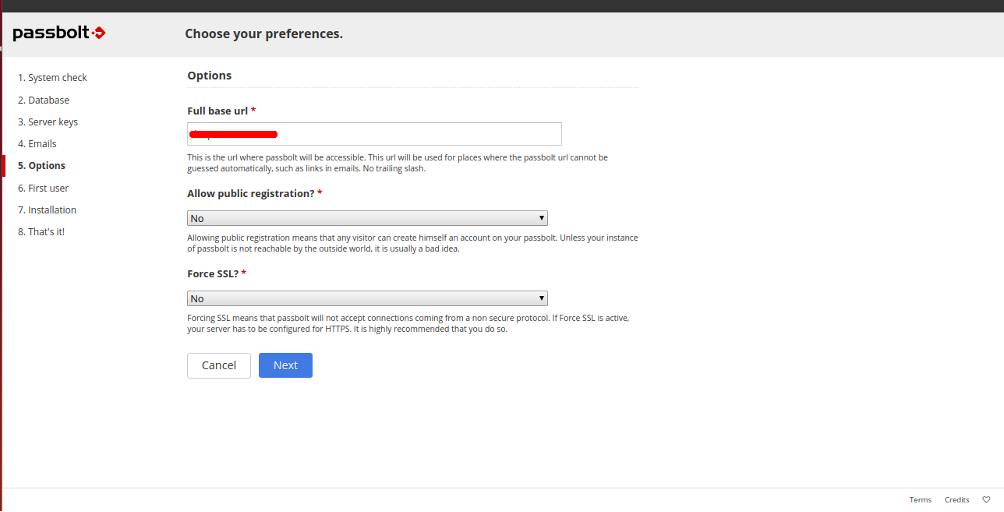
Provide your server URL and click on the Next button. You should see the following page:
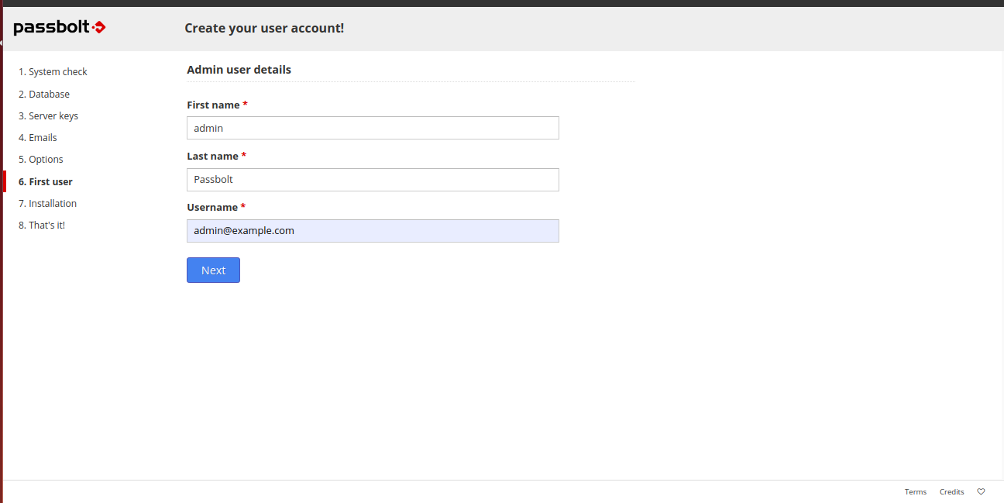
Provide your admin user details and click on the Next button. You should see the following page:
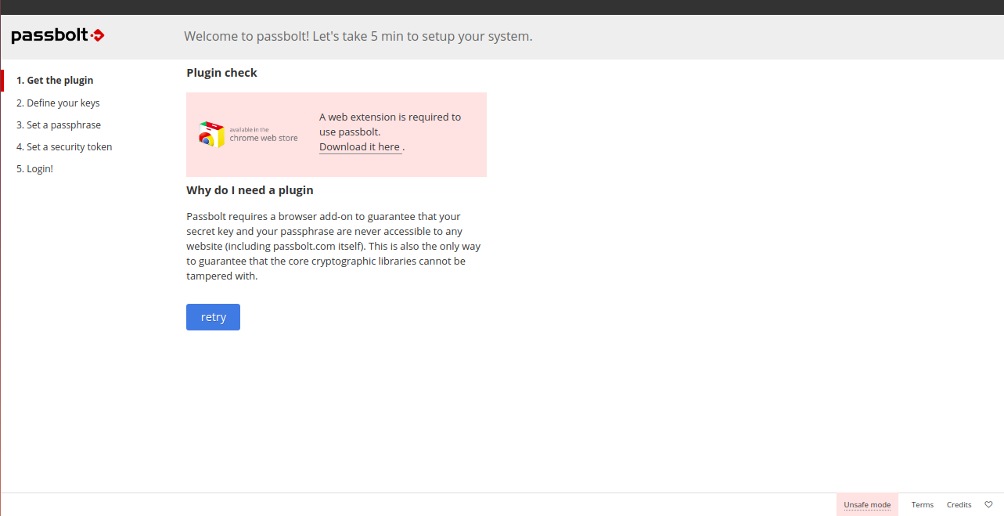
Click on the “Download it here” to download Passbolt chrome extension and click on the retry button. You should see the following page:
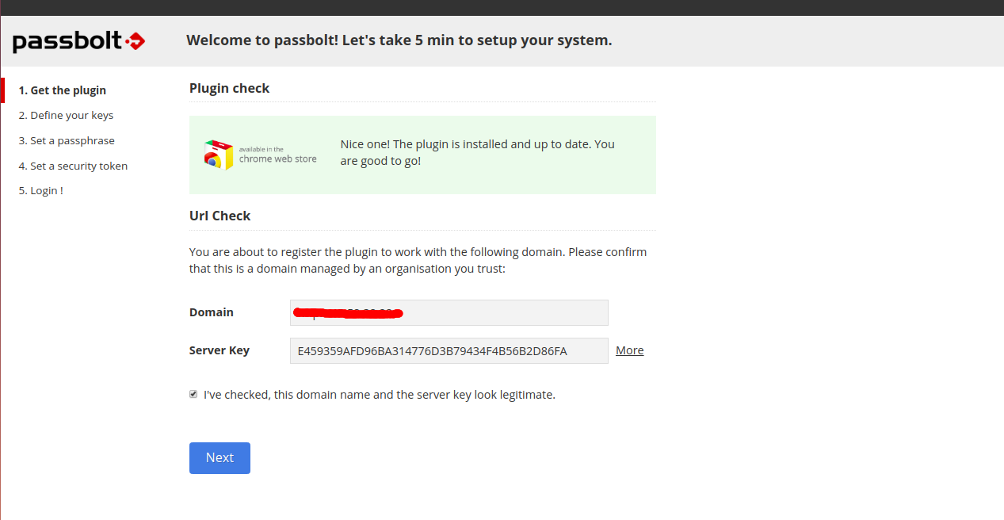
Provide your server IP and click on the Next button. You should see the following page:
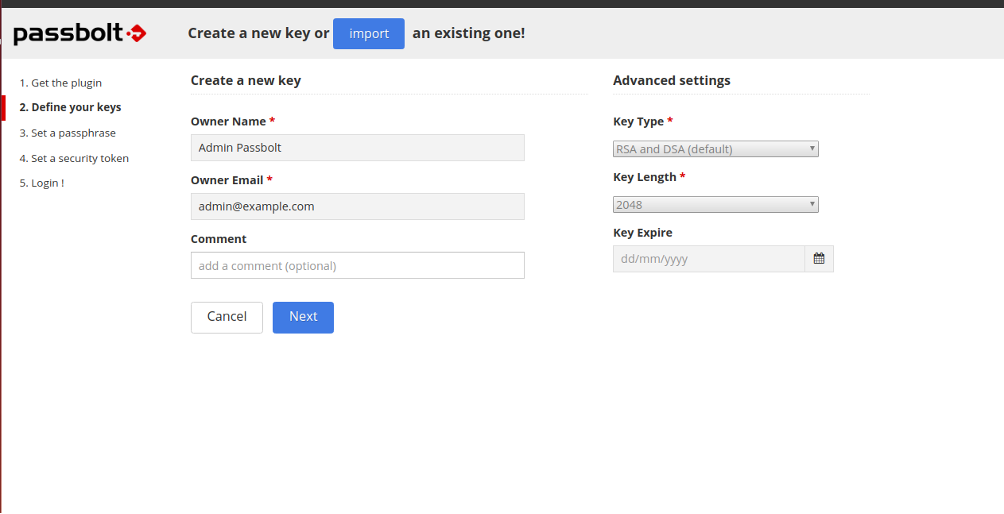
Provide the owner name and owner email and click on the Next button to create a new key. You should see the following page:
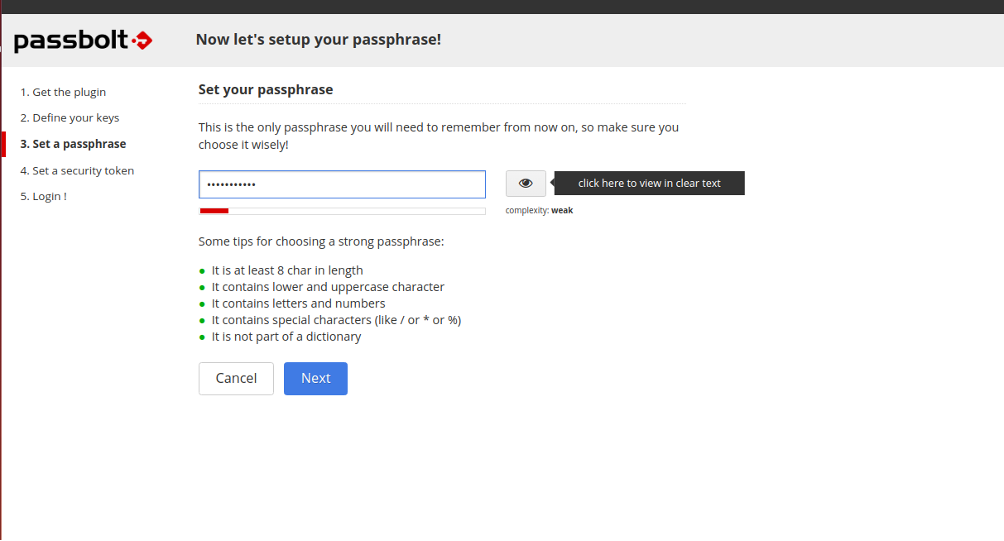
Set your passphrase and click on the Next button. You should see the following page:
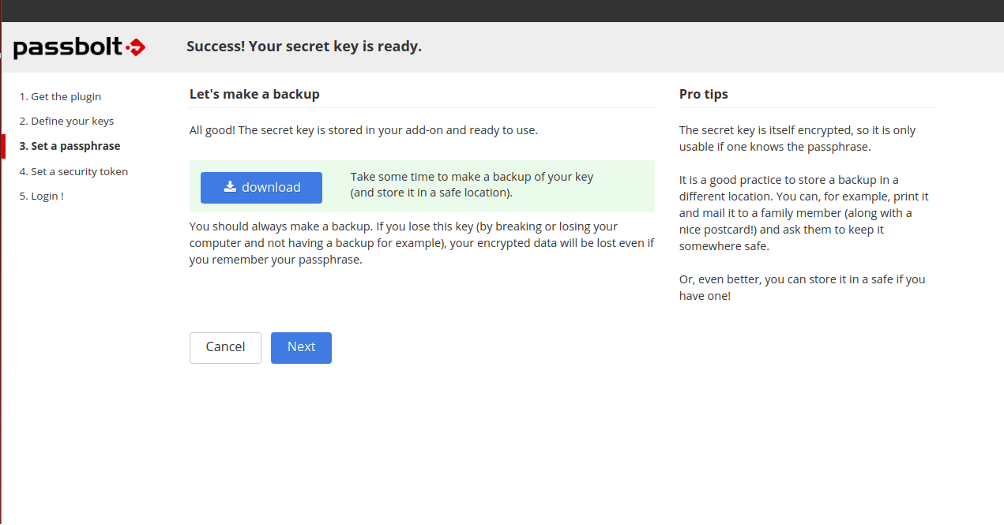
Click on the Next button. You will be redirected to the Passbolt login page as shown below:
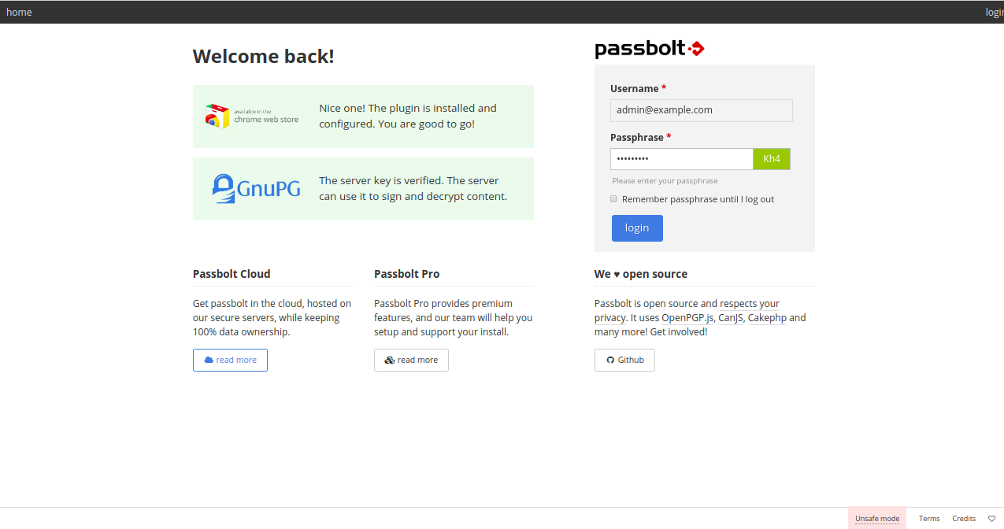
Provide your username, password and click on the login button. You should see the Passbolt dashboard in the following page:

Conclusion
Congratulations! You have successfully installed and configured Passbolt password manager on Ubuntu 18.04. You can now share your login credentials across your team using Passbolt. Set up Passbolt on VPS hosting from Atlantic.Net today!
* This post is for informational purposes only and does not constitute professional, legal, financial, or technical advice. Each situation is unique and may require guidance from a qualified professional.
Readers should conduct their own due diligence before making any decisions.