Splunk is a powerful log analysis tool used for searching, monitoring, and analyzing machine-generated big data from a web browser. It helps you simplify log data from servers and networking devices into a simple format that you can easily read and digest. Splunk supports all major operating systems including Windows, Linux, and Mac OS. It is easily scalable, fully integrated, and supports both local and remote data sources.
In this tutorial, we will show you how to install Splunk Log Analyzer Tool on Ubuntu 20.04.
Step 1 – Install Splunk
First, you must download Splunk onto the Ubuntu server.
- Log in to the Splunk website to download the latest version of Splunk package.
- Click on the “Free Splunk” logo on their website.
- Complete the brief registration form to create an account.
- Once the download is complete, use your favorite FTP client to transfer the file to the server.

Note – If you are not sure how to use FTP, please visit either of these guides:
Once the download is completed, install the downloaded file with the following command:
dpkg -i splunk-8.0.5-a1a6394cc5ae-linux-2.6-amd64.deb
Once the installation is completed, enable the Splunk service at system boot with the following command:
/opt/splunk/bin/splunk enable boot-start
You will need to accept the license agreement as shown below:
"Personnel" means any employee, consultant, contractor, or
subcontractor of Splunk.

"Splunk Preexisting IP" means, with respect to any C&I Services
Materials, all associated Splunk Technology and all Intellectual Property
Rights created or acquired: (a) prior to the date of the Statement of
Work that includes such C&I Services Materials, or (b) after the date of
such Statement of Work but independently of the C&I Services provided
under such Statement of Work.

"Statement of Work" means the statements of work and/or any all
applicable Orders that describe the specific services to be performed by
Splunk, including any materials and deliverables to be delivered by
Splunk.

SPLUNK GENERAL TERMS (v1.2020)

Do you agree with this license? [y/n]: y
Type y and hit Enter to continue. You will be asked to create an administrative account and set a password as shown below:
This appears to be your first time running this version of Splunk.

Splunk software must create an administrator account during startup. Otherwise, you cannot log in.
Create credentials for the administrator account.
Characters do not appear on the screen when you type in credentials.

Please enter an administrator username: admin
Password must contain at least:
* 8 total printable ASCII character(s).
Please enter a new password:
Please confirm new password:
Type your admin username and password and hit Enter. You should see the following output:
Copying '/opt/splunk/etc/openldap/ldap.conf.default' to '/opt/splunk/etc/openldap/ldap.conf'.
Generating RSA private key, 2048 bit long modulus
.........+++++
..+++++
e is 65537 (0x10001)
writing RSA key
Generating RSA private key, 2048 bit long modulus
.+++++
..................................................................................................................................................+++++
e is 65537 (0x10001)
writing RSA key

Moving '/opt/splunk/share/splunk/search_mrsparkle/modules.new' to
'/opt/splunk/share/splunk/search_mrsparkle/modules'.
Init script installed at /etc/init.d/splunk.
Init script is configured to run at boot.
Step 2 – Start Splunk Service
At this point, Splunk is installed in your system. Now, start the Splunk service with the following command:
service splunk start
You can verify the status of the Splunk service with the following command:
service splunk status
You should get the following output:
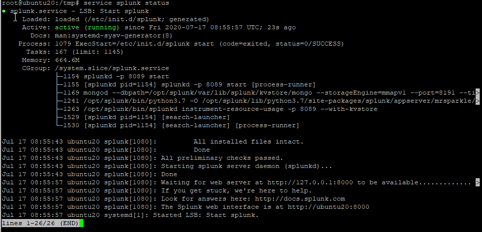
At this point, Splunk is started and listening on port 8000.
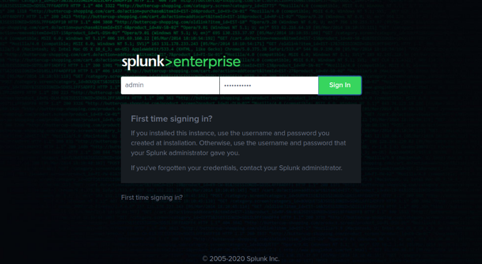
Step 3 – Access Splunk Web Interface
Now, open your web browser and access the Splunk interface using the URL http://your-server-ip:8000. You should see the following screen:
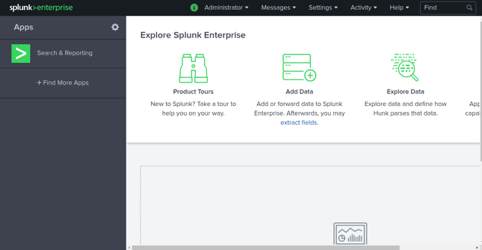
Provide your admin username and password and click on the Sign In button. You should see the Splunk dashboard in the following screen:
Conclusion
Congratulations! You have successfully installed Splunk on Ubuntu 20.04. Splunk is a very useful solution for log processing, collection, and analysis. Monitor your Linux environment with Splunk on your VPS Hosting account from Atlantic.Net.
* This post is for informational purposes only and does not constitute professional, legal, financial, or technical advice. Each situation is unique and may require guidance from a qualified professional.
Readers should conduct their own due diligence before making any decisions.