Table of Contents
- Prerequisites
- Step 1: Install Python and Required Libraries
- Step 2: Install PyTorch with GPU Support
- Step 3: Install Tesseract OCR
- Step 4: Create a Python Virtual Environment
- Step 5: Create a Web Interface to Upload Images
- Step 6: Run the Flask Application
- Step 7: Upload Images and Extract Tables
- Conclusion
Extracting tables from images is a common requirement in data extraction and document processing workflows. With the power of GPU computing and tools like Tesseract OCR and Camelot, we can automate this process effectively.
This guide explains how to set up a Python-based solution on an Ubuntu 22.04 GPU server to extract tables from images.
Prerequisites
Before starting, ensure you have the following:
- A GPU-enabled server running Ubuntu 22.04.
- Access to an Atlantic.Net GPU server or any other GPU-enabled environment.
- NVIDIA Drivers and CUDA Toolkit.
Step 1: Install Python and Required Libraries
Ensure your server has Python and essential libraries installed:
apt install python3 python3-pip imagemagick ghostscript python3.10-venv -yHere:
- imagemagick: For image preprocessing.
- ghostscript: For handling PDFs.
- python3.10-venv: To create isolated Python environments.
Step 2: Install PyTorch with GPU Support
PyTorch is a popular framework for machine learning and image processing. Installing it with GPU support ensures optimal performance.
pip install torch torchvision torchaudio --index-url https://download.pytorch.org/whl/cu124Here:
- torch, torchvision, and torchaudio are essential PyTorch packages.
- The –index-url specifies the CUDA-enabled PyTorch repository for GPU support.
You can verify the installation using:
python3 -c "import torch; print(torch.cuda.is_available())"This should return True if GPU support is enabled.
Step 3: Install Tesseract OCR
Tesseract is a powerful OCR tool for extracting text from images.
Install Tesseract OCR.
apt install tesseract-ocr libtesseract-dev -yVerify the installation:
tesseract --versionYou should see output similar to:
tesseract 4.1.1Step 4: Create a Python Virtual Environment
1. Create the project directory structure.
mkdir -p ~/table_extraction_project/{uploads,processed,output,scripts}2. Create a subdirectory for templates.
mkdir ~/table_extraction_project/scripts/templates3. Navigate to the project directory.
cd ~/table_extraction_project4. Create a Python virtual environment.
python3 -m venv venv5. Activate the virtual environment.
source venv/bin/activate6. Install required Python dependencies.
pip install flask pytesseract pillow numpy opencv-python camelot-py[cv] pandas
pip install "PyPDF2<3.0.0"
Step 5: Create a Web Interface to Upload Images
1. Create an HTML template file for the upload interface.
nano scripts/templates/index.htmlAdd the following HTML code.
<!DOCTYPE html>
<html>
<head>
    <title>Table Extraction</title>
</head>
<body>
    <h1>Upload an Image</h1>
    <form action="/upload" method="post" enctype="multipart/form-data">
        <input type="file" name="image" accept="image/*">
        <button type="submit">Upload and Extract Table</button>
    </form>
</body>
</html>
2. Create a Flask backend application.
nano scripts/app.pyAdd the following code.
from flask import Flask, request, render_template, send_from_directory
import os
import pytesseract
from PIL import Image
import camelot

app = Flask(__name__)

# Directories
UPLOAD_FOLDER = 'uploads'
PROCESSED_FOLDER = 'processed'
OUTPUT_FOLDER = 'output'
os.makedirs(UPLOAD_FOLDER, exist_ok=True)
os.makedirs(PROCESSED_FOLDER, exist_ok=True)
os.makedirs(OUTPUT_FOLDER, exist_ok=True)

app.config['UPLOAD_FOLDER'] = UPLOAD_FOLDER

@app.route('/')
def index():
    return render_template('index.html')

@app.route('/upload', methods=['POST'])
def upload_image():
    if 'image' not in request.files:
        return "No file uploaded!", 400

    file = request.files['image']
    if file.filename == '':
        return "No selected file!", 400

    filepath = os.path.join(app.config['UPLOAD_FOLDER'], file.filename)
    file.save(filepath)

    # Process image
    processed_filepath = process_image(filepath)
    table_filepath = extract_table(processed_filepath)

    return send_from_directory(OUTPUT_FOLDER, table_filepath, as_attachment=True)

def process_image(filepath):
    from PIL import Image

    # Load and preprocess image
    image = Image.open(filepath)
    processed_filepath = os.path.join(PROCESSED_FOLDER, os.path.basename(filepath))
    image.save(processed_filepath, dpi=(300, 300))  # Set resolution to 300 DPI
    return processed_filepath

def extract_table(filepath):
    # Convert image to searchable PDF using Tesseract
    pdf_filepath = os.path.join(PROCESSED_FOLDER, os.path.basename(filepath).replace('.jpg', ''))
    os.system(f"tesseract {filepath} {pdf_filepath} -l eng pdf")
    pdf_filepath += ".pdf"  # Tesseract appends ".pdf"

    # Check if PDF file was created
    if not os.path.exists(pdf_filepath):
        raise FileNotFoundError("Tesseract failed to generate the PDF file.")

    # Read table from the PDF
    tables = camelot.read_pdf(pdf_filepath)
    if len(tables) == 0:
        raise ValueError("No tables found in the PDF.")

    table_filepath = os.path.join(OUTPUT_FOLDER, "extracted_table.csv")
    tables[0].to_csv(table_filepath)
    return "extracted_table.csv"

if __name__ == '__main__':
    app.run(host='0.0.0.0', port=5000)
This Flask app allows users to upload images, processes them into searchable PDFs with Tesseract-OCR, and extracts tables using Camelot, saving results as CSVs for download via a web interface.
Step 6: Run the Flask Application
Your application is now ready. It’s time to run and test it.
1. Navigate to the scripts folder.
cd ~/table_extraction_project/scripts2. Run the Flask app.
python3 app.pyOutput.
* Serving Flask app 'app'
* Debug mode: off
WARNING: This is a development server. Do not use it in a production deployment. Use a production WSGI server instead.
* Running on all addresses (0.0.0.0)
* Running on http://127.0.0.1:5000
* Running on http://your-server-ip:5000
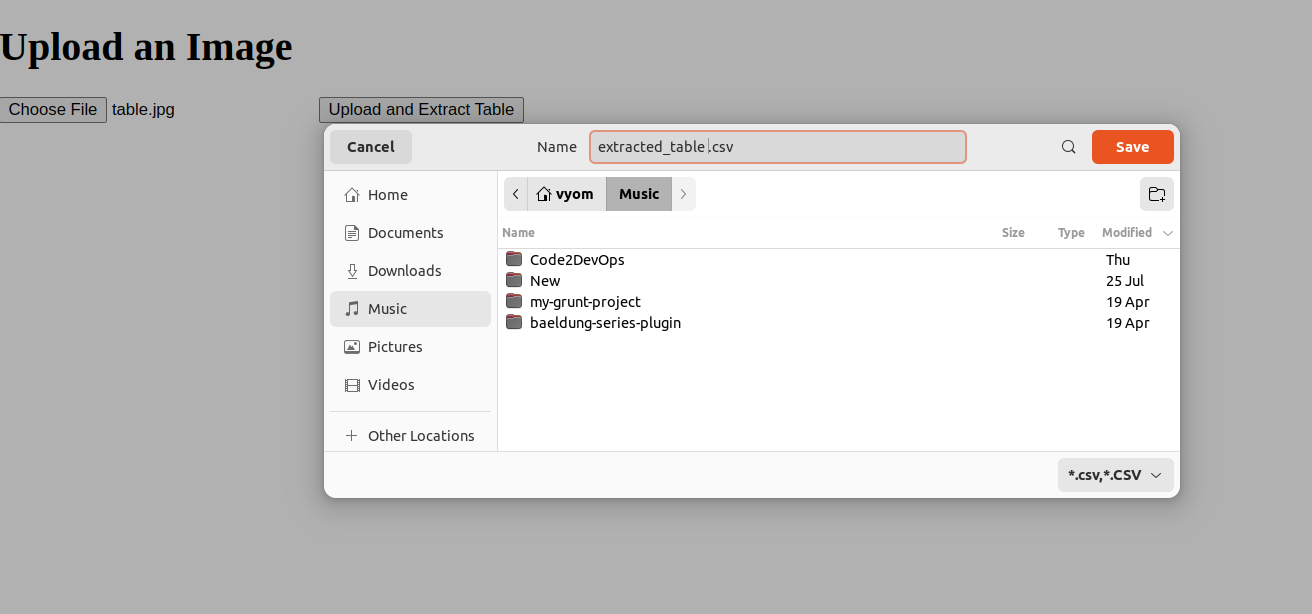
Press CTRL+C to quitStep 7: Upload Images and Extract Tables
1. Open your web browser and access your application using the URL http://your-server-ip:5000.

2. Click on the Upload button and upload a JPG image containing tables. Click on Upload and Extract Table. The server processes the image, extracts the table, and generates a downloadable CSV file.
Conclusion
This guide explains how to set up a GPU-enabled server to extract tables from images. By combining tools like Tesseract, Camelot, and Flask, you can automate table extraction tasks efficiently. This workflow is ideal for businesses or researchers handling large volumes of tabular data in scanned documents.
* This post is for informational purposes only and does not constitute professional, legal, financial, or technical advice. Each situation is unique and may require guidance from a qualified professional.
Readers should conduct their own due diligence before making any decisions.