Table of Contents
- Prerequisites
- Step 1 - Create Atlantic.Net Cloud Server
- Step 2 - Install Java
- Step 4 - Create Tomcat User
- Step 5 - Download Tomcat
- Step 6 - Create a System Unit File for Tomcat
- Step 7 - Access Tomcat Web Interface
- Step 8 - Configure Tomcat Web Management Interface
- Step 9 - Configure Nginx Proxy for Tomcat
- Conclusion
Apache Tomcat is an open-source implementation of the Java Servlet and JSP technologies that can be used to deploy Java-based applications. It was created under the Apache-Jakarta subproject, but due to its popularity, it is now hosted as a separate Apache project. Tomcat also provides additional functionality that makes it easier to develop a complete web application solution. Tomcat is simple, easy-to-use, and one of the most widely used web servers in the world.
If you are looking to run Java-based applications that operate seamlessly and fast, then Apache Tomcat is the best choice for you.
In this tutorial, we will learn how to install and configure Apache Tomcat with Nginx as a reverse proxy on Ubuntu 24.04 VPS.
Prerequisites
- A fresh Ubuntu 24.04 VPS on the Atlantic.Net Cloud Platform.
- A valid domain name pointed at your VPS IP address. In this tutorial, we will use example.com.
Note: You can refer to the Atlantic DNS Guide to manage the DNS records.
Step 1 – Create Atlantic.Net Cloud Server
First, log in to your Atlantic.Net Cloud Server. Create a new server, choosing Ubuntu 24.04 as the operating system with at least 2GB RAM. Connect to your Cloud Server via SSH and log in using the credentials highlighted at the top of the page.
Once you are logged in to your Ubuntu 24.04 server, run the following command to update your base system with the latest available packages.
apt-get update -y
Step 2 – Install Java
Apache Tomcat is a Java-based application, so Java must be installed on your system. You can install the latest version of Java with the following command:
apt-get install default-jdk -y
After installing Java, verify the Java version with the following command:
java --version
You should get the following output:
openjdk 21.0.7 2025-04-15
OpenJDK Runtime Environment (build 21.0.7+6-Ubuntu-0ubuntu124.04)
OpenJDK 64-Bit Server VM (build 21.0.7+6-Ubuntu-0ubuntu124.04, mixed mode, sharing)
Step 4 – Create Tomcat User
Next, you will need to create a Tomcat user and group to run the Tomcat service.
First, create a group with the name tomcat using the following command:
groupadd tomcat
Next, create a new tomcat user and make this user member of the tomcat group with a /home/tomcat home directory.
useradd -s /bin/false -g tomcat -d /home/tomcat tomcat
At this point, the Tomcat user is created.
Step 5 – Download Tomcat
First, visit the Apache Tomcat download page. You should see the following screen:

Next, download the latest version of Apache Tomcat with the following command:
wget https://dlcdn.apache.org/tomcat/tomcat-9/v9.0.105/bin/apache-tomcat-9.0.105.tar.gz
After downloading Apache Tomcat, extract the downloaded file with the following command:
tar -xvzf apache-tomcat-9.0.105.tar.gz
Next, move the extracted directory to /home/tomcat as shown below:
mv apache-tomcat-9.0.105 /home/tomcat
Next, change the ownership of the /home/tomcat directory to tomcat and give proper permissions with the following command:
chown -R tomcat:tomcat /home/tomcat
chmod -R 755 /home/tomcat/
Step 6 – Create a System Unit File for Tomcat
Next, you will need to create a systemd service file to run Tomcat as a service. You can create it with the following command:
nano /etc/systemd/system/tomcat.service
Add the following lines:
[Unit]
Description=Tomcat servlet container
After=network.target

[Service]
Type=forking

User=tomcat
Group=tomcat

Environment="JAVA_HOME=/usr/lib/jvm/default-java"
Environment="JAVA_OPTS=-Djava.security.egd=file:///dev/urandom"

Environment="CATALINA_BASE=/home/tomcat"
Environment="CATALINA_HOME=/home/tomcat"
Environment="CATALINA_PID=/home/tomcat/temp/tomcat.pid"
Environment="CATALINA_OPTS=-Xms512M -Xmx1024M -server -XX:+UseParallelGC"

ExecStart=/home/tomcat/bin/startup.sh
ExecStop=/home/tomcat/bin/shutdown.sh

[Install]
WantedBy=multi-user.target
Save and close the file. Then, reload the systemd daemon with the following command:
systemctl daemon-reload
Next, start the Tomcat service and enable it to start after system reboot:
systemctl start tomcat
systemctl enable tomcat
You can also check the status of the Tomcat service with the following command:
systemctl status tomcat
You should see the following output:
● tomcat.service - Tomcat servlet container
     Loaded: loaded (/etc/systemd/system/tomcat.service; disabled; preset: enabled)
     Active: active (running) since Sat 2025-05-24 07:22:11 AST; 5s ago
    Process: 512822 ExecStart=/home/tomcat/bin/startup.sh (code=exited, status=0/SUCCESS)
   Main PID: 512829 (java)
      Tasks: 30 (limit: 4609)
     Memory: 122.5M (peak: 122.9M)
        CPU: 5.714s
     CGroup: /system.slice/tomcat.service
             └─512829 /usr/lib/jvm/default-java/bin/java -Djava.util.logging.config.file=/home/tomcat/conf/logging.properties -Djava.util.logging.manager=org.apache.ju>

May 24 07:22:11 ubuntu systemd[1]: Starting tomcat.service - Tomcat servlet container...
May 24 07:22:11 ubuntu startup.sh[512822]: Tomcat started.
May 24 07:22:11 ubuntu systemd[1]: Started tomcat.service - Tomcat servlet container.
Step 7 – Access Tomcat Web Interface
Tomcat is now installed and running on port 8080. You can verify the Tomcat port with the following command:
ss -ant
You should see the following output:
Active Internet connections (servers and established)
Proto Recv-Q Send-Q Local Address           Foreign Address         State
tcp        0      0 127.0.0.53:53           0.0.0.0:*               LISTEN
tcp        0      0 0.0.0.0:22              0.0.0.0:*               LISTEN
tcp6       0      0 :::8009                 :::*                    LISTEN
tcp6       0      0 :::8080                 :::*                    LISTEN
tcp6       0      0 :::22                   :::*                    LISTEN
tcp6       0      0 127.0.0.1:8005          :::*                    LISTEN
Now, open your web browser and visit the URL http://your-server-ip:8080. You should see the Tomcat default web page:

Step 8 – Configure Tomcat Web Management Interface
Next, you will need to add a login to access the manager web application.
You can add a user to access manager-gui and admin-gui by editing the file tomcat-users.xml:
nano /home/tomcat/conf/tomcat-users.xml
Add the following lines above the line </tomcat-users>:
<role rolename="manager-gui"/>
<user username="tomcat1" password="s3cret" roles="manager-gui"/>
<role rolename="admin-gui"/>
<user username="tomcat" password="s3cret" roles="admin-gui"/>
Save and close the file when you are finished.
By default, Tomcat is configured to restrict access to the Manager and Host Manager apps only from the localhost, so you will need to remove this restriction.
To remove the restriction for Manager app, edit the context.xml file as shown below:
nano /home/tomcat/webapps/manager/META-INF/context.xml
Comment out the Valve section as shown below:
<Context antiResourceLocking="false" privileged="true" >
<!--
  <Valve className="org.apache.catalina.valves.RemoteAddrValve"
         allow="127\.\d+\.\d+\.\d+|::1|0:0:0:0:0:0:0:1|223.184.194.44" />
-->
  <Manager sessionAttributeValueClassNameFilter="java\.lang\.(?:Boolean|Integer|Long|Number|String)|org\.apache\.catalina\.filters\.CsrfPreven$
</Context>
Save and close the file.
To remove the restriction for Host Manager app, edit the context.xml file as shown below:
nano /home/tomcat/webapps/host-manager/META-INF/context.xml
Comment out the Valve section as shown below:
<Context antiResourceLocking="false" privileged="true" >
<!--

  <Valve className="org.apache.catalina.valves.RemoteAddrValve"
         allow="127\.\d+\.\d+\.\d+|::1|0:0:0:0:0:0:0:1|223.184.194.44|172.20.10.3" />
-->

  <Manager sessionAttributeValueClassNameFilter="java\.lang\.(?:Boolean|Integer|Long|Number|String)|org\.apache\.catalina\.filters\.CsrfPreven$
</Context>
Save and close the file when you are finished. Then, restart the Tomcat service to apply the changes:
systemctl restart tomcat
Now, open your web browser and type the URL http://your-server-ip:8080. You should see the following page:
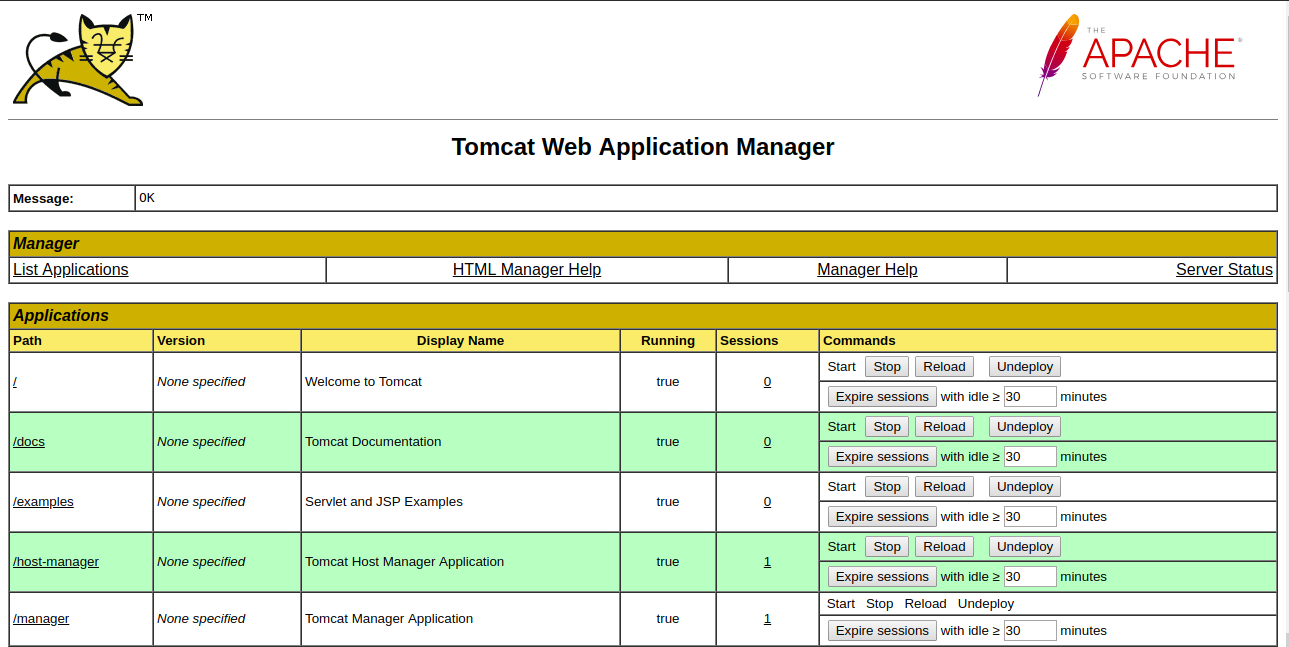
Now, click on the Manager App/Host Manage button. You will be prompted for the admin username and password. Provide your admin username and password and click on the Login button. You should see the Manager App/Host Manager on the following page:

Step 9 – Configure Nginx Proxy for Tomcat
By default, Tomcat is configured to run on port 8080, so you will need to configure Nginx as a reverse proxy to forward the request coming on port 8080 to the Nginx port 80.
First, install the Nginx web server with the following command:
apt-get install nginx -y
Once installed, create a new virtual host configuration file for Tomcat.
nano /etc/nginx/sites-available/tomcat.conf
Add the following lines:
server {
  listen 80;

  server_name    example.com;
  access_log /var/log/nginx/tomcat-access.log;
  error_log /var/log/nginx/tomcat-error.log;

  location / {
        proxy_set_header X-Forwarded-Host $host;
        proxy_set_header X-Forwarded-Server $host;
        proxy_set_header X-Forwarded-For $proxy_add_x_forwarded_for;
        proxy_pass http://127.0.0.1:8080/;
  }
}
Save and close the file, then enable the Nginx virtual host file and restart the Nginx web server to apply the configuration:
ln -s /etc/nginx/sites-available/tomcat.conf /etc/nginx/sites-enabled/
systemctl restart nginx
Now, you can access your Tomcat web interface using the URL http://example.com.
Conclusion
Congratulations! Your Tomcat installation is now completed. I hope you have now enough knowledge to deploy your Java-based application on the Tomcat server. For more information, visit the Tomcat official documentation at Tomcat Doc. Try out Tomcat today with VPS Hosting from Atlantic.Net!
* This post is for informational purposes only and does not constitute professional, legal, financial, or technical advice. Each situation is unique and may require guidance from a qualified professional.
Readers should conduct their own due diligence before making any decisions.