HTTP Strict Transport Security (HSTS) is a web security policy mechanism used for securing HTTPS websites against downgrade attacks. HSTS prevents your web browser from accessing the website over non-HTTPS connections.
After installing SSL, some websites contain pages that serve requests over HTTP. In that case, to avoid the usage of HTTP protocol HSTS header was introduced, it forces your website to redirect URL from HTTP to HTTPS.
In this post, we will show you how to enable HTTP Strict Transport Security (HSTS) for Apache on Ubuntu. This procedure is compatible with Ubuntu 22.04 and Ubuntu 24.04.
Step 1 – Install and Configure Apache
For the purpose of this tutorial, you will need to install the Apache webserver and create a virtual host configuration file to host a website.
First, install the Apache webserver with the following command:
apt-get install apache2 -y
Once the installation is completed, create a new apache virtual host configuration file for domain test.example.com.
nano /etc/apache2/sites-available/test.conf
Add the following lines:
<VirtualHost *:80>
   ServerName test.example.com
   ServerAdmin webmaster@example.com
   DocumentRoot /var/www/html/
   DirectoryIndex index.html
</VirtualHost>
Save and close the file, then enable the virtual host with the following command:
a2ensite test.conf
Next, restart the Apache to apply the changes:
systemctl restart apache2
Step 2 – Secure Apache with Let’s Encrypt SSL
Next, you will need to install the Certbot client to secure your website with SSL. You can install the Certbot client for Apache with the following command:
apt-get install python3-certbot-apache -y
Once the installation is completed, run the following command to install Let’s Encrypt SSL for your website test.example.com.
certbot --apache -d test.example.com
You will be asked to provide your email and accept the term of service:
Saving debug log to /var/log/letsencrypt/letsencrypt.log
Plugins selected: Authenticator apache, Installer apache
Enter email address (used for urgent renewal and security notices) (Enter 'c' to
cancel): hitjethva@gmail.com

- - - - - - - - - - - - - - - - - - - - - - - - - - - - - - - - - - - - - - - -
Please read the Terms of Service at
https://letsencrypt.org/documents/LE-SA-v1.2-November-15-2017.pdf. You must
agree in order to register with the ACME server at
https://acme-v02.api.letsencrypt.org/directory
- - - - - - - - - - - - - - - - - - - - - - - - - - - - - - - - - - - - - - - -
(A)gree/(C)ancel: A

- - - - - - - - - - - - - - - - - - - - - - - - - - - - - - - - - - - - - - - -
Would you be willing to share your email address with the Electronic Frontier
Foundation, a founding partner of the Let's Encrypt project and the non-profit
organization that develops Certbot? We'd like to send you email about our work
encrypting the web, EFF news, campaigns, and ways to support digital freedom.
- - - - - - - - - - - - - - - - - - - - - - - - - - - - - - - - - - - - - - - -
(Y)es/(N)o: Y
Obtaining a new certificate
Performing the following challenges:
http-01 challenge for test.example.com
Waiting for verification...
Cleaning up challenges
Created an SSL vhost at /etc/apache2/sites-available/test-le-ssl.conf
Enabled Apache socache_shmcb module
Enabled Apache ssl module
Deploying Certificate to VirtualHost /etc/apache2/sites-available/test-le-ssl.conf
Enabling available site: /etc/apache2/sites-available/test-le-ssl.conf
Next, you will need to select whether or not to redirect HTTP traffic to HTTPS:
Please choose whether or not to redirect HTTP traffic to HTTPS, removing HTTP access.
- - - - - - - - - - - - - - - - - - - - - - - - - - - - - - - - - - - - - - - -
1: No redirect - Make no further changes to the webserver configuration.
2: Redirect - Make all requests redirect to secure HTTPS access. Choose this for
new sites, or if you're confident your site works on HTTPS. You can undo this
change by editing your web server's configuration.
- - - - - - - - - - - - - - - - - - - - - - - - - - - - - - - - - - - - - - - -
Select the appropriate number [1-2] then [enter] (press 'c' to cancel): 2
Type 2 and hit Enter to finish the installation:
Redirecting vhost in /etc/apache2/sites-enabled/test.conf to ssl vhost in /etc/apache2/sites-available/test-le-ssl.conf

- - - - - - - - - - - - - - - - - - - - - - - - - - - - - - - - - - - - - - - -
Congratulations! You have successfully enabled https://test.example.com

You should test your configuration at:
https://www.ssllabs.com/ssltest/analyze.html?d=test.example.com
- - - - - - - - - - - - - - - - - - - - - - - - - - - - - - - - - - - - - - - -

IMPORTANT NOTES:
 - Congratulations! Your certificate and chain have been saved at:
   /etc/letsencrypt/live/test.example.com/fullchain.pem
   Your key file has been saved at:
   /etc/letsencrypt/live/test.example.com/privkey.pem
   Your cert will expire on 2021-06-22. To obtain a new or tweaked
   version of this certificate in the future, simply run certbot again
   with the "certonly" option. To non-interactively renew *all* of
   your certificates, run "certbot renew"
 - Your account credentials have been saved in your Certbot
   configuration directory at /etc/letsencrypt. You should make a
   secure backup of this folder now. This configuration directory will
   also contain certificates and private keys obtained by Certbot so
   making regular backups of this folder is ideal.
 - If you like Certbot, please consider supporting our work by:

   Donating to ISRG / Let's Encrypt:   https://letsencrypt.org/donate
   Donating to EFF:                    https://eff.org/donate-le

 - We were unable to subscribe you the EFF mailing list because your
   e-mail address appears to be invalid. You can try again later by
   visiting https://act.eff.org.
Your website test.example.com is now secured with Let’s Encrypt SSL.
Step 3 – Enable HSTS Header
Next, you will need to activate the HSTS header within your website virtual host configuration file.
Edit your website virtual host configuration file:
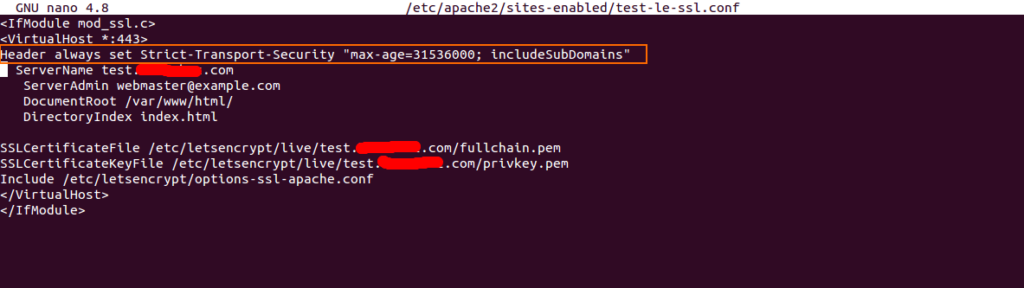
nano /etc/apache2/sites-enabled/test-le-ssl.conf
Add the following line below the first line:
Header always set Strict-Transport-Security "max-age=31536000; includeSubDomains"
Save and close the file then restart the Apache service to apply the changes.
systemctl restart apache2
Step 4 – Verify HSTS Header
At this point, your website is configured with HSTS header. Now you should verify whether the HSTS header is activated or not.
You can verify it with the following command:
curl -s -D- https://test.example.com/ | grep -i Strict
If everything is fine, you should get the following output:
Strict-Transport-Security: max-age=31536000; includeSubDomains
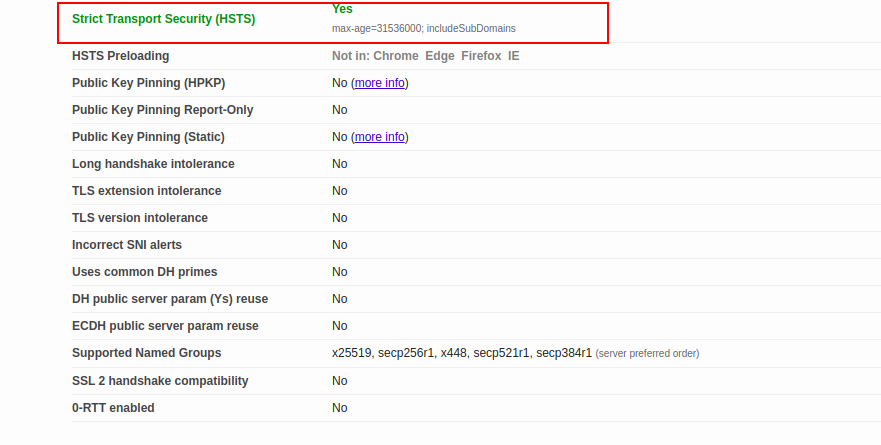
You can also verify it using the URL ssl labs.
Conclusion
In the above guide, you learned how to enable HSTS header for Apache on Ubuntu 24.04. Your website is now secured with HSTS and it can be accessed only through HTTPS protocol. Try it on your dedicated server hosting account from Atlantic.Net.
* This post is for informational purposes only and does not constitute professional, legal, financial, or technical advice. Each situation is unique and may require guidance from a qualified professional.
Readers should conduct their own due diligence before making any decisions.