Apache is free, open-source, and the most widely used web server around the world. It is not only known for its power but also for its multiple components with specific functions. Apache Virtual Host is one such component; it allows us to host various websites on a single server.
If you have one big server with extensive resources like lots of HDD space, RAM, and CPU power, you can host multiple websites using virtual hosting. You can host an unlimited number of websites on your Apache webserver. Ensure your server has enough resources to handle the traffic and disc space requirements. One of the best examples is a web hosting provider that uses virtual hosting to host hundreds and thousands of websites on a single server.
There are three ways to host multiple websites on a single server:
- Name-based Virtual Hosting.
- IP-based Virtual Hosting.
- Port-based Virtual Hosting.
In this tutorial, we will explain the process of hosting two websites on a single server in three different ways.
Prerequisites
- A fresh Ubuntu 18.04 Server
- Two valid domain names or subdomain names pointed to your VPS IP address. In this tutorial, we will use site1.example.com and site2.example.com as subdomains.
- Two static IP addresses, 192.168.0.101 and 192.168.0.102, are configured on your server.
Install Apache Web Server
First, install the Apache web server by running the following commands:
apt-get update -y
apt-get install apache2 -y
Once the installation is completed, start the Apache service with the following command:
systemctl start apache2
Name-Based Virtual Hosting
Name-based virtual hosting is the most commonly used method to host multiple websites on the same IP address and Port. You will need valid domain names to host numerous websites using name-based virtual hosting.
In this section, we will use site1.example.com and site2.example.com to host two websites on a single server.
Step 1 – Create a Directory Structure
First, create a document root directory for both websites:
mkdir /var/www/html/site1.example.com
mkdir /var/www/html/site2.example.com
Next, create an index.html page for both websites.
First, create an index.html page for site1.example.com:
nano /var/www/html/site1.example.com/index.html
Add the following lines:
<html>
<title>site1.example.com</title>
<h1>Welcome to site1.example.com Website</h1>
<p>This is my first website hosted with name-based virtual hosting</p>
</html>
Next, create an index.html page for site2.example.com:
nano /var/www/html/site2.example.com/index.html
Add the following lines:
<html>
<title>site2.example.com</title>
<h1>Welcome to site2.example.com Website</h1>
<p>This is my second website hosted with name-based virtual hosting</p>
</html>
Next, change the ownership of site1.example.com and site2.example.com directory to www-data:
chown -R www-data:www-data /var/www/html/site1.example.com
chown -R www-data:www-data /var/www/html/site2.example.com
Step 2 – Create a Virtual Host Configuration File
Next, you must create an Apache virtual host configuration file to serve both websites.
First, create an Apache virtual host configuration file for site1.example.com:
nano /etc/apache2/sites-available/site1.example.com.conf
Add the following lines:
<VirtualHost *:80>
ServerAdmin admin@site1.example.com
ServerName site1.example.com
DocumentRoot /var/www/html/site1.example.com
DirectoryIndex index.html
ErrorLog ${APACHE_LOG_DIR}/site1.example.com_error.log
CustomLog ${APACHE_LOG_DIR}/site1.example.com_access.log combined
</VirtualHost>
Save and close the file.
Next, create an Apache virtual host configuration file for site2.example.com:
nano /etc/apache2/sites-available/site2.example.com.conf
Add the following lines:
<VirtualHost *:80>
ServerAdmin admin@site2.example.com
ServerName site2.example.com
DocumentRoot /var/www/html/site2.example.com
DirectoryIndex index.html
ErrorLog ${APACHE_LOG_DIR}/site2.example.com_error.log
CustomLog ${APACHE_LOG_DIR}/site2.example.com_access.log combined
</VirtualHost>
Save and close the file. Then, enable the virtual host configuration file with the following commands:
a2ensite site1.example.com
a2ensite site2.example.com
Next, restart the Apache webserver to apply the configuration changes:
systemctl restart apache2
Step 3 – Test Both Websites
At this point, you have configured the Apache webserver to serve two websites.
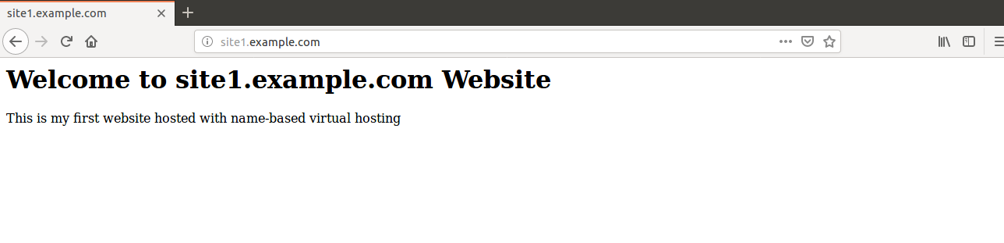
Now, open your web browser and type the URL http://site1.example.com. You should see your first website on the following screen:
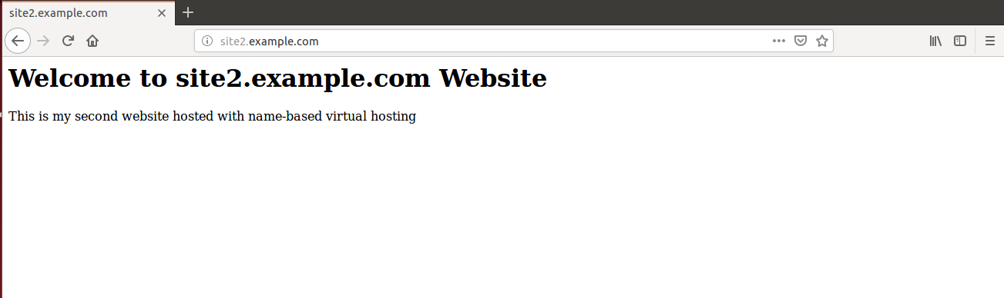
Next, open your web browser and type the URL http://site2.example.com. You should visit your second website on the following screen:
IP-Based Virtual Hosting
IP-based virtual hosting is a method to serve different websites based on IP address. You can assign a separate IP address for each website on a single server.
This section will use the IP addresses 192.168.0.101 and 192.168.0.102 to host two websites on a single server.
Step 1 – Create a Directory Structure
First, create a document root directory for both websites:
mkdir /var/www/html/192.168.0.101
mkdir /var/www/html/192.168.0.102
Next, create an index.html page for both websites.
First, create an index.html page for the website hosted on 192.168.0.101:
nano /var/www/html/192.168.0.101/index.html
Add the following lines:
<html>
<title>192.168.0.101</title>
<h1>Welcome to 192.168.0.101 Website</h1>
<p>This is my first website hosted with IP-based virtual hosting</p>
</html>
Save and close the file.
Next, create an index.html page for the website hosted on 192.168.0.102:
nano /var/www/html/192.168.0.102/index.html
Add the following lines:
<html>
<title>192.168.0.102</title>
<h1>Welcome to 192.168.0.102 Website</h1>
<p>This is my first website hosted with IP-based virtual hosting</p>
</html>
Save and close the file.
Next, change the ownership of both websites to www-data:
chown -R www-data:www-data /var/www/html/192.168.0.101
chown -R www-data:www-data /var/www/html/192.168.0.102
Step 2 – Create a Virtual Host Configuration File
Next, you must create an Apache virtual host configuration file to serve both websites.
First, create an Apache virtual host configuration file for the website hosted on 192.168.0.101:
nano /etc/apache2/sites-available/192.168.0.101.conf
Add the following lines:
<VirtualHost *:80>
ServerAdmin admin@localhost
ServerName  192.168.0.101
DocumentRoot /var/www/html/192.168.0.101
DirectoryIndex index.html
ErrorLog ${APACHE_LOG_DIR}/192.168.0.101_error.log
CustomLog ${APACHE_LOG_DIR}/192.168.0.101_access.log combined
</VirtualHost>
Save and close the file.
Next, create an Apache virtual host configuration file for the website hosted on 192.168.0.102:
nano /etc/apache2/sites-available/192.168.0.102.conf
Add the following lines:
<VirtualHost *:80>
ServerAdmin admin@localhost
ServerName  192.168.0.102
DocumentRoot /var/www/html/192.168.0.102
DirectoryIndex index.html
ErrorLog ${APACHE_LOG_DIR}/192.168.0.102_error.log
CustomLog ${APACHE_LOG_DIR}/192.168.0.102_access.log combined
</VirtualHost>
Save and close the file. Then enable the virtual host with the following command:
a2ensite 192.168.0.101
a2ensite 192.168.0.102
Finally, restart the Apache webserver to apply the changes:
systemctl restart apache2
Step 3 – Test Both Websites
At this point, you have configured Apache webserver to serve two websites.
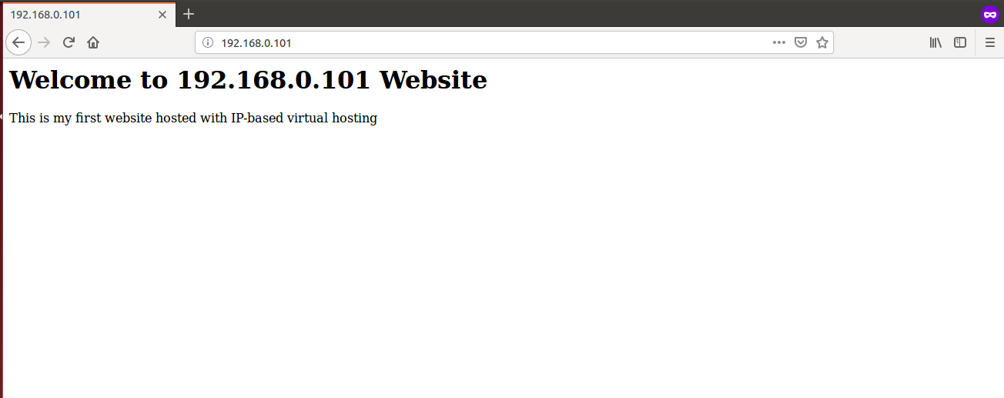
Now, open your web browser and type the URL http://192.168.0.101. You should see your first website on the following screen:
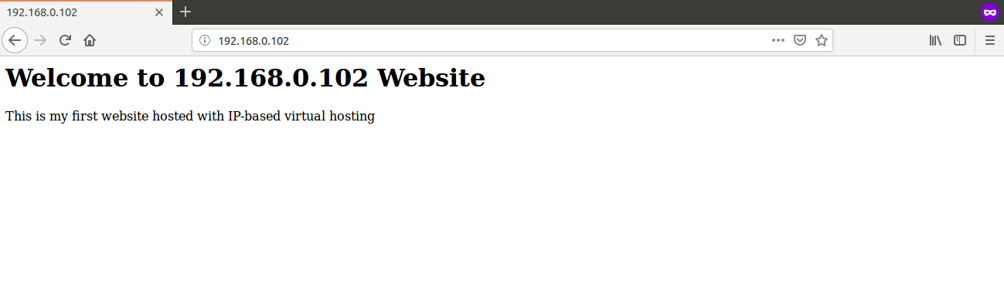
Next, open your web browser and type the URL http://192.168.0.102. You should see your second website on the following screen:
Port-Based Virtual Hosting
Port-based virtual hosting is a method to serve different websites based on the port number. You can assign a separate port number for each website on a single server with a single IP address.
This section will use ports 8080 and 8081 to host two websites on a single server with IP address 192.168.0.101.
Step 1 – Configure Apache to Listen on Port 8080 and 8081
First, you must configure the Apache webserver to listen on ports 8080 and 8081. You can do it by editing the file /etc/apache2/ports.conf:
nano /etc/apache2/ports.conf
Add the following lines precisely below the line Listen 80:
Listen 8080
Listen 8081
Save and close the file when you are finished.
Step 2 – Create a Directory Structure
First, create a document root directory for both websites:
mkdir /var/www/html/8080
mkdir /var/www/html/8081
Next, create an index.html page for both websites.
First, create an index.html page for the website hosted on port 8080:
nano /var/www/html/8080/index.html
Add the following lines:
<html>
<title>8080</title>
<h1>Welcome to 8080 Website</h1>
<p>This is my first website hosted with Port-based virtual hosting</p>
</html>
Save and close the file.
Next, create an index.html page for the website hosted on port 8081:
nano /var/www/html/8081/index.html
Add the following lines:
<html>
<title>8081</title>
<h1>Welcome to 8081 Website</h1>
<p>This is my first website hosted with Port-based virtual hosting</p>
</html>
Save and close the file.
Next, change the ownership of both websites to www-data:
chown -R www-data:www-data /var/www/html/8080
chown -R www-data:www-data /var/www/html/8081
Step 3 – Create a Virtual Host Configuration File
Next, you must create an Apache virtual host configuration file to serve both websites.
First, create an Apache virtual host configuration file for the website hosted on port 8080:
nano /etc/apache2/sites-available/8080.conf
Add the following lines:
<VirtualHost 192.168.0.101:8080>
ServerAdmin admin@localhost
ServerName  192.168.0.101
DocumentRoot /var/www/html/8080
DirectoryIndex index.html
ErrorLog ${APACHE_LOG_DIR}/8080_error.log
CustomLog ${APACHE_LOG_DIR}/8080_access.log combined
</VirtualHost>
Save and close the file.
Next, create an Apache virtual host configuration file for the website hosted on port 8081:
nano /etc/apache2/sites-available/8081.conf
Add the following lines:
<VirtualHost 192.168.0.101:8081>
ServerAdmin admin@localhost
ServerName  192.168.0.101
DocumentRoot /var/www/html/8081
DirectoryIndex index.html
ErrorLog ${APACHE_LOG_DIR}/8081_error.log
CustomLog ${APACHE_LOG_DIR}/8081_access.log combined
</VirtualHost>
Save and close the file. Then, enable the virtual host with the following command:
a2ensite 8080
a2ensite 8081
Finally, restart the Apache webserver to apply the changes:
systemctl restart apache2
<h3id=step4c>Step 4 – Test Both Websites
At this point, you have configured Apache webserver to serve two websites.
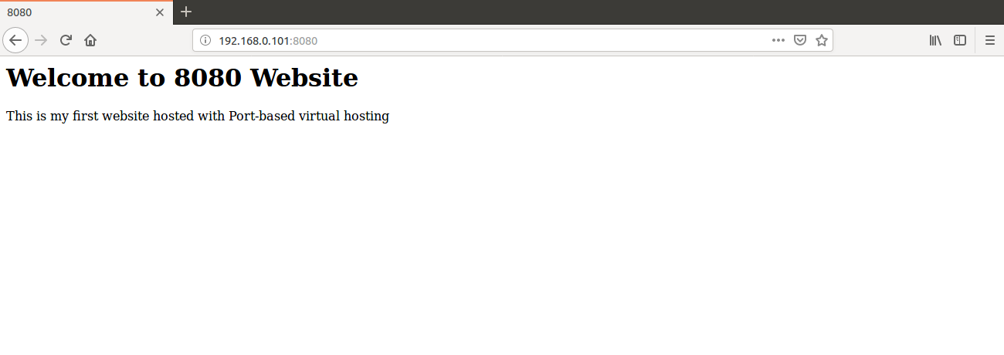
Now, open your web browser and type the URL http://192.168.0.101:8080. You should see your first website per the following screen:
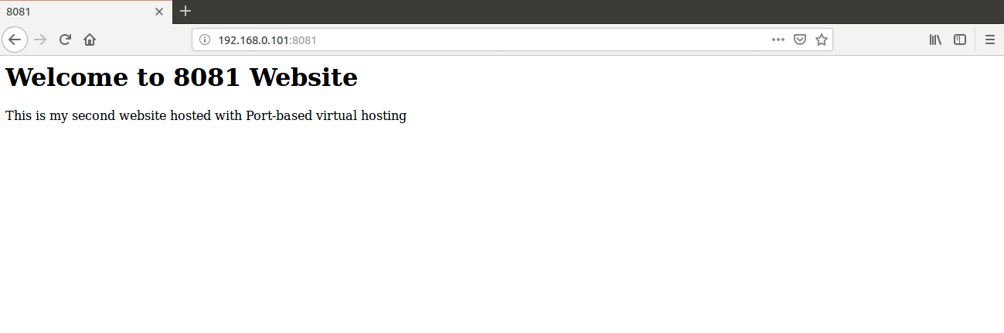
Next, open your web browser and type the URL http://192.168.0.101:8081. You should see your second website per the following screen:
Conclusion
Congratulations! You have successfully hosted two websites on a single server in three different ways. You can now easily host more websites with the Apache virtual hosting method. If you can start configuring multiple websites on an Apache VPS, check out Atlantic.Net’s VPS Hosting options.
* This post is for informational purposes only and does not constitute professional, legal, financial, or technical advice. Each situation is unique and may require guidance from a qualified professional.
Readers should conduct their own due diligence before making any decisions.