Apache and Nginx are free, open-source, and popular – the most widely used web servers worldwide. Apache and Nginx both run on all Unix-based operating systems. Apache is known for its power, while Nginx is known for its speed. Nginx is also used as a reverse proxy for HTTP, HTTPS, IMAP, SMTP, and POP3 and as a load balancer.
PHP-FPM (FastCGI Process Manager) is an alternative PHP FastCGI implementation specially designed for high-loaded websites. PHP-FPM allows you to run multiple versions of PHP at a time. PHP-FPM can be run differently than mod_PHP on a web server. If you want to host your web application with optimal performance, then PHP-FPM is the best choice.
This tutorial will explain how to enable PHP-FPM support on Apache and Nginx web servers on Ubuntu. This procedure is compatible with Ubuntu 18.04, Ubuntu 22.04, Ubuntu 24.04 and Fedora 41.
Add PHP-FPM Support on Apache and Nginx Web Server on Ubuntu
In this section, we will show you how to enable PHP-FPM support on both Nginx and Apache web servers.
Enable PHP-FPM Support on the Apache Web Server
This section will teach us how to install and enable PHP-FPM support on the Apache web server.
Step 1 – Install and Configure Apache and PHP-FPM
First, install Apache and PHP-FPM by running the following command:
apt-get update -y
apt-get install apache2 libapache2-mod-php libapache2-mod-fcgid php php-fpm php-cli -y
Once all the packages are installed, start the Apache and PHP-FPM service with the following command:
systemctl start apache2
systemctl start php8.3-fpm
Note: Replaced php8.3-fpm with your installed PHP version.
Next, you will need to configure the Apache web server with PHP-FPM support. To do so, create a new Apache virtual host configuration file:
nano /etc/apache2/sites-available/example.com.conf
Add the following lines:
<VirtualHost *:80>
     ServerAdmin admin@example.com
     DocumentRoot /var/www/html/
     DirectoryIndex info.php
     ServerName apache.example.com

     <Directory /var/www/html/>
        Options Indexes FollowSymLinks MultiViews
        AllowOverride All
        Order allow,deny
        allow from all
     </Directory>

    <FilesMatch \.php$>
        # 2.4.10+ can proxy to unix socket
         SetHandler "proxy:unix:/run/php/php8.3-fpm.sock|fcgi://localhost"
    </FilesMatch>

     ErrorLog ${APACHE_LOG_DIR}/example.com_error.log
     CustomLog ${APACHE_LOG_DIR}/example.com_access.log combined
</VirtualHost>
Note: Replaced php8.3-fpm with your installed PHP version.
Save and close the file. Then, enable the virtual host configuration file with the following command:
a2ensite apache.example.com
Next, you will need to enable a few modules for Apache2 to work with PHP-FPM:
a2enmod actions fcgid alias proxy_fcgi
Next, restart the Apache service using the following command:
systemctl restart apache2
Step 2 – Test Apache Web Server
Apache webserver is now configured with PHP-FPM support. It’s time to test whether PHP-FPM is loaded with Apache webserver or not.
To test it, create a sample info.php file inside the Apache document root directory:
nano /var/www/html/info.php
Add the following lines:
<?php
    phpinfo();
?>
Save and close the file, then change the ownership of the info.php file to www-data:
chown www-data:www-data /var/www/html/info.php
Next, open your web browser and type the URL http://apache.example.com. You should see the following page:

The above page indicates that PHP-FPM is loaded with the Apache web server.
Note: Don’t forget to remove the info.php file after testing.
Enable PHP-FPM Support on the Nginx Web Server
This section will teach us how to install and enable PHP-FPM support on the Nginx web server.
Step 1 – Install and Configure Nginx and PHP-FPM
First, install Nginx and PHP-FPM by running the following command:
apt-get install nginx php php-fpm php-cli -y
Once all the packages are installed, start Nginx and PHP-FPM service with the following command:
systemctl start nginx
systemctl start php7.2-fpm
Next, you will need to configure the Nginx web server with PHP-FPM support. To do so, create a new Nginx virtual host configuration file:
nano /etc/nginx/sites-available/example.com.conf
Add the following lines:
server {
        listen 80;
        root /var/www/html/;
        index info.php;
        server_name nginx.example.com;

        location ~ \.php$ {
          fastcgi_split_path_info ^(.+\.php)(/.+)$;
          fastcgi_pass unix:/var/run/php/php8.3-fpm.sock;
          fastcgi_index index.php;
          include fastcgi_params;
          fastcgi_param SCRIPT_FILENAME $document_root$fastcgi_script_name;
          fastcgi_intercept_errors off;
          fastcgi_buffer_size 16k;
          fastcgi_buffers 4 16k;
          fastcgi_connect_timeout 600;
          fastcgi_send_timeout 600;
          fastcgi_read_timeout 600;
        }

   location / {
       try_files $uri $uri/ =404;
   }

}
Note: Replaced php8.3-fpm with your installed PHP version.
Save and close the file. Then, enable the Nginx virtual host with the following command:
ln -s /etc/nginx/sites-available/example.com.conf /etc/nginx/sites-enabled/
Next, restart the Nginx and PHP-FPM service to apply the configuration changes:
systemctl restart nginx
systemctl restart php7.2-fpm
Step 2 – Test Nginx Web Server
The Nginx web server is now configured with PHP-FPM support. It’s time to test whether PHP-FPM is loaded with the Nginx web server or not.
To test it, create a sample info.php file in the Nginx document root directory:
nano /var/www/html/info.php
Add the following lines:
<?php
    phpinfo();
?>
Save and close the file, then change the ownership of the info.php file to www-data:
chown www-data:www-data /var/www/html/info.php
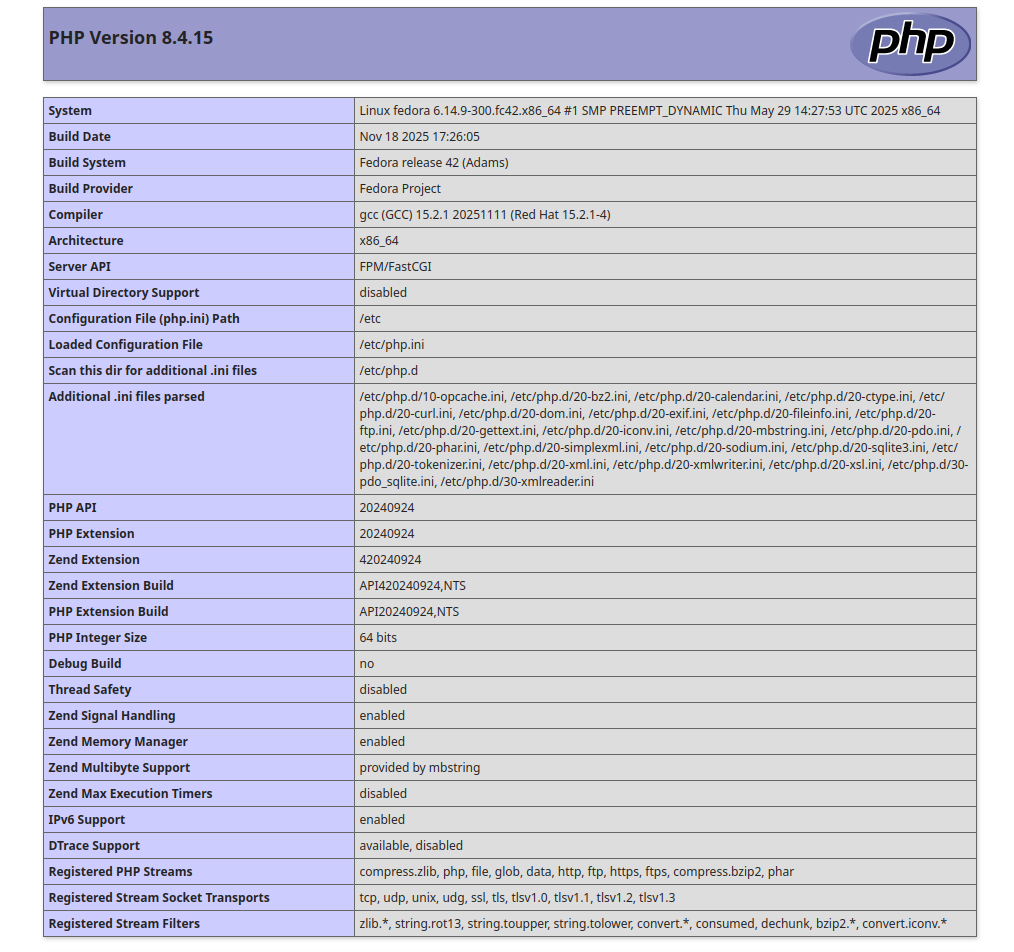
Next, open your web browser and type the URL http://nginx.example.com. You should see the following page:

The above page indicates that PHP-FPM is loaded with the Nginx webserver.
Note: Don’t forget to remove the info.php file after testing.
Add PHP-FPM Support on Apache and Nginx Web Server on Fedora
In this section, we will show you how to enable PHP-FPM support on both Nginx and Apache web servers.
Enable PHP-FPM Support on the Nginx Web Server
Here, we will show you how to enable PHP-FPM support on the Nginx Web Server on Fedora.
Step 1 – Install and Configure Nginx and PHP-FPM
First, you will need to install the Nginx server and PHP-FPM package on your server. You can install it using the following command.
dnf install nginx php php-cli php-common php-fpm -y
Once the Nginx package is installed, start and enable the Nginx and PHP-FPM server with the following command.
systemctl start nginx php-fpm
systemctl enable nginx php-fpm
You can check the status of the PHP-FPM service with the following command.
systemctl status php-fpm
You will see the following output.
● php-fpm.service - The PHP FastCGI Process Manager
     Loaded: loaded (/usr/lib/systemd/system/php-fpm.service; disabled; vendor preset: disabled)
     Active: active (running) since Tue 2025-12-10 01:06:35 EDT; 3s ago
   Main PID: 6994 (php-fpm)
     Status: "Ready to handle connections"
      Tasks: 6 (limit: 2328)
     Memory: 10.0M
        CPU: 74ms
     CGroup: /system.slice/php-fpm.service
             ├─6994 php-fpm: master process (/etc/php-fpm.conf)
             ├─6995 php-fpm: pool www
             ├─6996 php-fpm: pool www
             ├─6997 php-fpm: pool www
             ├─6998 php-fpm: pool www
             └─6999 php-fpm: pool www
Next, you will need to configure Nginx to run PHP with FPM. First, create a document root directory for your site.
mkdir -p /var/www/html/
Next, create a sample info.php file.
nano /var/www/html/info.php
Add the following code:
<?php
    phpinfo();
?>
Save and close the file, then set proper ownership to info.php file.
chown -R nginx: /var/www/html/info.php
Next, create an Nginx virtual host configuration file.
nano /etc/nginx/conf.d/example.conf
Add the following configuration:
server {
    listen 80;
    server_name nginx.example.com;
    root /var/www/html/;
    index info.php;

    access_log /var/log/nginx/example.com.access.log;
    error_log /var/log/nginx/example.com.error.log;

    location ~ \.php$ {
        try_files $uri =404;
        fastcgi_pass unix:/run/php-fpm/www.sock;
        fastcgi_index   index.php;
        fastcgi_param SCRIPT_FILENAME $document_root$fastcgi_script_name;
        include fastcgi_params;
    }

    location ~* \.(js|css|png|jpg|jpeg|gif|ico|svg)$ {
        expires max;
        log_not_found off;
    }

}
Save and close the file, then verify the Nginx for any syntax errors.
nginx -t
Finally, restart the Nginx service to apply the changes.
systemctl restart nginx
Step 2 – Verify the Nginx
At this point, Nginx is configured to work with PHP-FPM. Now, open your web browser and verify your setup using the URL http://nginx.example.com. You will see your PHP information page on the following screen.
Enable PHP-FPM Support on the Apache Web Server
Here, we will show you how to enable PHP-FPM support on the Apache Web Server on Fedora.
Step 1 – Install and Configure Apache and PHP-FPM
First, you will need to install the Apache server and the PHP-FPM package on your server. You can install it using the following command.
dnf install httpd php php-cli php-common php-fpm -y
Once the Apache package is installed, start and enable the Apache and PHP-FPM server with the following command.
systemctl start httpd php-fpm
systemctl enable httpd php-fpm
Next, you will need to configure Apache to run PHP with FPM. First, create a document root directory for your site.
mkdir -p /var/www/html/
Next, create a sample info.php file.
nano /var/www/html/info.php
Add the following code:
<?php
    phpinfo();
?>
Save and close the file, then set proper ownership to info.php file.
chown -R Apache: /var/www/html/info.php
Next, create an Apache virtual host configuration file.
nano /etc/httpd/conf.d/example.conf
Add the following configuration:
<VirtualHost *:80>
     ServerAdmin admin@example.com
     DocumentRoot /var/www/html/
     DirectoryIndex info.php
     ServerName apache.example.com

     <Directory /var/www/html/>
        Options Indexes FollowSymLinks MultiViews
        AllowOverride All
        Order allow,deny
        allow from all
     </Directory>

    <FilesMatch \.php$>
         SetHandler "proxy:unix:/run/php-fpm/www.sock|fcgi://localhost"
    </FilesMatch>

     ErrorLog /var/log/httpd/example.com_error.log
     CustomLog /var/log/httpd/example.com_access.log combined
</VirtualHost>
Finally, restart the Apache service to apply the changes.
systemctl restart httpd
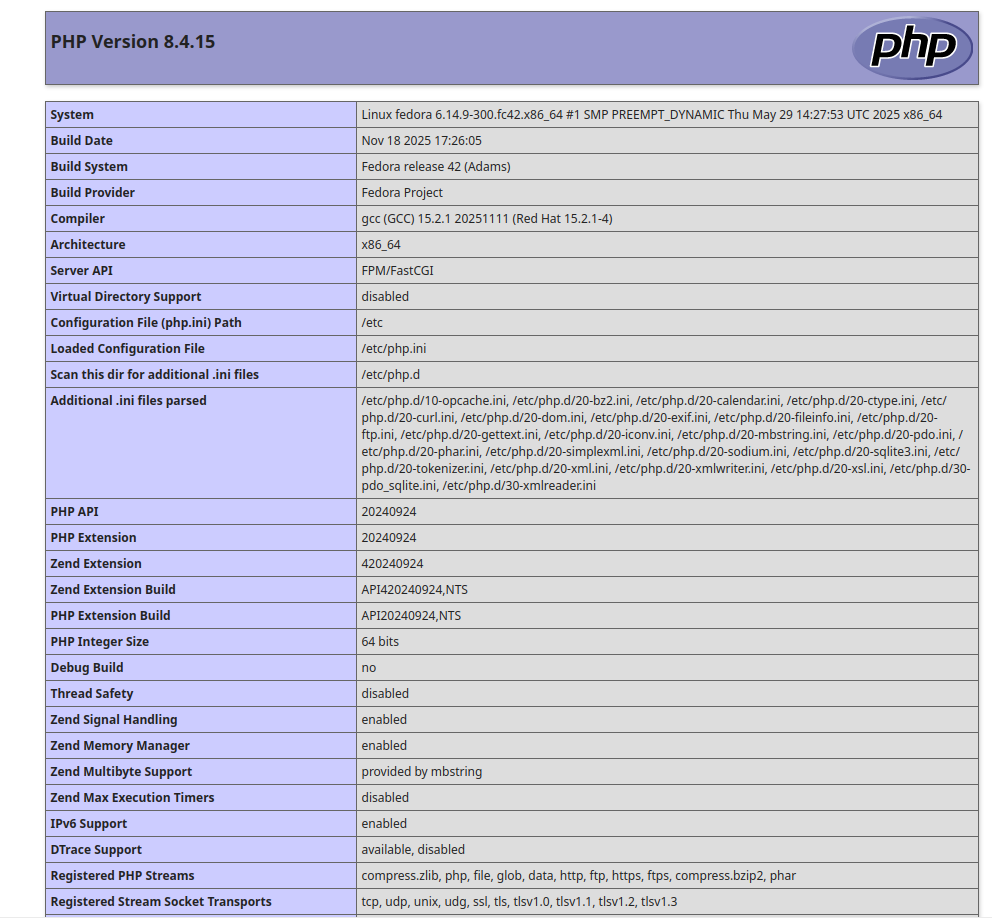
Step 2 – Verify the Apache
At this point, Apache is configured to work with PHP-FPM. Now, open your web browser and verify your setup using the URL http://apache.example.com. You will see your PHP information page on the following screen.
Conclusion
Congratulations! You have successfully configured Nginx and Apache web servers with PHP-FPM support. I hope you now have enough knowledge to use PHP-FPM to run multiple versions of PHP at a time. To start with PHP-FPM on Apache and Nginx, sign up for a VPS Hosting plan with Atlantic.Net today.
* This post is for informational purposes only and does not constitute professional, legal, financial, or technical advice. Each situation is unique and may require guidance from a qualified professional.
Readers should conduct their own due diligence before making any decisions.