How to Add a Swap File on Ubuntu 20.04
February 5, 2015 by Kristopher Fieler ( 1 ) under VPS Hosting
0 Comments
Introduction
In this article, we will go over how to create a swap file. A swap file is useful in instances where your cloud server does not have enough memory to perform the tasks or processes that are running. This can cause your server to start killing processes in order to free up some memory, some of which may be important such as a database or a web server!
A swap file can help you avoid these issues by utilizing hard drive space as virtual memory when regular memory is not immediately available.
Adding a Swap file on Ubuntu 20.04
We must first make sure that there is no current swap file in use. The easiest way to determine this is to run the following command:
free -m
Output:
             total       used       free     shared    buffers     cached
Mem:          3834       3448        385        681        173       1424
The output will show us how much memory the system has and how much, if any, the swap has been configured. In this case, the server has just been provisioned, and no swap has been configured.
In the next step, we will choose the amount of space to allocate to swap. This can be accomplished by the following command:
dd if=/dev/zero of=/swapfile bs=1024 count=2048k
In this example, we will create a 2GB swap file. There are 1024 megabytes in 1 gigabyte, so in order to achieve 2GB, I will be using 2048k as the count.
NOTE: Do not forget to include the “k” at the end, otherwise you will actually be creating a 2-megabyte swap file! This is because the byte size is being multiplied by the amount specified in the count block.
Now we must assign the swap file we just created to the operating system:
mkswap /swapfile

mkswap /swapfile
Enable the swap file and verify it is assigned:
swapon /swapfile
free -m
Output:
total       used       free     shared    buffers     cached
Mem:          3834       3448        385        681        173       1424
Swap:         2017         0         2017


The output of “free -m” should now show the amount you configured for swap.

Next, we need to configure the system to enable the swap file every time the server boots. Otherwise, you would need to manually enable it every time you reboot the server using the “swapon /swapfile” command.

To accomplish this we will need to edit the /etc/fstab file using a text editor of your choice.

Add the following line to the end of the file:
/swapfile none swap sw 0 0
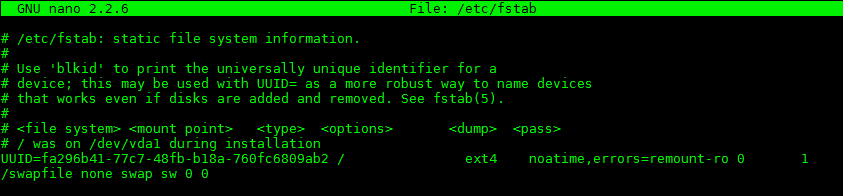
/swapfile none swap sw 0 0
Once this has been completed, save your changes and close the file.
After this is completed, you will still need to set the “swappiness.” By default, most Linux deployments have swappiness default to 60. This means that if 40% of RAM is used and 60% is unused, the swap file will be used. Since our cloud servers are all on SSD, our default swappiness is set to 0. What this means is that if 100% of all RAM is used, then and only then does the swap file gets used.
Run the command:
nano /etc/sysctl.conf
Then change or add this line:
vm.swappiness = 10
If you need a slightly higher swap, you can play with this number. Try not to go higher than 20 or 30. We recommend swappiness be set low for multiple reasons. The first reason we recommend a low swappiness is that using it too aggressively will reduce the lifespan of the SSDs. The other reason is that if swappiness is set too high, the system uses the swap file too often. This can cause system input/output conflicts as the server is too busy swapping things in and out of the swap file, rather than using the RAM properly. On occasion, this can slow down the server more than a lack of RAM.
Then you need to restart the swap file to take effect with the new settings. You can either reboot the server or run:
swapoff -a
and
swapon -a
That’s it! You now have a persistent swap file for your cloud server.
*Note –These commands will work in a CentOS deployment as well*
Get a $250 Credit and Access to Our Free Tier!
Free Tier includes:
G3.2GB Cloud VPS a Free to Use for One Year
50 GB of Block Storage Free to Use for One Year
50 GB of Snapshots Free to Use for One Year