Accurate time synchronization over the Internet is crucial for any system administrator. You can face data corruption or other issues if your server time is not synchronized with the correct time zone. NTP, which stands for Network Time Protocol, is a TCP/IP protocol for synchronizing time over a network.
This tutorial will show you how to check whether time synchronization works on your Ubuntu 24.04 server.
Step 1 – Install systemd-timesyncd
First, run the following command to update your base system with the latest available packages.
apt-get update -y
Install timesyncd package.
apt install systemd-timesyncd
Enable and start time sync.
systemctl enable --now systemd-timesyncd
timedatectl set-ntp true
Step 2 – Verify Your Current Time, Date and Time Zone
The date command is the easiest way to find your server’s current date and time.
You can run the date command, as shown below, to show your server’s current time and date:
date
You should see the following output:
Fri May 23 11:57:23 AM UTC 2025
Next, you can check whether the time on your servers is activated and whether your server is synchronized with the correct time zone using the timedatectl command:
timedatectl
You should get the following output:
               Local time: Fri 2025-05-23 12:06:18 UTC
           Universal time: Fri 2025-05-23 12:06:18 UTC
                 RTC time: Fri 2025-05-23 12:06:18
                Time zone: UTC (UTC, +0000)
System clock synchronized: yes
              NTP service: active
          RTC in local TZ: no
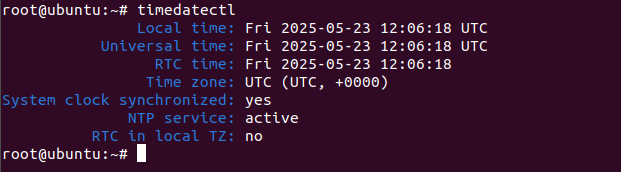
The above output shows that the time synchronization is activated and your configured time zone is Etc/UTC.
You can also check the status of the time synchronization service with the following command:
systemctl status systemd-timesyncd.service
You should see the following output:
● systemd-timesyncd.service - Network Time Synchronization
     Loaded: loaded (/usr/lib/systemd/system/systemd-timesyncd.service; enabled; preset: enabled)
     Active: active (running) since Fri 2025-05-23 12:04:37 UTC; 2min 21s ago
       Docs: man:systemd-timesyncd.service(8)
   Main PID: 38914 (systemd-timesyn)
     Status: "Contacted time server 185.125.190.58:123 (ntp.ubuntu.com)."
      Tasks: 2 (limit: 4609)
     Memory: 1.4M (peak: 2.0M)
        CPU: 54ms
     CGroup: /system.slice/systemd-timesyncd.service
             └─38914 /usr/lib/systemd/systemd-timesyncd
Step 3 – Change Time Zone Settings
If you want to change your server’s time zone settings, you can also set it using the timedatectl command.
If you’re not sure about your time zone, you can list the available time zones with the following command:
timedatectl list-timezones
You should see the long list of available time zones on the following screen:

Next, you can set the time zone using the timedatectl set-timezone command.
For example, set your server’s time zone to America/Antigua as shown below:
timedatectl set-timezone America/Antigua
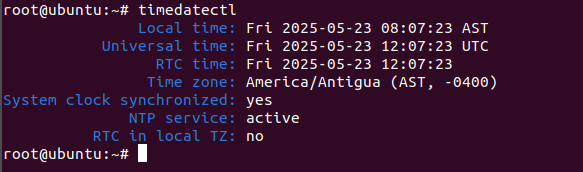
Now, verify the time zone with the following command:
timedatectl
You should see the following output:
               Local time: Fri 2025-05-23 08:07:23 AST
           Universal time: Fri 2025-05-23 12:07:23 UTC
                 RTC time: Fri 2025-05-23 12:07:23
                Time zone: America/Antigua (AST, -0400)
System clock synchronized: yes
              NTP service: active
          RTC in local TZ: no
Step 4 – Activate/Deactivate Time Synchronization
You can also disable and enable the time synchronization at any time using the timedatectl command.
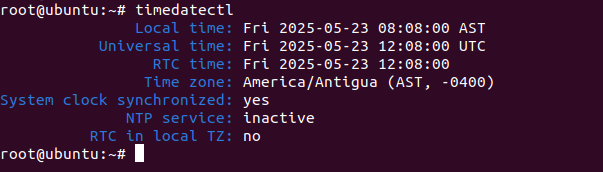
To disable synchronization, run the following command:
timedatectl set-ntp off
Now, verify the changes with the following command:
timedatectl
You should get the following output:
               Local time: Fri 2025-05-23 08:08:00 AST
           Universal time: Fri 2025-05-23 12:08:00 UTC
                 RTC time: Fri 2025-05-23 12:08:00
                Time zone: America/Antigua (AST, -0400)
System clock synchronized: yes
              NTP service: inactive
          RTC in local TZ: no
You can enable time synchronization at any time with the following command:
timedatectl set-ntp on
You can run the timedatectl command again to confirm the network time status.
Conclusion
In this guide, we reviewed how to see the system time and date, change the time zone, and enable/disable time synchronization on Ubuntu 24.04. For more information, you can visit the official documentation at NTP Doc.
Learn more about our VPS hosting services and Virtual private servers.
* This post is for informational purposes only and does not constitute professional, legal, financial, or technical advice. Each situation is unique and may require guidance from a qualified professional.
Readers should conduct their own due diligence before making any decisions.