How to Install WordPress on a Ubuntu 14.04 LTS Cloud Server
June 15, 2015 by Editorial Team ( 450 ) under VPS Hosting
0 Comments
 WordPress Illustration by Walker Cahall
Verified and Tested 06/15/15
Introduction
This how-to will take you through installing WordPress on Ubuntu 14.04 LTS. WordPress is a content management system that is free and open source. Since it is open-source, there are numerous themes and plugins readily available to you. Although it is typically used as a blogging platform, it can be used for many other uses.
In This Article
Prerequisites
A Ubuntu 14.04 server running LAMP or LEMP is required to install WordPress. Please see our how-to guide for installing LAMP or LEMP. If you do not have a server, you can get a trusted virtual private server from Atlantic.Net, or use our One-Click WordPress installation.
Step 1 – Set Up the MySQL Database in Ubuntu 14.04
We are going to start by setting up the MySQL database by running the following commands:
mysql -u root -p
When prompted, enter your MySQL root password that you set up when installing MySQL.
In MySQL, enter the following commands:
create database wordpress character set utf8 collate utf8_bin;
Make sure you set your secure password where it says [insert-password-here]
grant all privileges on wordpress.* to wordpressuser@localhost identified by "[insert-password-here]";
flush privileges;
exit
Step 2 – Get the Latest WordPress Install on Ubuntu 14.04
Now that the database is created, we can download the latest version with the following command:
wget http://wordpress.org/latest.tar.gz
The newest package will download to the directory you are in, with the file name latest.tar.gz. We need to decompress the file by running:
tar -xzvf latest.tar.gz
Step 3 – Configure WordPress on Ubuntu 14.04
Next, we need to copy wp-config-sample.php to wp-config.php, where it gets its base configuration. To do that, run:
cp wordpress/wp-config-sample.php wordpress/wp-config.php
In your favorite text editor, edit wordpress/wp-config.php
For a basic setup, we need to have the following.
define(‘DB_NAME’, ‘wordpress’);
define(‘DB_USER’, ‘wordpressuser’);
define(‘DB_PASSWORD’, ‘[insert-password-here]’);
It should look like this when completed:
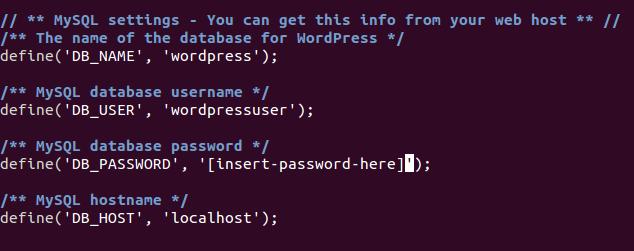 What wp-config.php should look like once you have edited it
Next, we need to move the WordPress folder to your web directory.
cp -r ~/wordpress/* /var/www/html
Note: Your web directory may be different based on your configuration.
Step 4 – Finish The Installation Through The WordPress Web Installation
Now, we can go to the WordPress web installation. In your browser, go to http://
yourhostname-or-ipaddress
If you are unsure what your IP address is, run the following:
ifconfig
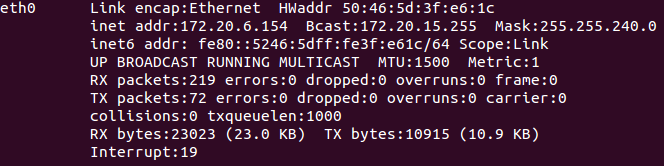 An example of using ifconfig to show the IP address of your server
In our example, we would put http:// 172.20.6.154/ in the address bar and get the following page.
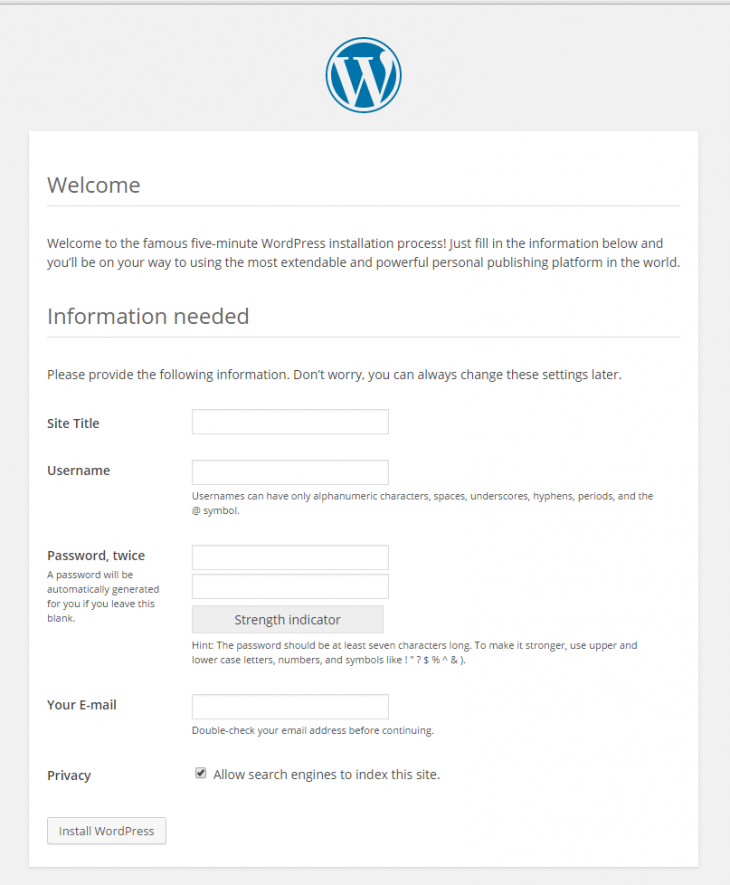 An example of the WordPress web installation
From here, all that is needed to do is to follow along with the WordPress install and give the information required.
Congratulations! You have just installed WordPress on Ubuntu 14.04. For more information, you may want to check out the WordPress Codex.
Learn more about our VPS hosting services and Virtual private servers.
Get a $250 Credit and Access to Our Free Tier!
Free Tier includes:
G3.2GB Cloud VPS a Free to Use for One Year
50 GB of Block Storage Free to Use for One Year
50 GB of Snapshots Free to Use for One Year